Breaking News

ADATA Launches URBAN TAPSAFE External SSD Sony Expands Gaming Gear Range with INZONE H6 Air and INZONE M10S II Transcend Launches RDE3 microSD Express Card Reader for Next-Generation High-Speed Performance PlayStation Plus Game Catalog for April 2026 Samsung Sets a New Standard of Color with Micro RGB TV Lineup

logo

  • Share Us
    • Facebook
    • Twitter
  • Home
  • Home
  • News
  • Reviews
  • Essays
  • Forum
  • Legacy
  • About
    • Submit News

    • Contact Us
    • Privacy

    • Promotion
    • Advertise

    • RSS Feed
    • Site Map

Search form

Arctic Cooling Freezer 7

Jul 12,2005 0

2. Installation


Review Pages

1. Introduction
2. Installation
3. Performance
4. Conclusion


The Arctic Cooling Freezer 7 CPU Heat Sink was extremely easy to install, and the whole procedure took only a few minutes to complete, with the CPU heatsink itself requiring only a few seconds to install.

Let's have a look at the steps that are required to install the F7 heatsink.

First step obviously is to remove the previous, stock box cooler.

as one can see, the mounting clips are the same...

Then we clean the CPU surface of any Thermal Compound that was left over from the original box cooler. After cleaning the surface, we should have a nice clean CPU that looks something like this...

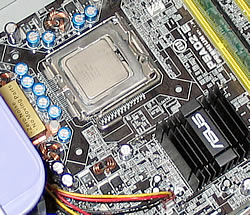
be sure to clean any remaining compound, failing to may prove hazardous...

Now we need to apply a new layer of thermal compound onto the CPU's surface. In this case, we used the paste which comes with the F7 in the retail package, the ARCTIC MX-1. Note here that this compound hardens during the first 200h as Arctic Cooling claims, while performance improves steadily. Apply the MX-1 compound evenly all over the CPU's surface, and it should look something like this...

a thin layer must be applied, and make sure no air bubbles are trapped beneath the compound...

Now, install the F7 heatsink onto the CPU, the easiest part of the installation I might add. Line up the F7 with the CPU and orient it so that the fan will blow the hot air towards the rear of the case (as is should with ATX cases) or to the front, depending on the airflow of the case fans. Before clamping the fan into position, move in small circular motion so that the thermal compound spreads evenly and any air bubbles are expelled.

In our case the case fans blow the air in...

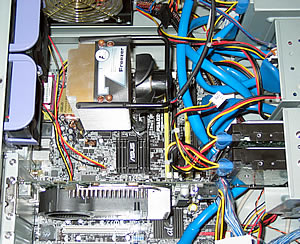
Now we can secure the Arctic Cooling Freezer 7 heatsink to the CPU.

We put the cooler on the CPU and connect the clips onto the retention module ...

And finally, we plug in the fan power cable to the appropriate supply clip on the motherboard as shown in the picture below...

all one needs to do now is just press the power button...

We are now ready to go. Installation completed successfully.


Review Pages

1. Introduction
2. Installation
3. Performance
4. Conclusion


Pages

  • « first
  • ‹ previous
  • 1
  • 2
  • 3
  • 4
  • next ›
  • last »

Arctic Cooling

Tags: Arctic Cooling
Previous Post
Connect3D X300SE
Next Post
Plaintiff Anonymous

Related Posts

  • Arctic Liquid Freezer II 360 Α-RGB

  • Arctic Liquid Freezer II 280 RGB

  • Arctic Unveils the Freezer 7 X CPU Cooler

  • Keep Your AMD 3rd Gen Ryzen Threadripper Processor Cool with ARCTIC Freezer 50 TR

  • ARCTIC Unveils the Liquid Freezer II series

  • Arctic Introduces New Freezer 34 CPU Coolers

  • ARCTIC Releases New VGA Cooler Series

  • Arctic Freezer i11/A11 CPU Coolers Released

Latest Reviews

In the Age of AI Phishing, the Best User Experience Might Be the One That Feels Safest
Enterprise & IT

In the Age of AI Phishing, the Best User Experience Might Be the One That Feels Safest

SoundPeats C30
Consumer Electronics

SoundPeats C30

Why Streaming Live Casino Games Demands Smarter Tech
Enterprise & IT

Why Streaming Live Casino Games Demands Smarter Tech

Kioxia Exceria Plus G3 512GB microSD
Cameras

Kioxia Exceria Plus G3 512GB microSD

SoundPeats Cove Pro
Consumer Electronics

SoundPeats Cove Pro

Popular News

TEAMGROUP Launches EXPERT P34F Find My External SSD

TEAMGROUP Launches EXPERT P34F Find My External SSD

Samsung announces Galaxy Tab S11 and Galaxy S25 FE series

Samsung announces Galaxy Tab S11 and Galaxy S25 FE series

Viltrox Showcases Upcoming Lens Lineup and New TTL Flash at IBC 2025

Viltrox Showcases Upcoming Lens Lineup and New TTL Flash at IBC 2025

CORSAIR announces Vanguard Pro 96 and Vanguard 96 Gaming Keyboards

CORSAIR announces Vanguard Pro 96 and Vanguard 96 Gaming Keyboards

Panasonic Introduces the First Ultra-Telephoto Zoom Lens in the LUMIX S Series

Panasonic Introduces the First Ultra-Telephoto Zoom Lens in the LUMIX S Series

MSI Launches DATAMAG 40Gbps Magnetic Portable SSD

MSI Launches DATAMAG 40Gbps Magnetic Portable SSD

MSI Launches FORGE GK600 TKL WIRELESS Special Edition Compact Mechanical Keyboard

MSI Launches FORGE GK600 TKL WIRELESS Special Edition Compact Mechanical Keyboard

Viltrox Joins the L-Mount Alliance, Expanding Creative Possibilities

Viltrox Joins the L-Mount Alliance, Expanding Creative Possibilities

Main menu

  • Home
  • News
  • Reviews
  • Essays
  • Forum
  • Legacy
  • About
    • Submit News

    • Contact Us
    • Privacy

    • Promotion
    • Advertise

    • RSS Feed
    • Site Map
  • About
  • Privacy
  • Contact Us
  • Promotional Opportunities @ CdrInfo.com
  • Advertise on out site
  • Submit your News to our site
  • RSS Feed