Breaking News

Razer Unveils Raiju V3 Pro Samsung announces Galaxy XR headset Leica M EV1 – the first M-Camera with an integrated electronic viewfinder Micron Delivers Industry’s Highest Capacity SOCAMM2 for Low-Power DRAM in the AI Data Center KIOXIA launches EXCERIA PLUS G3 and EXCERIA G3 microSD cards for exceptional photography and video performance

logo

  • Share Us
    • Facebook
    • Twitter
  • Home
  • Home
  • News
  • Reviews
  • Essays
  • Forum
  • Legacy
  • About
    • Submit News

    • Contact Us
    • Privacy

    • Promotion
    • Advertise

    • RSS Feed
    • Site Map

Search form

Thermaltake Big Typhoon

Mar 22,2005 0

2. Installation


Review Pages

1. Introduction
2. Installation
3. Performance/Overclocking
4. Conclusion


Thermaltake Big Typhoon - 02 - Installation

Installation of the Big Typhoon was not so hard. It took much longer to disassemble the computer than to actually install the fansink on the motherboard, since you can't just plug it onto your motherboard socket.

There are four H clips included with the Big Typhoon. Two metallic, one spongy and one mylar with adhesive tape attached.

To start off with, the first thing you have to do is to remove everything off your motherboard and take it out of the case so that you have clear access to your CPU (if you have trouble with that, consult your motherboard's manual). The reason for removing the motherboard entirely is that you will also need access to the rear of the motherboard.

Around the socket, you will find a set of screw mounts. Turn the motherboard over and place the sponge so that the mounts are aligned with the motherboard and everything sits symmetrically.

Next, peel the tape from the mylar H clip to reveal the gluey side and carefully attach it onto the sponge so that all mounts are now aligned.

After having done this, place one of the metallic clips on the pile of clips and secure its position by inserting the 4 larger screws included in the packaging.

Now that the backbone of the HSF is properly set up, turn the motherboard right side up and slip on the 4 washers.

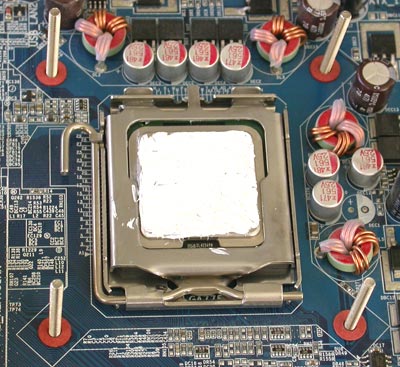
Uniformly cover the CPU with the High thermal conductivity compound included in the Big Typhoon package.

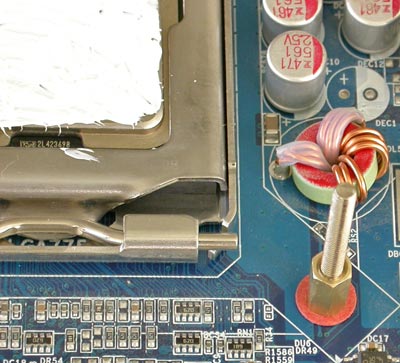
Next, secure the standoffs on each of the 4 screws.

Place the heatsink on the processor and secure it with the last metallic H clip.

Now for the tricky part. You have to tighten 4 nuts over the 4 screws so that the heatsink is tightly attached on the processor.

Using a wrench is hopeless and will take you hours of work. Instead, just press down the clip with one of your hands while tightening the nuts with the other.

After this step, the motherboard is ready to try.


Review Pages

1. Introduction
2. Installation
3. Performance/Overclocking
4. Conclusion


Pages

  • « first
  • ‹ previous
  • 1
  • 2
  • 3
  • 4
  • next ›
  • last »

Thermaltake

Tags: Thermaltake
Previous Post
IOData AvelLink Player2
Next Post
Samsung TS-H552U

Related Posts

  • Thermaltake Launches AW360/420 AIO Liquid Cooler and WAir CPU Cooler for Workstations

  • Begin the Racing Journey with the Thermaltake GR300 Racing Simulator Cockpit

  • Thermaltake Unveils the Massive EXTREME with Cross-flow Fan

  • Thermaltake Releases the Toughpower TF3 1300W with Support for RTX50 Series GPUs

  • Thermaltake Unveils G6 Direct Drive Racing Wheel Bundle and GM5 3DOF Motion System

  • Thermaltake Launches the TT150 LED Bag in Different Sizes and New Colors

  • Thermaltake New TH V2 Ultra EX ARGB Sync AIO – Snow Edition is Now Available Worldwide

  • Thermaltake Coolers Support New-Gen Intel and AMD CPUs

Latest Reviews

be quiet! Light Base 500 LX
Cooling Systems

be quiet! Light Base 500 LX

be quiet! Pure Loop 3 280mm
Cooling Systems

be quiet! Pure Loop 3 280mm

Dragon Touch Digital Calendar
Consumer Electronics

Dragon Touch Digital Calendar

Soft2bet and the unseen hardware that makes instant play possible
Enterprise & IT

Soft2bet and the unseen hardware that makes instant play possible

Noctua NF-A12x25 G2 fans
Cooling Systems

Noctua NF-A12x25 G2 fans

Popular News

COLORFUL Introduces CVN B850I GAMING FROZEN Motherboard

COLORFUL Introduces CVN B850I GAMING FROZEN Motherboard

COLORFUL Presents CVN X870 ARK FROZEN Motherboard for AMD Ryzen 9000 CPUs

COLORFUL Presents CVN X870 ARK FROZEN Motherboard for AMD Ryzen 9000 CPUs

COLORFUL Presents the B860 Series Motherboards

COLORFUL Presents the B860 Series Motherboards

Intel-AMD new motherboards announced

Intel-AMD new motherboards announced

TEAMGROUP Launches EXPERT P34F Find My External SSD

TEAMGROUP Launches EXPERT P34F Find My External SSD

ASRock AM5 Motherboards Now Fully Support AMD Ryzen 9 9950X3D & 9900X3D Processors

ASRock AM5 Motherboards Now Fully Support AMD Ryzen 9 9950X3D & 9900X3D Processors

Samsung announces Galaxy Tab S11 and Galaxy S25 FE series

Samsung announces Galaxy Tab S11 and Galaxy S25 FE series

Viltrox Showcases Upcoming Lens Lineup and New TTL Flash at IBC 2025

Viltrox Showcases Upcoming Lens Lineup and New TTL Flash at IBC 2025

Main menu

  • Home
  • News
  • Reviews
  • Essays
  • Forum
  • Legacy
  • About
    • Submit News

    • Contact Us
    • Privacy

    • Promotion
    • Advertise

    • RSS Feed
    • Site Map
  • About
  • Privacy
  • Contact Us
  • Promotional Opportunities @ CdrInfo.com
  • Advertise on out site
  • Submit your News to our site
  • RSS Feed