Stellar Data Recovery For Mac
3. Menus - GUI
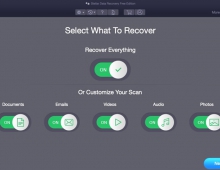
The overall GUI is the same as the version we saw for the Windows operating system, to recover files, there is also option to select "Recover Everything". The software supports 4K/2K sectors in the drive and many filesystems (APFS, HFS+, FAT32, NTFS, ExFAT, EXT2, EXT3, EXT4, CDFS, UDF). The Technician edition of the software supports Virtual Machine Recovery (VMDK, VDI, VHD, and VHDX), while data can be extracted from desktop/laptop hard drives, external hard drives, pen drives, memory cards, SSD drives, SD cards, etc. Mac-based systems do have extra protection, and the software supports data recovery from systems with T2 security chips and both Intel/M1, M2, M3, and M4 chips.

Users also have a drive monitor software available.

Which can report the disk status, SMART, and other useful information about your internal/external HDD/SSDs.


Proceeding with the Recover From tab, we can select Volumes either internal or external.

The third option is to recover data from a nonbooting Mac.

You can also resume recovery, provided that you have already run a scan before.

Disk images also can be created for internal/external volumes/disks.


Under preferences, several options are present.

While there is a huge list of supported file types/names for almost all files you can imagine. Of course, users can add their file types if needed or tweak the existing ones.

macOS users have also more tools available with the Stellar Data Recovery software, like SpeedUp their system.


You need to assign full disk access for this function to work properly.


There are three different types of Speedup, Clean junk files, Privacy scan, or Speed optimizations.

Scanning our system, the software found several things that can be removed safely.


This function is only available for the retail builds of the Stellar Data Recovery and not for the Demo version.

Going back to the first tab, let's recover files from our system.

The software recommends disabling System Integrity Protection (SIP) to give even better results.

Instructions are given on how to achieve this.

After some time, our HDD was scanned and many files were found that could be recovered. The amount of time the software needs to scan your drive depends upon many factors, capacity, drive speed, file number, etc..

Files can be either in folders with corresponding categories (App, Video, Photo, Docs, Txt, etc)

Inside each folder, you can view the filename and file type.

The same applies also for photos

Users can also preview the deleted files that were found and can be recovered.

Files bigger than 1GB are not possible to recover, you need the full version, but up to that limit, the DEMO build will work just fine.