Breaking News

TEAMGROUP Unveils the ACE 8K MicroSDXC Memory Card ASUS Announces Ascent QN10 Mini PC CORSAIR Launches Second Generation Nautilus II AIO CPU Coolers CORSAIR Launches VOXARA USB Gaming Condenser Microphone Fanatec announces the ClubSport F1 Racing System

logo

  • Share Us
    • Facebook
    • Twitter
  • Home
  • Home
  • News
  • Reviews
  • Essays
  • About
    • Submit News

    • Contact Us
    • Privacy

    • Promotion
    • Advertise

    • RSS Feed

Search form

Thermaltake Matrix

Apr 19,2006 0

3. Installation


Review Pages

1. Introduction
2. A Closer Look
3. Installation
4. Conclusion


The MATRIX case follows the tool free philosophy, meaning that a user is able to a full PC without the need for screws or screwdrivers.

There's a couple of things you'll have to take into consideration before commencing with the installation procedure. First of all, the tool free installation isn't entirely tool free and can require some unscrewing to be done. If you are going to be installing more than one 5.25" drive unit or more than one 3.5" drive, then both side panels need to be removed. In each drive bay, there's a protective metal plate in each slot except for the topmost for either the 5.25" and 3.5".

To remove this metal plate, you have to remove a screw located on the right hand side as you look at the front of the case. On the left hand side, there is a tool free clip which you can then use to clamp your drive in place. Tools will also be necessary when installing the PSU.

Let's take a quick look at the procedure.

1. We first removed the side panel to get access to the inside. We installed the motherboard in a flash, using the screws that come with the case. There's also a user manual which along with the screws are initially inside the case.

2. We then installed the drives (optical and HDD) and the power supply control panel for our Thermaltake PSU. Since we are going to be using more than one 5.25" drive bay slot (one for our DVD burner and one for the power supply control panel), we need to remove one 5.25 drive slot metal plate. Since these plates are held in place with a screw, you'll need to also remove the other side panel to gain access.

The above photo shows the screws which hold metal plates in place.
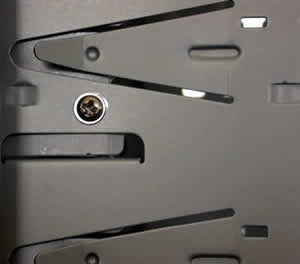
3. After the drives were installed (including the HDD), we moved on to installing the Power Supply Unit. We installed the Thermaltake PurePower 550. Note here, that we had to remove a PSU clamp (see photo below), in order for the PSU to fit in.

4. After removing the clamp, the PSU slipped right into place, and we moved on with installing our GPU card.

5. The installation in expansion slots was fairly easy, the easiest part of the installation in the MATRIX case.

We removed the metal plate occupying the PCI slot where we wanted to install our card. We lifted the green clip and installed the GPU card, then locked down the green clip to hold the card firmly in place.

6. All in all, a fairly simple and straightforward assembly. The only hitch was when we had to remove the side panel to install a second unit in our 5.25" drive bay.
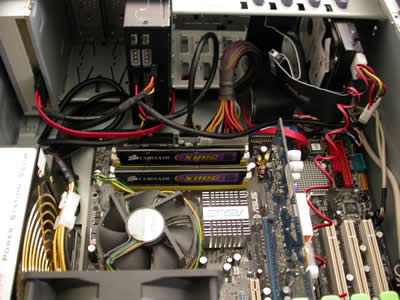
Everything installed, the system up and running, with plenty of space left inside the case.


 

Review Pages

1. Introduction
2. A Closer Look
3. Installation
4. Conclusion


Pages

  • « first
  • ‹ previous
  • 1
  • 2
  • 3
  • 4
  • next ›
  • last »

Thermaltake

Tags: Thermaltake
Previous Post
SONY DW-G120A
Next Post
ABIT AN8 32X

Related Posts

  • Thermaltake Launches AW360/420 AIO Liquid Cooler and WAir CPU Cooler for Workstations

  • Begin the Racing Journey with the Thermaltake GR300 Racing Simulator Cockpit

  • Thermaltake Unveils the Massive EXTREME with Cross-flow Fan

  • Thermaltake Releases the Toughpower TF3 1300W with Support for RTX50 Series GPUs

  • Thermaltake Unveils G6 Direct Drive Racing Wheel Bundle and GM5 3DOF Motion System

  • Thermaltake Launches the TT150 LED Bag in Different Sizes and New Colors

  • Thermaltake New TH V2 Ultra EX ARGB Sync AIO – Snow Edition is Now Available Worldwide

  • Thermaltake Coolers Support New-Gen Intel and AMD CPUs

Latest Reviews

Fanxiang MP83 M.2 NVMe SSD Enclosure
Enterprise & IT

Fanxiang MP83 M.2 NVMe SSD Enclosure

Ugreen CM642 USB4.0 Enclosure
PC components

Ugreen CM642 USB4.0 Enclosure

be quiet! Dark Power 14 IO
PC components

be quiet! Dark Power 14 IO

SanDisk High Endurance 512GB microSDXC
Cameras

SanDisk High Endurance 512GB microSDXC

Samsung PRO Ultimate 512GB microSDXC
Cameras

Samsung PRO Ultimate 512GB microSDXC

Popular News

CORSAIR announces Vanguard Pro 96 and Vanguard 96 Gaming Keyboards

CORSAIR announces Vanguard Pro 96 and Vanguard 96 Gaming Keyboards

MSI Launches FORGE GK600 TKL WIRELESS Special Edition Compact Mechanical Keyboard

MSI Launches FORGE GK600 TKL WIRELESS Special Edition Compact Mechanical Keyboard

MSI’s Latest AMD X870E MAX & EVO Series Motherboards

MSI’s Latest AMD X870E MAX & EVO Series Motherboards

Panasonic Introduces the First Ultra-Telephoto Zoom Lens in the LUMIX S Series

Panasonic Introduces the First Ultra-Telephoto Zoom Lens in the LUMIX S Series

COLORFUL Launches iGame B850M ULTRA Series Micro-ATX Motherboards

COLORFUL Launches iGame B850M ULTRA Series Micro-ATX Motherboards

COLORFUL Presents Limited Edition Chitu MAG-60 Magnetic Keyboard Inspired by the Year of the Horse

COLORFUL Presents Limited Edition Chitu MAG-60 Magnetic Keyboard Inspired by the Year of the Horse

COLORFUL Presents iGame Z890 ULTRA-S W and iGame Z890M ULTRA Z Motherboards

COLORFUL Presents iGame Z890 ULTRA-S W and iGame Z890M ULTRA Z Motherboards

LIAN LI Launches 8.8” Universal Screen with Flexible Mounting Solution

LIAN LI Launches 8.8” Universal Screen with Flexible Mounting Solution

Main menu

  • Home
  • News
  • Reviews
  • Essays
  • About
    • Submit News

    • Contact Us
    • Privacy

    • Promotion
    • Advertise

    • RSS Feed
  • About
  • Privacy
  • Contact Us
  • Promotional Opportunities @ CdrInfo.com
  • Advertise on out site
  • Submit your News to our site
  • RSS Feed