Breaking News

DZOFILM Expands Arles Cine Lens System With 25–75mm and 65–180mm T2.6 Zooms G.SKILL Launches Trident Z5 Royal NeoX Series DDR5 Memory with AMD EXPO Technology XERON Launches NEX A61 ARGB CPU Air Cooler Viltrox to Unveil New Lenses And Production Solutions at IBC2026 ASUS Announces WiFi 8 Router

logo

  • Share Us
    • Facebook
    • Twitter
  • Home
  • Home
  • News
  • Reviews
  • Essays
  • About
    • Submit News

    • Contact Us
    • Privacy

    • Promotion
    • Advertise

    • RSS Feed

Search form

Thermaltake Beetle

May 10,2005 0

2. Installation


Review Pages

1. Introduction
2. Installation
3. Performance/Overclocking
4. Conclusion


In order to install the Beetle on a K8 motherboard, you normally have to remove the retention module surrounding the CPU socket. However, as there are two kinds of back plates supporting the retention module, metal and plastic ones, the installation varies for each type.

As Thermaltake recently included on the Beetle product page, installing the Beetle on a plastic back plate board does not require removal of the retention module, as the back plate is shorter and would give you a hard time or even damage your processor when you try to screw the I-bar on the board.
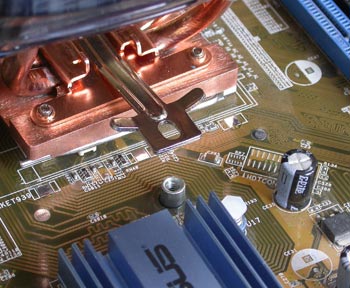
That way you don't have to remove the motherboard from the case. Just remove the screws from the retention module, cover your processor with a thin layer of thermal conductive paste and place the Beetle on top of it.

The Beetle has to be placed so that it blows air towards the case fan that might be located at the rear of your box. After doing this, get the appropriate K8 I-bar found amongst the Beetle's accessories and place it on the copper base of the Beetle as shown above.

Next, for plastic plated boards, get the two large K8 screws along with their springs and washers and screw the I-bar onto the PCB.

For metal plated boards, the two large K8 screws are just not long enough to tighten the I-bar. For this reason, use the screws that originally held the retention module and also remove the springs.

Connect the Beetle's 3-pin power supply cable onto your motherboard's CPU fan socket and the Beetle is ready for use. The final result should look something like the picture above.
 

Review Pages

1. Introduction
2. Installation
3. Performance/Overclocking
4. Conclusion


Pages

  • « first
  • ‹ previous
  • 1
  • 2
  • 3
  • 4
  • next ›
  • last »

Thermaltake

Tags: Thermaltake
Previous Post
A War On Informatics Is In Store..
Next Post
Windows XP Professional x64 Edition

Related Posts

  • Thermaltake Launches AW360/420 AIO Liquid Cooler and WAir CPU Cooler for Workstations

  • Begin the Racing Journey with the Thermaltake GR300 Racing Simulator Cockpit

  • Thermaltake Unveils the Massive EXTREME with Cross-flow Fan

  • Thermaltake Releases the Toughpower TF3 1300W with Support for RTX50 Series GPUs

  • Thermaltake Unveils G6 Direct Drive Racing Wheel Bundle and GM5 3DOF Motion System

  • Thermaltake Launches the TT150 LED Bag in Different Sizes and New Colors

  • Thermaltake New TH V2 Ultra EX ARGB Sync AIO – Snow Edition is Now Available Worldwide

  • Thermaltake Coolers Support New-Gen Intel and AMD CPUs

Latest Reviews

Ugreen CM642 USB4.0 Enclosure
PC components

Ugreen CM642 USB4.0 Enclosure

be quiet! Dark Power 14 IO
PC components

be quiet! Dark Power 14 IO

SanDisk High Endurance 512GB microSDXC
Cameras

SanDisk High Endurance 512GB microSDXC

Samsung PRO Ultimate 512GB microSDXC
Cameras

Samsung PRO Ultimate 512GB microSDXC

be quiet! Light Mount TKL
Consumer Electronics

be quiet! Light Mount TKL

Popular News

CORSAIR announces Vanguard Pro 96 and Vanguard 96 Gaming Keyboards

CORSAIR announces Vanguard Pro 96 and Vanguard 96 Gaming Keyboards

MSI Launches FORGE GK600 TKL WIRELESS Special Edition Compact Mechanical Keyboard

MSI Launches FORGE GK600 TKL WIRELESS Special Edition Compact Mechanical Keyboard

Panasonic Introduces the First Ultra-Telephoto Zoom Lens in the LUMIX S Series

Panasonic Introduces the First Ultra-Telephoto Zoom Lens in the LUMIX S Series

MSI’s Latest AMD X870E MAX & EVO Series Motherboards

MSI’s Latest AMD X870E MAX & EVO Series Motherboards

COLORFUL Launches iGame B850M ULTRA Series Micro-ATX Motherboards

COLORFUL Launches iGame B850M ULTRA Series Micro-ATX Motherboards

COLORFUL Presents Limited Edition Chitu MAG-60 Magnetic Keyboard Inspired by the Year of the Horse

COLORFUL Presents Limited Edition Chitu MAG-60 Magnetic Keyboard Inspired by the Year of the Horse

COLORFUL Presents iGame Z890 ULTRA-S W and iGame Z890M ULTRA Z Motherboards

COLORFUL Presents iGame Z890 ULTRA-S W and iGame Z890M ULTRA Z Motherboards

LIAN LI Launches 8.8” Universal Screen with Flexible Mounting Solution

LIAN LI Launches 8.8” Universal Screen with Flexible Mounting Solution

Main menu

  • Home
  • News
  • Reviews
  • Essays
  • About
    • Submit News

    • Contact Us
    • Privacy

    • Promotion
    • Advertise

    • RSS Feed
  • About
  • Privacy
  • Contact Us
  • Promotional Opportunities @ CdrInfo.com
  • Advertise on out site
  • Submit your News to our site
  • RSS Feed