Media Quality Tests
4. Submit Tests detailled description
Review Pages
2. View Page Description
3. Submission of Tests
4. Submit Tests detailled description
5. List of Tests conducted by a particular reader
6. Empty
7. An example of viewing a test
8. An example of submitting a test
9. Security constraints
10. Csv file format
11. Some suggestions for the proper submission
12. Measuring the quality of recorded media
13. Frequently Asked Questions
14. Glossary of Terms
15. Programming decisions
16. APPENDIX 1. UmDoctor Pro II
17. APPENDIX 2. KProbe
18. APPENDIX 3. CdSpeed
19. APPENDIX 4. PlexTools Professional
"Submit Page" description
Please first read the previous section and have yourself acquainted enough with the "View Page" of the tests. Having noticed some finer details there, will most probably enable you to submit your own tests with less effort and fewer errors.
First please review the security settings of your browser as explained here.
We assume that you have some knowledge of the test reading application like KProbe and UmDoctor and how they behave. More details for each candidate reading application can be found in the appendices of this review.
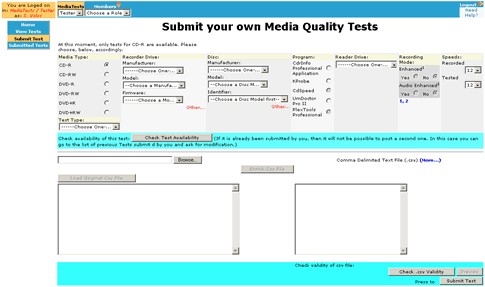
Below is a complete picture of the page for submitting your own tests.
We should say a few things about the top and left toolbars above. On the top toolbar the user can change what he can edit by changing from Member to Tester. As a Member he can define and edit the various options concerning his account.

As a media Tester he is able to view the submitted tests, post new tests and edit previously posted tests.

In each case he can choose from the toolbar on the left the available pages he can access. At every time he can also locate his position in the web site by reading the labels on the "yellow" selections.
Next, we identify in the following picture the steps you will have to take in order to submit your first successful test.
First you will have to choose the parameters of the test as in steps 1-12 below, then you will have to transform and submit the actual result file. Please read on.
Choosing the Parameters
Most of the following steps 1-12 can be followed in parallel, with a few notable exceptions. (Steps 1, 2 and 9, 10) below. In these 2 cases (4 steps) he must follow step 1 before 2 and step 9 before 10. Either way, the user can follow the steps as exactly presented below and be sure he has made a valid initial selection.
In order to submit a new test, first you will have to tell the system the parameters of the test you have done.
Steps

1. Please choose the media type.
2. According to you previous selection in step 1, you will be presented with a drop down list of available Types of tests. Choose the one suitable for your case. Please note that step has to be taken first. Otherwise, that is if you first choose the Type of the test, changing the media type will result to changing the test Type selection.
This behavior is by design. According to the disc there is a different list of possible tests. In general most of the time you will have to deal with one of the following 2 cases: CD-R/C1-C2 and DVD-R/PI-PO.
3. In this step select the Manufacturer of the recording drive.
4. Choose the recording drive model.
5. Choose the firmware of the recorder.
In steps 3-5 you should take into account the same issues for the respective steps in the case of the "View Page".
6. In this step select the Manufacturer of the recording disc.
7. Choose the disc model.
8. Choose the Identifier of the disc.
As before, please consult the relevant steps in the "View Page" description.

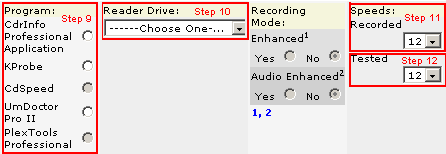
9. In this step choose one of the following 3 non-grayed-out radio buttons. In the case of the normal user you will have to further restrict your available options to 2. The first is KProbe, the other UmDoctor. We explain in a following section why we are forced in these 2 only selections for the time being.
10. According to your previous selection the right drop-down-list is populated by the group of available testing drives. This is different because each of the 2 above programs works only with a particular manufacturer chip-set.
11. In this step, as well as in the following:
12. you can choose the recorded and tested speed of the disc whose test you are about to post.
Having completed the above steps, you are ready to first check out if this test is already submitted by you or not. We have added this precautionary action in order to help you eliminate possible failure cases.
13. Please press the "Check test Availability" button and you will be presented with one of the following 2 pop-up windows.
![]()
Pop-Up 1 |
Pop-Up 2 |
 |
 |
In the first case, you are free to proceed into actually posting the results, in the other case you will have to check for missing parameters, or you will have to change at least one of them in order to define a non-already posted test.
Transforming and posting the file
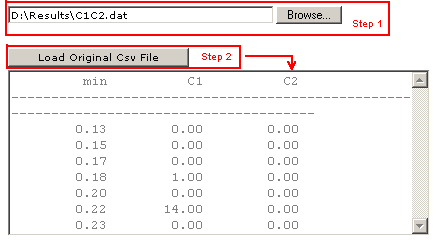
You can do this in 5 easy steps. (These are highlighted from left-to-right in the following picture.)
You should be familiar with the security relaxation requirements as specifically explained in the relevant section. Failing to follow these guidelines, you will be unable to submit any tests.

1. Press the "Browse" button in order to locate in your local PC filesystem the .CSV file containing the results of the test whose parameters you have chose above.
2. Press "Load original csv file" in order to load in memory the file.

3. Press "Shrink Csv File" in order to have the file shrinked to about 1KB. This is necessary in order to be able to include the test results in our database.
4. Press the button "Check Csv validity". This seems to be an almost redundant step. We have included it for those willing to manually populate the right panel with the test results (not recommended.) We have included code for checking most errors. But still this is not fale-safe. You must follow the whole procedure for an original Csv file in order to be sure you are submitting the correct result.
Please note that it might be the case of KProbe or UmDoctor bug that might result to illegitimate Csv files. In this case please contact us.
5. Last, press the "Submit Test" button in order to post the test.
Review Pages
2. View Page Description
3. Submission of Tests
4. Submit Tests detailled description
5. List of Tests conducted by a particular reader
6. Empty
7. An example of viewing a test
8. An example of submitting a test
9. Security constraints
10. Csv file format
11. Some suggestions for the proper submission
12. Measuring the quality of recorded media
13. Frequently Asked Questions
14. Glossary of Terms
15. Programming decisions
16. APPENDIX 1. UmDoctor Pro II
17. APPENDIX 2. KProbe
18. APPENDIX 3. CdSpeed
19. APPENDIX 4. PlexTools Professional


