Media Quality Tests
2. View Page Description
Review Pages
2. View Page Description
3. Submission of Tests
4. Submit Tests detailled description
5. List of Tests conducted by a particular reader
6. Empty
7. An example of viewing a test
8. An example of submitting a test
9. Security constraints
10. Csv file format
11. Some suggestions for the proper submission
12. Measuring the quality of recorded media
13. Frequently Asked Questions
14. Glossary of Terms
15. Programming decisions
16. APPENDIX 1. UmDoctor Pro II
17. APPENDIX 2. KProbe
18. APPENDIX 3. CdSpeed
19. APPENDIX 4. PlexTools Professional
View Page description
Please pay attention in the picture below.

The following are the steps you take during the selection of each test result for viewing it or comparing it with other sesults.
1. First the user has to decide on viewing tests concerning CD’s or DVD’s. By clicking on the relevant toolbar at the top he can change this option. The default is CD tests:

2. Next he will have to decide on what type of tests he is interested in viewing. Depending on the case of a CD or DVD in step 1 above, he is offered a different list of options.


We note that decisions 1 and 2 are the first ones. Changing them subsequently will result to a complete change of everything else the user has selected so far. So please be careful at your choices here.
The next steps 3-13 are to be taken in this exactly order when making the first selection for a test. Subsequently the user can fix some of his choices to be able to add similar tests faster, provided there are available tests in our database.
Please wait a few seconds while the next list-box is being populated with the data that are relevant with your previous selection you have made. A round-trip to our server is required . Under a DSL or faster connection this time will be negligible, provided the net out there is under normal traffic. Under ISDN or PSTN a lot depends on the ping time to our site from your particular location. In general, ping numbers under 250-300 will provide a very acceptable postback response and a pleasant user experience.
3. Please now select the manufacturer of the drive for which you want to find relevant tests. This is the maker of the recording drive.
You have to select this here, in order to be able to keep to an acceptable length the range of the number of options available on the other list-boxes below. In the case of an OEM drive with a different brand, please choose the latter. Batches of drives, even from the same OEM, usually are quality differentiated, either towards the top or the bottom, depending on the actual brand name that appears on the box of the drive you bought and his agreement with the OEM.
4. Next select the drive model.
5. Then the firmware of the drive.

Isolating steps 3, 4 and 5 by checking the "Fix it" box to the right of each selection, gives you the option of reducing the number of choices you have to define during each drive/media combination. Once, for example, you have selected the first test, you can fix all the selected options up to the firmware version if you like, provided there are other tests in our database to subsequently fill in your decisions:

6. In this step, similarly, choose the Disc manufacturer. This is the name of the brand as it appears on the disc or it’s covers. In case there is no such info on both places, then please use the name of the disc manufacturer as it appears by the media Identity finding application (DvdInfo, CdSpeed, ...)
7. Then select the Disc model. This is displayed on the disc itself or in the covers of the disc or in both places, provided you did not buy the disc in bulk without any identifying mark. In the latter case choose one of the _Unbranded available options.
8. Here choose the Disc Identity as comprised by the “Manufacturer” and “msf” readings, displayed by the Disc Identification Utility. You can see how other testers have used this selection in order to not double-post the same mark.

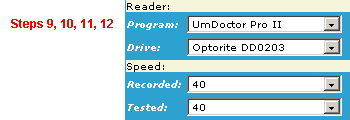
9. Next, choose the Testing application. For the time being and for reasons explained here<link> , there are only 3 applications available. KProbe, UmDoctor and CdrInfo. The latter is used only by our team for publishing our own media quality tests based on professional Yamaha equipment. The former 2 programs are acceptable for any tester to use and submit test.
10. Afterwards, please choose the reader drive. This is based on the choice you made previously, as it must be both compatible with the reading test application (step 9) and at least one Test should be available for viewing.
11. In this step you choose the recording speed. So, you can find out how different speeds chosen during recording affect the quality of the measured results.
12. Similarly, you must choose the testing speed. In some cases this is not adjustable during testing and is thus equal to the maximum one, in other cases clever use of speed –reduction software might adjust it accordingly and hence being able to offer distinguishable test results.

13. Next select the particular test you want to see.
From this respect our page is very “democratic:) Each one of our site members can submit his own test. But only once, although he is able to subsequently edit it or replace it with a newer or (presumably) more accurate measurement. (This applies to the same combination of drive, media, and all other settings)
On top of these options a user can also choose each one of the following cases as well: “Best”, “Worst” and “Average”. The first refers to the test with the fewest errors. The second refers to the test with the most errors. The “Average” case resembles to the one closest to the mathematical average of all submitted tests. For more information, please read the answer to the relevant FAQ question.
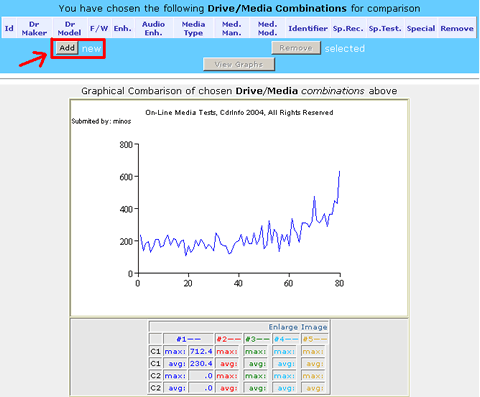
14. As soon as you have made your choices above you are ready to formalize your selection by clicking the button “Add” on the topmost of the right part of the page.
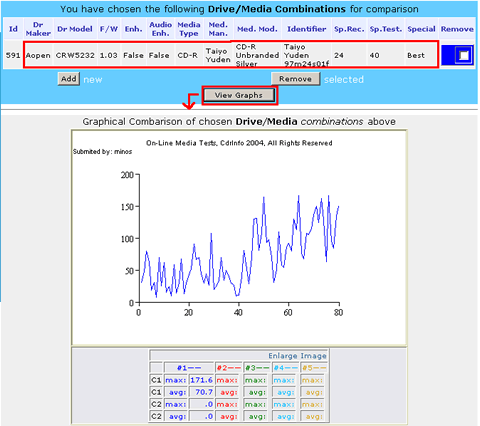
You can then either Press “View” and immediately see the chosen graphic of a test, or continue your selections on the left for adding up to 5 different disc/drive/etc combinations.
You can not add 2 times the same test, unless it is has been submitted by a different user (member) or refers to the aggregates “Best”, “Worst” or “Average”.

You can thus repeat steps 3-13 above for making more selections.
You can also remove some of them at any time. The system is clever enough to keep the state of the page intact, as long as you do not press for a different media or test type (steps 1, 2).
In this case you must start all over from the beginning. This might be tedious if you have already made several selections. So, please pay particular attention on this.
Review Pages
2. View Page Description
3. Submission of Tests
4. Submit Tests detailled description
5. List of Tests conducted by a particular reader
6. Empty
7. An example of viewing a test
8. An example of submitting a test
9. Security constraints
10. Csv file format
11. Some suggestions for the proper submission
12. Measuring the quality of recorded media
13. Frequently Asked Questions
14. Glossary of Terms
15. Programming decisions
16. APPENDIX 1. UmDoctor Pro II
17. APPENDIX 2. KProbe
18. APPENDIX 3. CdSpeed
19. APPENDIX 4. PlexTools Professional


