Xtreamer Pro Media Player Review
6. Settings
Let's see some of the main settings available at the Xtreamer Pro's Ver. 2.4.2 menu:

Six different sections are available on a menu bar placed at the bottom of the screen. These are the "Media library" section, where you can select from various areas to get his media content (local/network), the "Internet" section, which has many interesting widgets, the "Movie JukeBox" section, which leads you to another menu as we will explain later, the "File Manager" section, which allows you to make file copy/move/delete functions, and last but not least, the "Settings" section.
We should note here that the menu responded quickly to the remote control's commands.
Let's navigate through the "Settings" section. The settings are also categorized in those related to the playback, A/V, the network, the system and the applications.
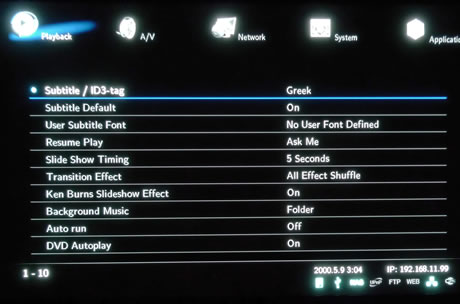
Let's move on to the "Playback" settings. Here you can specify the language used for subtitle / ID3-tag languages, selecting and change their fonts, set the player to resume from the point where you previously stopped playback, set the slide show timing, any transition effect and also background music during photo slide show and also set the DVD Auto play function, which allows you to select automatic DVD play mode when inserting a DVD disk into the DVD ROM connected to your player via USB port. The Auto Run function is only available in internal HDD to automatically play a designated playlist when Xtreamer starts:
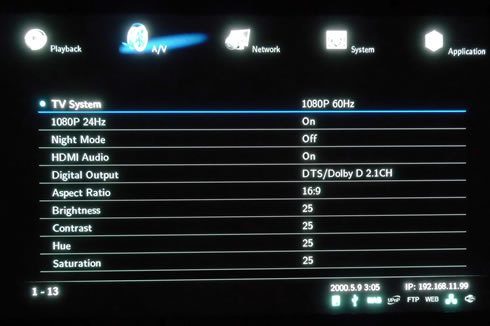
At the "A/V" settings tab you can select the proper display resolution and video output type (PAL, NTSC and HDMI Auto / NTSC / PAL / 480P / 576P / 720P 50Hz / 720P 60Hz / 1080i 50Hz / 1080i 60Hz / 1080P 50Hz / 1080P). The feature worked pretty well with our Panasonic 50S20 Plasma TV. The 1080P 24Hz can be enabled or disabled. Once enabled, it will allow you playback of 1080P 24Hz when playing Blu-ray file (BD); however, this function is subject to the factors that Xtreamer is connected to TV with "HDMI cable", and depending on the screen scanning with 24Hz frame rate. We should note here that the TV, AV amp and media file you use must be acceptable to 1080P 24Hz as well as your media file is recorded by 1080P 23.976fps. If the video is not’t properly played by enabling the "1080P 24Hz" mode, you will be required to disable it. In addition, the the initial TV screen may flicker when you select the "1080P 24Hz" mode.
At the same menu, you can to turn on (or off) the HDD Audio through the HDMI connection and also select between Digital and Analog Output Type:
- DTS / AC3 5.1CH (Pass though): It enables 5.1ch surround sound with optical connection when you use multi-channel speakers.
- DTS / AC3 2.1CH (Downmix): Decoding all sounds is demanded to output 2.1ch stereo sound when TV or a 2-ch speaker is used.
- ACC/FLAC/OGG
5.1CH PCM(HDMI):
It outputs 5.1ch surround sound created by ACC/FLAC/OGG, and supports
multi channel output with only HDMI connection.
If you have a plasma screen you might find the "Night Mode" useful, since it reduces the brightness of the screen:
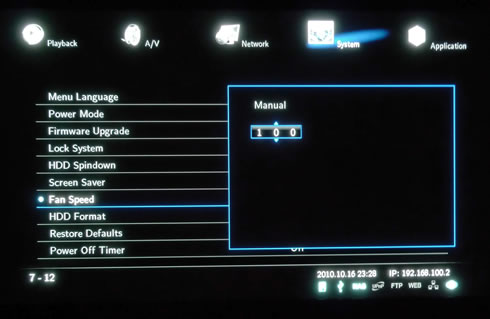
We will quickly present the the "System" settings, which are are commonly met in all the media players. Here you can set the menu language (up to 23 language supported with fully translated menus), set the Power Mode - settings related to the [POWER] button of the your remote ( Power Off - Select to switch off the power, NAS Mode - Speed and stability of stream are improved by optimizing its function of network application as setting off PLAYER mode internally.The allotted memory for PLAYER function is set to Off mode which enables the system to reserve 90 percent of the memory for NAS Mode and the Confirm Window - By pressing [POWER] button, Confirm Window is displayed to select between [Power OFF] and [NAS Mode].)
The "System" settings tab also displays the current firmware version of the device, allows you to to assign a password to your system folders in order to protect your content, control the fan speed for lowering noise [Low / Medium / High / Manual], set the time for automatic changing images on your screen during periods of user inactivity (screen saver) and also allow you to format the installed HDD, as we previously saw.


When we set the "Fan Speed" control to Low, the spinning fan was still audible in a totally quiet room. However, we could not hear it at all during movie playback:
Finally at the "Application" settings menu, you can select various other functions of the Xtreamer Pro device, such as NAS, UPnP media server, Web and FTP server.
NAS network drive provides storing and copying files services, of which all are connected to Xtreamer via Windows file administrator in a convenient way.
You will be able to set up a UPnP Media Server in order to improve the function of a network application
and enjoy playback functions when the device is connected to a UPnP AV Media Server such as Tversity, PS3 Media Server and XBMC Media Center. This feature supports UPnP Media Server and NFS client functions.
A Web Server reads files uploading and downloading from the Xtreamer player, and send a response to the client's Web browser using HTTP. The server responds with the content of that resource and you can control the Xtreamer
Pro using the remote control.
Xtreamer has also built-in FTP service that you will let you manage and copy files to and from it through an FTP
connection:

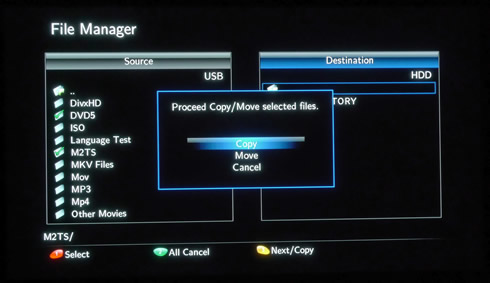
Let's leave the "Settings" menu and explore the "File Manager" menu. The Xtreamer has a built in file manager that allows you to copy files to and from any USB attached drive (a Digital Camera, an MP3 Player or a Mobile Phone) to Xtreamer internal HDD without having to use a PC.
In our case we will copy some files from an external USB flash drive to the installed HDD. The procedure is simple, first select the source and the destination:

Select the folders/files you need to copy into the HDD as well as the directory at the destination medium:
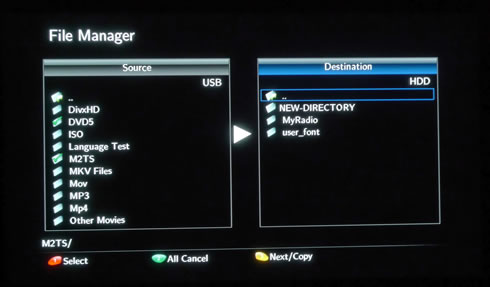
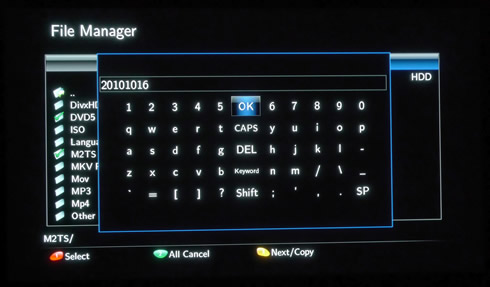
Let's make a new directory:
Press the "3" button on the remote control to perform the selected action:
After using the device we saw that the Xtreamer Pro was able to copy files from the local network at a speed of up to 5.67MB/sec. The transfer rate speed with a device connected to the USB port was 14MB/sec, which is a decent performance.