Making Professional DVD from Authoring to Replication
5. Examples
3.1.1 Example:
Step 1: Connect the cable from your DV camera to your IEEE 1394 controller card or your capture card.
Step 2: Download WinDV from http://windv.mourek.cz/download/WinDV-1.2.3.zip
and unzip the file to any directory on your hard drive. There is no need to
install the program. You can simply run the program directly by double-clicking
![]() .
.
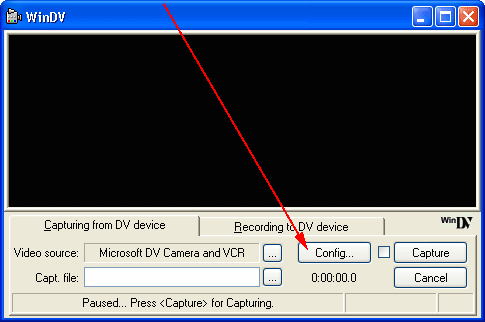
Step 3: Click the [Config...] button
Choose [type-2 AVI (vids+auds)] from the next dialog then
click "OK"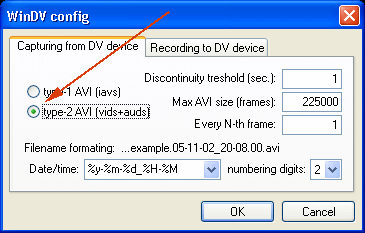
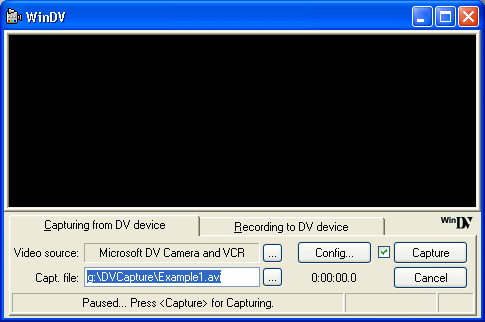
Tick the checkbox next to the [Config...] button and then provide a file name in the [Capt. file:] input field. Make sure the folder name for the file name has been created. For example, if "g:\DVDCapture" fold is not created in the above example, WinDV will bomb in a very unfriendly way by saying [ "Runtime Error!" ... "This application has requested the Runtime to terminate it in an unusual way. Please contact the application's support team for more information."]
You can stop the capturing by pressing the [Cancel] button any time. The capturing will also stop when there is no video signal coming from the DV camcorder.
Step 4: Download VirtualDub from http://www.virtualdub.org/download
and unzip the files to a directory on your hard drive. Again, there is no need
to install the application, just double-click the  icon to fire up the program.
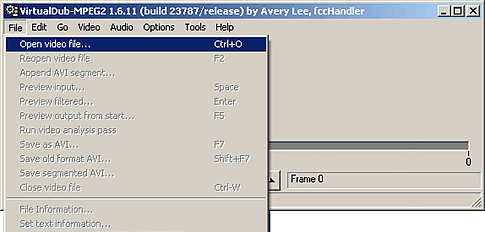
Step 5: Click [File] > [Open video file] to open the file we have captured in Step 3.
Step 6: As you can see the opened AVI file has some video noise at the beginning. This is normally the case because most video tapes are non-recordable for the first few seconds.

When VirtualDub is opened you can see two screens as shown above. The left screen represents the source file and the right screen represents the result of the editing. The three controls we are going to use are i) the video play head, ii) the [Mark In] button, and the [Mark Out] button. The other buttons are just there for you to navigate to the specific point of the video but I found them less efficient as compared with moving the play head. You can move the play head quickly along the timeline to get to any point very quickly.
By and large editing is a matter of trimming and rearranging of the video. To trim the unwanted portion of the video you just move the play head to the beginning position where you want the trimming to start; press the [Mark In] button to mark it, then move the play head to the ending position where you want the trimming to stop; press the [Mark Out] button. The time between the [Mark In] and [Mark Out] will be highlighted. You can either press the [Delete] button on the keyboard to delete it or press [Ctrl-X] to delete it and put it into the clipboard. By putting into the clipboard you can paste it to any place where the play head is positioned.

Step 7: Once you have finished the editing, click [File] > [Save as AVI...] to save the edited file which will be used as input for encoding.

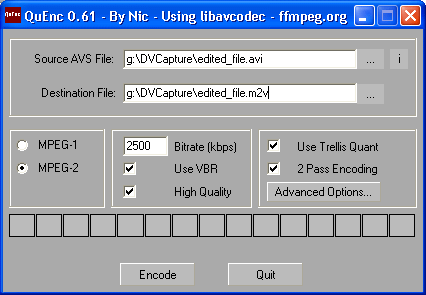
Step 8: Download QuEnc from http://www.afterdawn.com/software/video_software/video_encoders/quenc.cfm
and unzip the file to any directory on your hard drive. Start QuEnc by
double-clicking ![]() .
.
Step 9: Chose the source file we saved in Step 7 and press the [Encode] button.
Step 10: As a result of the last step, you now have an m2v file which is essentially the video portion of the movie. In this step we will try to get the audio out using a tool called BeLight. You can download Belight from http://corecodec.org/projects/belight/. Run the .exe file to install BeLight and start the program after the installation.
Step 11: Click on the [AC3] tab, press the [Input] button to locate the file we finished in Step 7. The output field will be automatically filled in.

Press the [Start] button to start the audio ripping.
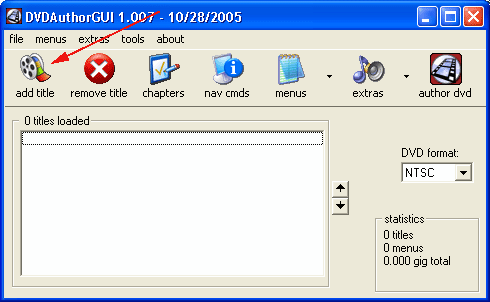
Step 12: Download DVDAuthorGui from http://www.videohelp.com/~liquid217/dvdauthorgui.pl?p=download. Install the program and run DVDAuthorGui after installation.
Step 13: Press the [add title] button to add the m2v and ac3 files.
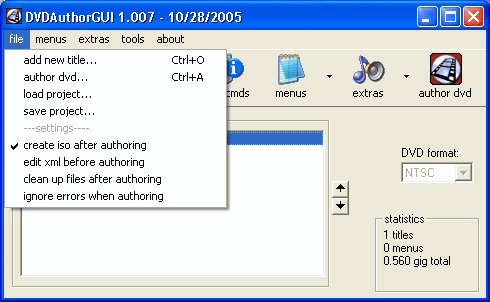
Step 14: Choose [file] > [create iso after authoring].
Step 15: Once the files are added, press the [author dvd] button.
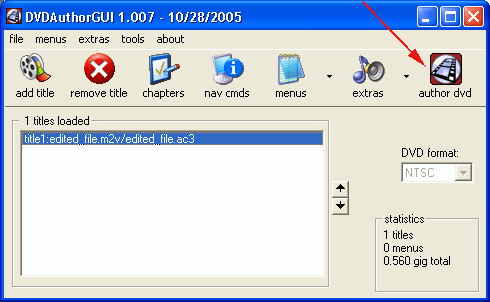
You will be asked to name a fold where the result of the authoring will be stored. Just give any name you like. Depending on the length of the video and the speed of your computer it may take 15 minutes to hours to finish up this process. Once done, you will have the VIDEO_TS and AUDIO_TS folders in the directory you have named earlier.
Step 16: With the ISO file we have created in Step 15, we now have everything we need to burn the result to a DVD. You can use any disc burning software that supports image burning. Nero and Roxio Easy Media Creator are the most common ones. You can also use free tool such as ImgBurn. Simply download ImgBurn from http://imgburn.com/index.php?act=download then install it.
Step 17: Once started, click on the [Source] browser button to choose the ISO file we have created in Step 15, put a blank DVD-R into your DVD writer, and then press the green go button. Voila! In about 10 minutes you will have the DVD burned.

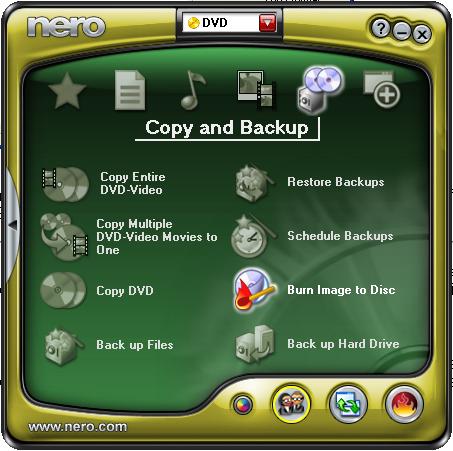
If you use Nero, just choose the [Burn Image to Disc] button and then choose the ISO file we have created in Step 15 and the rest should be self-explanatory.
3.1.2 Quicker and Easier Ways
With all the exercises so far, you must be asking the question: Is there a better way? Yes! There are quicker and easier ways and they are being listed here. The example above was deliberately chosen to illustrate the logical flow of information from one stage to the next. Once you understand this flow it will be much easier for you to appreciate some other software products.
|
Solution |
Tools used |
Description |
|
1 |
WinAVI Video Capture, ImgTool, ImgBurn | If your source video is pretty clean, you can choose to capture the video directly into DVD format using WinAVI Video Capture and then create the ISO file using ImgTool. Burn the ISO file using ImgBurn. |
|
2 |
WinDV, VirtualDubMod, AVI2DVD, ImgBurn. | Capture the video as Type 2 AVI with WinDV, edit the video using VirtualDubMod, author the DVD with AVI2DVD to create the ISO file. AVI2DVD integrates the Encoding and Mastering procedures into one program and you have few encoders to choose. Use ImgBurn to burn the ISO file into DVD. |
|
3 |
AVIEdit, QuEnc, DVDAuthorGui, ImgBurn | Capture and edit with AVIEdit, encode with QuEnc, master with DVDAuthorGui, burn with ImgBurn |
|
4 |
WinDV, DIKO, ImgBurn | Capture with WinDV, edit, encode, and master with DIKO, burn DVD with ImgBurn. |
Again, you are not limited to the ways we have listed. Feel free to mix up the software products to create your own suite. Some software products require your to write an Avisynth script which is beyond the scope of our discussion.