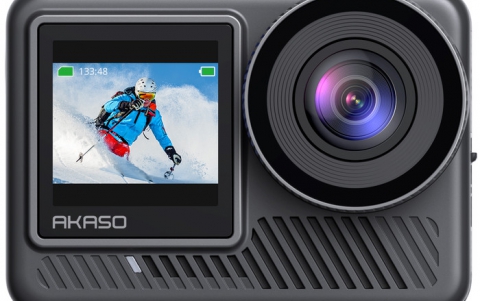
Akaso Brave 8 Lite
4. Tests
First of all the device supports 7 languages for voice control: shutdown/start recording/stop recording/photo
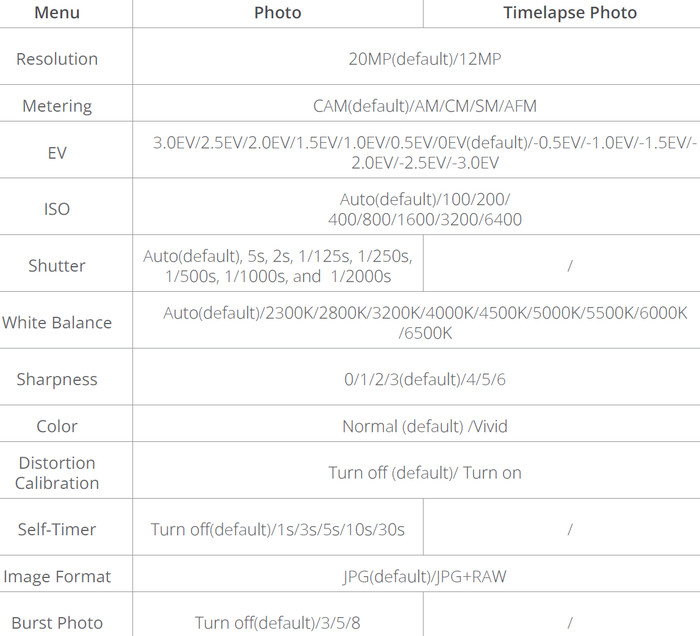
(English/Chinese/German/Spanish/French/Italian/Japanese), which can be handy for some users. The supported video format is MP4 with H264 & H265 encoders. ISO can be set from Auto (default)/100/200/400/800/1600/3200 up to 6400. Shutter is also adjustable from Auto(default), 5s, 2s, 1/125s, 1/250s, 1/500s, 1/1000s and up to 1/2000s. Lastly, white Balance had several different functions Auto (default)/2300K/2800K/3200K/4000K/4500K/5000K/5500K/6000K
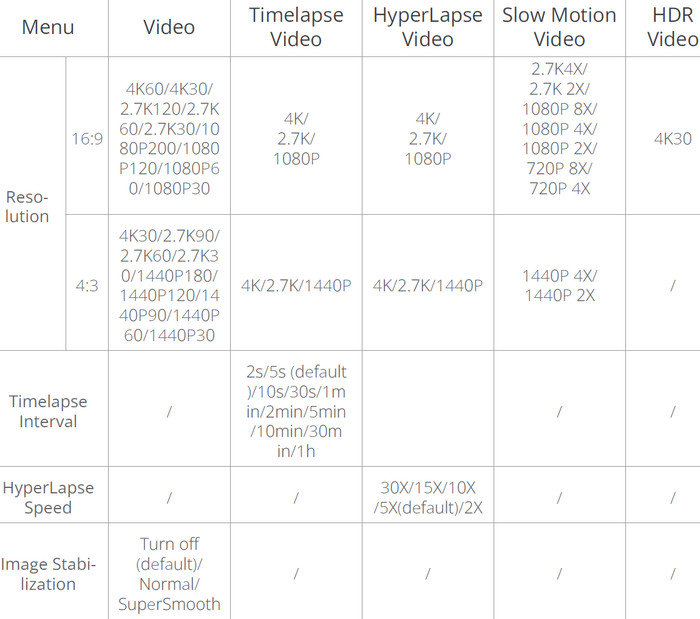
Below are the full specifications concerning Video formats.
and for images
Full Technical Specifications
microSD recommendation |
U3; up to 512GB (FAT32; 4GB file split) |
Wireless |
RF 2.4G + Wi‑Fi; 2.4G / 5G band selection |
Video max |
4K60/ 4K30 / 2.7K120 / 2.7K90 / 2.7K60 / 2.7K30 / 1440P180/ 1440P120 / 1440P60/ 1440P30/ 1080P120 /1080P60 /1080P30 |
Aspect ratios |
16:9 and 4:3 |
Video standards |
NTSC / PAL |
Video codecs |
H.264 / H.265 |
Video modes |
Video, Time Lapse Video, Hyperlapse, Slow Motion, HDR Video |
HDR limit |
4K30 only |
Stabilization |
Off / Normal (EIS + 6-axis gyro) / SuperSmooth (app workflow) |
Bitrate |
High / Medium / Low |
Color |
Normal / Vivid |
Wind noise reduction |
On / Off |
Distortion calibration |
On / Off (availability depends on settings) |
Fragment / loop recording |
Off / 15s / 30s / 180s loop (availability depends on settings) |
HindSight |
10–15s pre-capture buffer |
Vertical capture |
Gyroscope-assisted; 4K and 2.7K not available for vertical video |
Photo max |
20MP (also 12MP) |
Photo modes |
Photo, Time Lapse Photo |
Photo formats |
JPG / JPG+RAW |
Burst |
Configurable burst counts (up to 8 shots/sec behavior) |
Webcam mode |
USB Camera; default 4K30 |
Powering on/off and instant capture
Power on/off is simple: press and hold Power to turn it on, press and hold again to shut down. During recording, I can short-press Power to switch the display off while recording continues.
One Key Fast Shooting is the setting I enable early: pressing Shutter while the camera is off powers it on and starts recording immediately; pressing again stops, saves, and powers off.
Power on/off is simple: press and hold the Power button to turn the camera on, and press and hold again to shut it down. During recording, I can toggle the display off while recording continues, which helps prevent accidental touches and can reduce distractions.
One Key Fast Shooting is the feature I enable early: pressing Shutter while the camera is off powers it on and starts recording immediately; pressing Shutter again stops, saves, and powers off. It’s the fastest way to use the camera like a true grab-and-go action cam.
Navigation model (gesture-first)
The UI is gesture-driven: swipe right for modes, left for playback, up for settings, down for the quick menu (Wi‑Fi, voice control, lock, grid, brightness, preferences). Once it’s muscle memory, it’s fast — but wet touch input can trigger accidental changes.
The interface is gesture-driven: swipe right for the mode menu, left for playback/album, up for video/photo settings, and down for a quick menu (Wi‑Fi, voice control, lock, grid, brightness, preferences). Once this is muscle memory, changing modes and settings is fast.
For Wi‑Fi control, I treat it as a “session” feature: I enable Wi‑Fi from the quick menu when I need it, then expect to manually hop to the camera network on some phones. If I leave Wi‑Fi enabled without connecting, it may shut itself off after a short period, so reconnecting can be a repeat step.
When I’m downloading clips over Wi‑Fi, I expect occasional interruptions—especially with longer transfers—so I keep the phone close, avoid backgrounding the app, and don’t plan on this being a “dump everything quickly” workflow.
Buttons and underwater control
Physical buttons (Power, Shutter, Mode) matter for gloves, wet hands, and underwater use. When submerged, touch can drift; buttons and screen lock are the reliable control path.
Physical buttons (Power, Shutter, Mode) matter for gloves, wet hands, and underwater use. When submerged, touch input can drift due to moisture; buttons and screen lock are the reliable control path.
Physically, the rubberized skin helps grip, but the port hatches are the parts I baby. They’re the most fragile-feeling elements on the camera, and the microSD door can take some fiddling.
Accessories & mounting
The included mounts are plentiful, but quality can vary. I check the camera frame for tight fit: if it’s loose, the camera can wobble slightly inside it, adding visible shake.
The wrist-strap remote is genuinely useful: it’s harder to lose than tiny standalone remotes and makes start/stop control easy without touching the camera.
The in-box plastic frame and mounts are usable, but I pay attention to fit. If the frame is loose, the camera can wobble slightly inside it, which shows up as extra shake. A sturdier metal/aluminum case helps, and mounting options with cold-shoe points make it easier to add a light or mic when the setup allows.
The wrist-strap style remote is also a nice convenience: it’s harder to lose than tiny standalone remotes, and it’s a fast way to start/stop recording without touching the camera.
Recording Modes (What Each One Is For)
Standard Video
This is the main mode. It supports the headline 4K/60 and unlocks most video settings: bitrate, color, wind reduction, distortion calibration, fragment/loop recording, HindSight, and stabilization choices.
Time Lapse Video
Interval capture compiled into a fast-motion clip. I use it for sunsets, traffic/city movement, and travel sequences.
Hyperlapse
Moving timelapse with selectable speed-up factors. It’s one of the more fun modes for travel and hikes when I want a dynamic ‘fast world’ look.
Slow Motion
Slow motion is useful, but it requires dropping below 4K. I plan ahead if I want both high detail and slow-down in the same shoot.
HDR Video
HDR is fixed to 4K30. I treat it as an alternate look, not a default — and I don’t expect stabilization + HDR to be the strongest combination here.
Angles / Digital framing
The camera offers multiple angle/framing options (Super Wide / Wide / Portrait Perspective / Narrow). Digital angle/zoom quality drops quickly, and angle/zoom can be disabled when stabilization is active, so I plan my framing choices up front.
Mode & Feature Compatibility Cheat Sheet
High-level rules:
- HDR Video is fixed at 4K30.
- Digital angle/zoom is disabled when stabilization is active, and also unavailable in Hyperlapse.
- Audio is mode-dependent; several non-standard modes disable audio recording, and a waterproof housing disables audio.
- SuperSmooth output typically requires app download/processing.
- Vertical capture is gyroscope-assisted; 4K and 2.7K are not available for vertical video.
Practical best practices:
- If I want the widest compatibility and the cleanest workflow, 4K30 tends to be the sweet spot.
- If I need 60fps for action motion, I accept that some stabilization options may be reduced compared to 4K30.
- If I need tighter framing, I plan for stabilization constraints (since angle/zoom and stabilization don’t stack).
- For underwater use, I lock the screen and rely on buttons.
Recommended Settings Profiles (Start Here)
1. Daylight Travel (best overall look)- Mode: Video
- Resolution: 4K30 or 4K60 (60fps for motion; 30fps for broader feature flexibility)
- Stabilization: Normal, or SuperSmooth workflow at supported settings for extra smoothness
- Bitrate: High
- Color: Normal
2. Walking/Running Clips (smoothness priority)
- Mode: Video
- Resolution: 4K30
- Stabilization: SuperSmooth workflow
- Audio: internal mic on; consider an external mic if speaking to camera in wind
3. Cycling / Rough Roads (damage control)
- Mode: Video
- Resolution: 4K30 or 1080p60 depending on what stabilizes best for your mount and roads
- Stabilization: Normal; consider SuperSmooth workflow at supported settings
- Wind reduction: On (expect improvement, not miracles)
4. Underwater / Wet Use (reliability priority)
- Enable screen lock
- Operate with buttons rather than touch
- Resolution: 4K30 or 1080p based on light
- Note: audio is not recorded in a waterproof housing
5. Low Light (best chance of usable footage)
- Prefer lower settings than 4K60 to reduce load/noise
- Color: Normal
- Stabilization: Normal (SuperSmooth can help motion but won’t fix low-light noise limits)
6. Social “Ready-to-Post” Clips
- Use Fragment clips: 15s or 30s
- Mode: Video
- Color: Normal
- Bitrate: High
The primary workflow consideration is stabilization: you can either record with basic in-camera stabilization and transfer files normally, or utilize the highest stabilization tier, which requires the app-side processing pipeline. Because of this, selecting 4K/30 versus 4K/60 is more than just a quality preference—it fundamentally dictates which stabilization paths remain available for the shot.
Lets now see what you can expect from this device...
Video quality in good light
In bright, uncomplicated lighting, the Brave 8 Lite delivers sharp 4K footage with pleasing detail and generally natural color that exceeds typical budget-camera expectations. This makes it a capable tool for travel, hiking, and casual daylight sports.
To maintain this image quality, it is best to keep the camera in its standard wide view. I’ve found that pushing into aggressive digital "narrow" framing causes fine detail to break down and amplifies noise—particularly in shaded areas or shadows—much faster than when shooting at the native focal length.
Exposure & HDR behavior
In high-contrast scenes, such as a bright sky paired with a shaded subject, exposure can be inconsistent and highlights may clip sooner than expected. While an HDR mode is available, it isn't a universal upgrade; it often lifts shadows and exposure so aggressively that the image looks over-bright. In practice, standard video frequently maintains a more natural balance and a more believable result.
Low light
Low light is the Brave 8 Lite's predictable weak spot. As light fades, noise rises quickly and fine detail falls away, moving the camera well outside its comfort zone for dusk rides, indoor action, or night scenes.
While dropping the frame rate from 4K/60 to 4K/30 allows the camera to run a slower shutter and pull more exposure, it doesn't transform this into a night specialist. This adjustment yields slightly more usable results, but the gain in brightness comes at the direct cost of motion clarity.
Stabilization & vibration
Stabilization on the Brave 8 Lite is usable but polarizing. For walking and general handheld movement, results are smooth enough, particularly at the highest supported settings. However, it struggles with high-frequency vibrations like rough roads or MTB chatter, failing to achieve a locked, gimbal-like look.
The primary "gotcha" is that the in-camera stabilization often looks underwhelming on its own; achieving "SuperSmooth" results typically requires the app-side processing pipeline. While manageable for a few clips, this becomes a processing marathon for long shooting days. This workflow is further complicated by a practical annoyance: stabilized clips are often output in short segments of only a few minutes. If you record a long ride or walk, this necessitates a tedious cycle of individual exports and manual stitching during final editing.
Overheating
Thermal management is a significant practical constraint. Recording at high resolutions and frame rates—or performing wireless transfers and app-side processing—can cause the camera to become very hot. When this occurs, it serves as a clear indicator to lower the settings, break up large transfers into smaller batches, and allow the unit to cool down.
Battery behavior & indicator reality
Battery behavior is highly settings-dependent, and the percentage indicator can be inconsistent when pushing the hardware to its limits. On indoor runs at 4K/60, you can expect roughly 80 minutes on a single charge before shutdown, though I plan around more conservative runtimes and keep spares ready.
I also avoid mid-shoot battery swaps unless necessary, as settings can occasionally reset, requiring reconfiguration. High resolutions and frame rates—alongside wireless transfers—increase power draw and cause the body to get noticeably hot, particularly around the lens area. While outdoor airflow helps, thermal management remains a constant constraint; I treat heat as a sign to break up transfers and allow the camera to cool.
Audio & mics
Internal audio is a consistent weak point; voices often sound muffled, small, or harsh, and loud frequencies can distort easily. While wind reduction is available, it cannot erase heavy roar at high speeds. External microphone support exists, but the experience is rarely plug-and-play. Compatibility for USB-C adapters and wireless receivers is narrow, and certain configurations can result in silent or crackly recordings. Consequently, it is vital to test the specific microphone chain before relying on it for important capture. Finally, remember that using a waterproof housing will effectively eliminate audio recording altogether.
Water: waterproof vs usable
The camera is rated for water use without a housing and it can deliver great surface-water clips. But water is also where the experience can become inconsistent: wet touch control can drift, screens aren’t hydrophobic, and fogging/condensation can show up in cool conditions. For underwater use I rely on screen lock and button-first control.
App & transfers
I treat Wi‑Fi as a session feature: enable it, connect, grab what I need, then move on. For large transfers, I expect slow downloads and occasional interruptions, and I avoid backgrounding the app. If I’m relying on app-based stabilization exports, this becomes the main bottleneck of the whole camera.
Long‑term ownership notes (what I’d watch over time)
Over time, the experience with this camera is defined less by headline specs and more by consistency. I treat the port doors, seals, and lens area as primary maintenance points; they are the components most likely to determine whether the device remains dependable for travel and water use.
I also treat the batteries as consumables. If runtimes drift or the indicator becomes unreliable, I assume the cells are aging and plan for at least one spare set. For long trips, I lean on lower settings when 4K/60 isn't strictly necessary, as heat and power draw scale quickly at higher configurations.
Finally, I plan around the workflow. If I am shooting intense action that requires the smoothest possible output, I budget extra time for app-based transfers and processing. When I prefer a clean "shoot → copy → edit" path, I choose settings that keep the workflow simple and bypass the app-side requirements.