Primera Bravo Disc Publisher
3. Hardware and Software Installation
Review Pages
PRIMERA BRAVO OPTICAL PUBLISHING SYSTEM - Page 3
Hardware and Software Installation
Hardware
The installer CD-ROM bundled in the package guides the user through the process of setting up the duplicator. First of all, you have to apply the power to the device. The power adapter supplied with the Publisher is connected into the rear power port of the Publisher.
 Next,
you have to load the discs. All you have to do is to open the Publisher cover
and load the Input Bin with 25 blank discs. Both Output and Input bins can be
placed on the mounting pegs.
Next,
you have to load the discs. All you have to do is to open the Publisher cover
and load the Input Bin with 25 blank discs. Both Output and Input bins can be
placed on the mounting pegs.
In order to install the Ink Cartridges you have to press the cartridge button
to move the Ink Cartridge Carrier to the load position and open the ink cartridge
covers. Slowly remove the tape covering the cartridge's print head, being careful
to avoid damaging the barcode label on the underside of the cartridge. Insert
the ink cartridges into the carrier, copper end first, and snap the cartridge
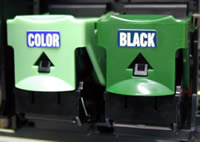
cover in place. Insert the color one in the left holder, the monochrome black
in the right cartridge holder. In the following picture you can see the cartridges
as they are normally installed on the printer.
The next step is to connect the FireWire cable. The IEEE 1394 cable carries the data that will be sent to the recorder when producing discs. If necessary, install first a compatible FireWire board in your PC. Connect the 6 Pin FireWire cable included with your Publisher. Connect the other end to the FireWire board's output port on your PC. After the connection, Windows will recognize the built-in recorder of the Publisher. In our case, the Teac recorder was identified as "Initio W540E", as the following picture shows:

Driver Installation
The data are transferred to the Publisher through the USB cable, also available in the Publisher package. Connect the Publisher to your PC using the beige USB Cable. After a few moments, Windows 2000 will tell you it has found new hardware and is looking for software to install it. By allowing Windows to install the software automatically, you may see a notice like the one shown here stating that the Optical Disc has not passed Windows Logo Testing.

Click Install Anyway to continue installing the printer driver for your Publisher. Windows 2000 recognized the new device as "Disc Publisher", as you can see below:

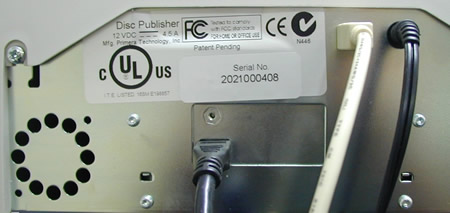
After connecting all the essential cables the rear panel of the Publisher must look as the following picture shows:
After the printer driver software for the Publisher has been installed, click Next and you will see a screen to select the language for the software. Select a language and you will be guided through installing both SureThing CD Labeler and Prassi PrimoDVD 2.0. Once installation has completed, reboot your computer.
Review Pages