Primera Bravo Disc Publisher
5. Creating a publishing job
PRIMERA BRAVO OPTICAL PUBLISHING SYSTEM - Page 5
Creating a new publishing job
As we have mentioned the software bundled in the Publisher package is the Prassi
PrimoDVD 2.0 and the SureThing Disc Labeler. With Prassi PrimoDVD 2.0 you will
be able to create your data, audio or any other type of CD/DVD compilations
or copy your favorite CD/DVD discs, while SureThing Disc Labeler is the tool
for creating your own designs on your DVD/CD media. Both software are available
in the installation CD-ROM in the package.
After a successful installation of the Publisher and the software suite, we
are free to launch the PrimoDVD 2.0. The following picture will appear when
you launch the Primo, asking you to select the drive to be used with the Publisher:

We chose the "Teac CD-W540E" drive, since this is the drive available in the CD Publisher we tested. The next dialog box appears and prompts the user to launch the SureThing CD Labeler program in order to design a print image for the disc before proceeding to the recording process:
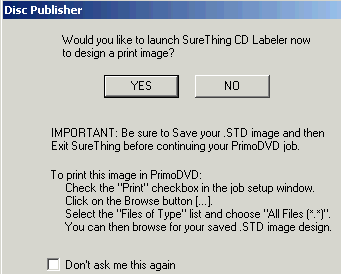
 Let's
select "YES" to launch the SureThing CD Labeler.
Let's
select "YES" to launch the SureThing CD Labeler.
A wizard window comes up and lets you adjust the basic settings for your new
design. You can select the printer you want to use, among other possible printers
connected to your PC. In our case, we select the "CD Color Pinter"
and continue with the selection of the background of our design. We can choose
among the built-in background or import our own.
Next, we can select any layout or start from an existing Smart Design in order
to create our own. This is the last step of the wizard and after that, the main
design window appears. Note that user can also proceed to the main design window
(blank design) from the first step of the wizard.
As you can see below, in the main window there is a circular CD layout that
offers the user the chance to easily add text on the layout and also to take
a first look at the printing output. On the left you see the design bar where
you select the type of the background, the text or the logos you can add to
the CD layout. On the top there are two more toolbars, the design editor Speed
Tools and the design editor Control Strip toolbars.

 The
speed tools enable the user to manage the items of the template, change the
text formatting, calibrate the printer, and print. The design editor Control
Strip helps the user to change the text formatting by choosing among various
fonts, the Bold, Italic, or Underline attributes, text color, etc.
The
speed tools enable the user to manage the items of the template, change the
text formatting, calibrate the printer, and print. The design editor Control
Strip helps the user to change the text formatting by choosing among various
fonts, the Bold, Italic, or Underline attributes, text color, etc.
You can select one of the 32 Smart design backgrounds for your printings or
use your own background from a file on your hard disk. You have also the chance
to set the background color (shade and pattern) in the "set background
color" window.
The user can add some logos and clipart in his design using the Logos/Clipart
tab. The software provides some ready to use CD & Media symbols to insert
or you can use the Picture Tool, where you select the inserting image from your
disk and then you can easily place it anywhere on the CD printing area, with
the additional capability for precise size adjustment.
The Text Effect tab offers the user two choices: Using the text effect wizard
to insert text in the layout or to use the text effect tool. In a four step
session you select the shape of your text from eight sample patterns, the variation
of the text, the text color, the text shadow, border color, and font and text
size.
Using the text effect tool we are offered more detailed choices. Text shades,
text color, background color, text borders and much more can easily be adjusted.
Some sample text types are also provided for quick and easy selection. The inserted
text can be printed in a circular, angled or straight perspective, satisfying
any possible layout preference. For adding text, the software gives four choices,
three for adding text and one for symbol insertion. The first choice is to add
text using the New Text Fame option. A box will appear into the CD printing
area and user can write the text there. You can move or change the text size
using your mouse with a simple right-click and turning to the object mode. The
second choice is the use of the Text Frame tool where you manually select the
text inserting area and then move the text potentially. The program also provides
some ready to use text forms about User Info, Name, country, address and many
more. Also you can choose from a variety of symbols classified in five different
fonts.
Once we have finished our design, we could save it as a SureThing Design (*.STD) file format. Moreover, the Publisher also supports print files (*.PRN) from any application (including SureThing), such as Adobe Illustrator and CorelDraw!. This flexible option might be very handy for all those who wish to print their favorite designs already made by these popular design applications.


