Freecom Traveller II
1. Data Tests
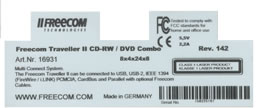
Freecom Traveller II combo CDRW/DVD- Page 1
- Introduction
![]() Freecom
Traveller II combo drive is a CD-RW and DVD combo player, designed for all those
that ask for a portable drive able to write their dailly CD-R/RW and read almost
all kind of DVD media in the same drive.
Freecom
Traveller II combo drive is a CD-RW and DVD combo player, designed for all those
that ask for a portable drive able to write their dailly CD-R/RW and read almost
all kind of DVD media in the same drive.
 Freecom
Traveller II is an 8X4X24 CD-RW drive plus an 8X DVD-ROM. The drive can also
play MP3 files and can be externally/battery powered. The drive offers a connection
interface flexibility due to Freecom Multi connect interface. Parallel, PCMCIA,
USB, USB-2, CardBus or IEEE-1394 (FireWire/ i.LINK) can be used by simply attaching
to the drive a different FREECOM Cable.
Freecom
Traveller II is an 8X4X24 CD-RW drive plus an 8X DVD-ROM. The drive can also
play MP3 files and can be externally/battery powered. The drive offers a connection
interface flexibility due to Freecom Multi connect interface. Parallel, PCMCIA,
USB, USB-2, CardBus or IEEE-1394 (FireWire/ i.LINK) can be used by simply attaching
to the drive a different FREECOM Cable.
- Features
- 8x writing, 2/4x re-writing, 24x reading (CD), 8x DVD
- MP3 and audio playback
- Supported Interfaces: Freecom Multi Connect USB 1.1,
2/" Firewire (IEEE 1394)/PCMCIA/Parallel/CardBus
- Dimensions: 14.5 x 14.5 x 1.7 cm (L x W x H)Weight:
450 gr without power module, 600 gr with power module
- Buffer: 2MB
- JustLink anti-buffer underrun
- Write methods: TAO, SAO, Packet writing
- Unpacking
 The
supplied package was the retail European contained except from the drive, a
manual CD-ROM, Roxio Easy CD Creator and DirectCD v5.1 as writing/packet writing
software, Cyberlink Power DVD v3.0 as DVD movie software. The package also included
a 24X 700MB blanc CD-R, a quick install manual, a CD-R pen, a warranty registration
form, a pluggable power module and the AC power adapter. The connection cables
are excluded and can by provided by Freecom stores. The drive comes with a 2-year
warranty (for Europe only) .
The
supplied package was the retail European contained except from the drive, a
manual CD-ROM, Roxio Easy CD Creator and DirectCD v5.1 as writing/packet writing
software, Cyberlink Power DVD v3.0 as DVD movie software. The package also included
a 24X 700MB blanc CD-R, a quick install manual, a CD-R pen, a warranty registration
form, a pluggable power module and the AC power adapter. The connection cables
are excluded and can by provided by Freecom stores. The drive comes with a 2-year
warranty (for Europe only) .
 The
design of the drive is smart and stylish. The drive has a front-open tray and
on the top there is the "Freecom" logo.
The
design of the drive is smart and stylish. The drive has a front-open tray and
on the top there is the "Freecom" logo.
On the face of the drive there are the eject button, the emergency eject hole and the access indicator led.

On the rear panel there are the power and the interface connectors. Freecom provides various cables for connecing via Parallel, IEEE 1934, USB II, PCMCIA / Cardbus.

Also, there are two operation status leds, that light to orange according to the external / battery power supply condition.

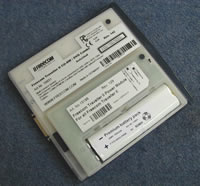
Battery Powered
 Frecom
Traveller II can be also powered by Ni MH rechargables batteries provided by
Freecom. The batteries should be placed in the Freecom power module which comes
with the drive and is showed on the right.
Frecom
Traveller II can be also powered by Ni MH rechargables batteries provided by
Freecom. The batteries should be placed in the Freecom power module which comes
with the drive and is showed on the right.
 To
install the batteries you should firstly disconnect the drive from power and
from the PC/notebok Put the drive upside down and release the safe on the left
to open the cover, in the place where the power module should be plugged.
To
install the batteries you should firstly disconnect the drive from power and
from the PC/notebok Put the drive upside down and release the safe on the left
to open the cover, in the place where the power module should be plugged.
Plug the power module on the back of the drive and then the battery, as shown below


Place the battery cover that comes in the retail package and connect the drive to the PC/notebook
The battery should be charged before use. For charging the battery it is necessary that the external power supply is connected to the device and the Freecom cable is connected to the device but not to the PC/notebook The battery should be charged for at least five to six hours.
 On
the power module there is an "Ext Power" / "Batt. only"
switch. If the drive is connected through USB/Parallel/IEEE 1394 interfaces,
and the power pack is not connected to the device, the battery is in use and
does not recharge during operation in both "Ext. Power" / "Batt.
only" switch settings. Especially for the case of PCMCIA/CardBus connection
interfaces, in the "Ext. Power" switch setting, the drive is powered
from the notebook and the battery, meaning that the battery buffers the power
fluctuations from the notebook. In the same situation, the battery recharges
when the drive is in standby mode.
On
the power module there is an "Ext Power" / "Batt. only"
switch. If the drive is connected through USB/Parallel/IEEE 1394 interfaces,
and the power pack is not connected to the device, the battery is in use and
does not recharge during operation in both "Ext. Power" / "Batt.
only" switch settings. Especially for the case of PCMCIA/CardBus connection
interfaces, in the "Ext. Power" switch setting, the drive is powered
from the notebook and the battery, meaning that the battery buffers the power
fluctuations from the notebook. In the same situation, the battery recharges
when the drive is in standby mode.
When the power pack is connected to the drive, the drive is powered by the power pack and the battery recharges when the drive is in the standby mode, regardless the swicth setting.

- Installation
 We installed the drive and after reboot we saw that Nero identified the drive
as "TEAC DW-28E"! Should we expect another Teac drive performance?
Probably yes, see more in the result pages.
We installed the drive and after reboot we saw that Nero identified the drive
as "TEAC DW-28E"! Should we expect another Teac drive performance?
Probably yes, see more in the result pages.
We unchecked the "Auto Insert Notification" and were ready for testing. Freecom Traveller II was connected through IEEE 1934 (FireWire) interface.The Freecom Traveller II drive had the firmware revision v1.0A installed. We used Nero (5.5.6.4), InCD (3.14), CloneCD (3.2.3.1) and Padus DJ (3.50.818) for the recording tests.
- Test Machine
 WinMe/XP
OS
WinMe/XP
OS
Soyo 7VCA
Celeron II 566 over clocked to 850 MHz
128MB SDRAM PC 133
WD 18GB UDMA 66
Quantum Fireball EX 6.4 GB UDMA 33
DAWI 2975 - PCI (ULTRA) SCSI Host Adapter
ATI AIW 128
Adaptec's USB2connect 3100LP PCI card