Primera Inscripta Thermal CD Printer
3. Installing Ribbons
Primera Inscripta Thermal Printer - Page 3
Installing Ribbons
- Preparing for use
 To
enjoy your CD printings you should firstly install an ink ribbon to the printer.
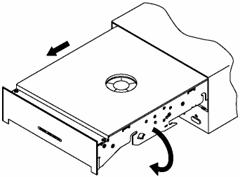
With the power on, you eject the tray and then you pull it forward to totally
remove it from the main unit. Then you press the Ribbon Catridge eject Button
and pull the Ribbon Catridge carefully out. The brochure says that you can "hot
swap" the print head. What does this mean?
To
enjoy your CD printings you should firstly install an ink ribbon to the printer.
With the power on, you eject the tray and then you pull it forward to totally
remove it from the main unit. Then you press the Ribbon Catridge eject Button
and pull the Ribbon Catridge carefully out. The brochure says that you can "hot
swap" the print head. What does this mean?
 Hot-swapping
is another innovative and exclusive feature of Inscripta. As you probably know
by now, the ribbon is housed in a removable cartridge which also contains the
print head. Without removing power, you can swap the cartridge (this is "hot"
swapping) and put another spare cartridge in its place. There are three major
advantages to this:
Hot-swapping
is another innovative and exclusive feature of Inscripta. As you probably know
by now, the ribbon is housed in a removable cartridge which also contains the
print head. Without removing power, you can swap the cartridge (this is "hot"
swapping) and put another spare cartridge in its place. There are three major
advantages to this:
1. In high-production environments, you have no down-time when
a ribbon change is necessary.
2. When and if a print head needs to be replaced, you can swap in a new cartridge
and keep printing while you replace the worn-out print head.
3. Users who use both one-color and two-color ribbons can keep one cartridge
each loaded with the different types of ribbons and quickly swap back and forth,
 Then
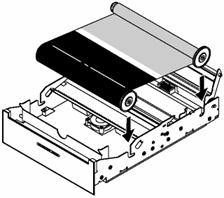
you turn the Ribbon Catridge upside down and lift up the front and the rear
hold-down bracket by pulling the bracket up and pressing backwards. Notice that
the shaft of the Ribbon hold-down bracket is allotted on the gear side.
Then
you turn the Ribbon Catridge upside down and lift up the front and the rear
hold-down bracket by pulling the bracket up and pressing backwards. Notice that
the shaft of the Ribbon hold-down bracket is allotted on the gear side.
Insert the ribbon in the slots towards you. Place the take-up reel in the slots located in the end of the printer as shown in the picture.
 What's
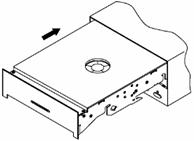
left is to close the Ribbon Hold-Down brackets and to insert the Ribbon Catridge
back into the printer till it docks securely.
What's
left is to close the Ribbon Hold-Down brackets and to insert the Ribbon Catridge
back into the printer till it docks securely.
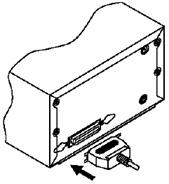
The next step is to apply to the power to the printer and to connect it to the computer. Applying the power is rather easy .What you have to do is to place one end of the adapter cord (adapter supplied with the printer) into the power jack on the rear panel of the printer.
 Then
plug the power cord of the adapter into an available wall outlet. Once the power
cord is connected, the printer will automatically turn ON as indicated by the
LED status light illuminating and blinking every two seconds. This is the printer's
normal "waiting" for data mode.
Then
plug the power cord of the adapter into an available wall outlet. Once the power
cord is connected, the printer will automatically turn ON as indicated by the
LED status light illuminating and blinking every two seconds. This is the printer's
normal "waiting" for data mode.
The printer is equipped with a standard 8-bit Centronics-type
parallel port. This port is the means through which receives data from the PC.
To connect the device to the PC simply obtain a parallel cable (preferably IEEE
1284-compilant) and connect it to the printer (don't forget to snap the fastening
clips into place). The other side of the cable connects to the computer at LPT1,
LPT2, or parallel connector: