Breaking News

DZOFILM Expands Arles Cine Lens System With 25–75mm and 65–180mm T2.6 Zooms G.SKILL Launches Trident Z5 Royal NeoX Series DDR5 Memory with AMD EXPO Technology XERON Launches NEX A61 ARGB CPU Air Cooler Viltrox to Unveil New Lenses And Production Solutions at IBC2026 ASUS Announces WiFi 8 Router

logo

  • Share Us
    • Facebook
    • Twitter
  • Home
  • Home
  • News
  • Reviews
  • Essays
  • About
    • Submit News

    • Contact Us
    • Privacy

    • Promotion
    • Advertise

    • RSS Feed

Search form

Nero DVD-Rom Guide

Nov 11,2003 0

2. Step1


Review Pages

1. Introduction
2. Step1
3. Step2
4. Step3
5. Step4
6. Step5


“Nero Burning Rom DVD-ROM (ISO)”

Running Nero

Begin by putting your media into the DVD recorder drive (if you haven't already done so) and launch Nero (you should have a shortcut on your desktop, or select it by going Start>Programs>Nero>Nero Burning ROM). As soon as the application opens, a dialog box is briefly displayed with the program's version details, owner, etc. This is followed by the "New Compilation" dialog screen.

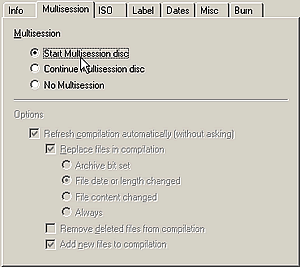
Select the option DVD from the drop-down menu located on the top left corner. Below the drop-down selection will appear a series of icons listing the various activities that can be performed on DVD media. For our purposes, select the DVD-ROM (ISO) icon. In the Multisession section (screen shot below), select one of the following:

  • Start Multisession disc if this is a new media that has never been written to. With this option selected, it is possible to burn more data on the media sometime in the future, hence the name multisession.
  • Continue Multisession disc if the media has been created at a previous session using the Start Multisession disc option. In this way it is possible to append or update data already written on the media.
  • No Multisession if this is going to be a one time burn and no more data is going to be written in the future. This restriction also applies to rewriteable media, which will require that you erase the rewriteable media first, before being able to write new data.

Since we are starting with a new, unwritten to media, choose Start Multisession disc

.
 

Next, select the Label tab as shown below, and enter a volume label for your media. By default, Nero enters the label NEW, but you can enter any name you like, up to a maximum of 32 characters. Applications such as Windows Explorer show the volume label along with the drive letter which can help identify the media in the drive. If you forget or don't want to enter a volume name at this point, you can enter a volume label later on.


On the top right corner of the dialog screen, press the "New" button.


Only if under the Multisession section you chose Continue Multisession disc, you will now see a screen similar to the following:
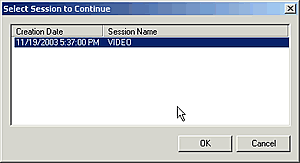
This lists any previous sessions written on the media. Choose the last session and press OK.

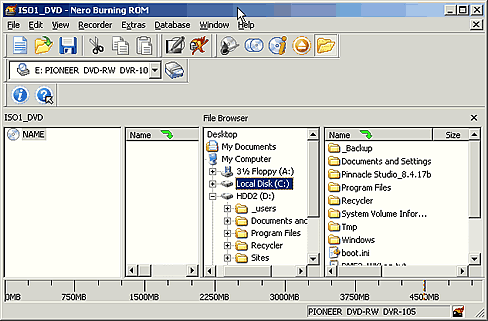
Regardless of the multisession options chosen, the following screen should now appear.


Review Pages

1. Introduction
2. Step1
3. Step2
4. Step3
5. Step4
6. Step5


Pages

  • « first
  • ‹ previous
  • 1
  • 2
  • 3
  • 4
  • 5
  • 6
  • next ›
  • last »

Tags:
Previous Post
Philips DVR824P
Next Post
How to backup a DVD movie

Related Posts

Latest Reviews

Ugreen CM642 USB4.0 Enclosure
PC components

Ugreen CM642 USB4.0 Enclosure

be quiet! Dark Power 14 IO
PC components

be quiet! Dark Power 14 IO

SanDisk High Endurance 512GB microSDXC
Cameras

SanDisk High Endurance 512GB microSDXC

Samsung PRO Ultimate 512GB microSDXC
Cameras

Samsung PRO Ultimate 512GB microSDXC

be quiet! Light Mount TKL
Consumer Electronics

be quiet! Light Mount TKL

Popular News

CORSAIR announces Vanguard Pro 96 and Vanguard 96 Gaming Keyboards

CORSAIR announces Vanguard Pro 96 and Vanguard 96 Gaming Keyboards

MSI Launches FORGE GK600 TKL WIRELESS Special Edition Compact Mechanical Keyboard

MSI Launches FORGE GK600 TKL WIRELESS Special Edition Compact Mechanical Keyboard

Panasonic Introduces the First Ultra-Telephoto Zoom Lens in the LUMIX S Series

Panasonic Introduces the First Ultra-Telephoto Zoom Lens in the LUMIX S Series

MSI’s Latest AMD X870E MAX & EVO Series Motherboards

MSI’s Latest AMD X870E MAX & EVO Series Motherboards

COLORFUL Launches iGame B850M ULTRA Series Micro-ATX Motherboards

COLORFUL Launches iGame B850M ULTRA Series Micro-ATX Motherboards

COLORFUL Presents Limited Edition Chitu MAG-60 Magnetic Keyboard Inspired by the Year of the Horse

COLORFUL Presents Limited Edition Chitu MAG-60 Magnetic Keyboard Inspired by the Year of the Horse

COLORFUL Presents iGame Z890 ULTRA-S W and iGame Z890M ULTRA Z Motherboards

COLORFUL Presents iGame Z890 ULTRA-S W and iGame Z890M ULTRA Z Motherboards

LIAN LI Launches 8.8” Universal Screen with Flexible Mounting Solution

LIAN LI Launches 8.8” Universal Screen with Flexible Mounting Solution

Main menu

  • Home
  • News
  • Reviews
  • Essays
  • About
    • Submit News

    • Contact Us
    • Privacy

    • Promotion
    • Advertise

    • RSS Feed
  • About
  • Privacy
  • Contact Us
  • Promotional Opportunities @ CdrInfo.com
  • Advertise on out site
  • Submit your News to our site
  • RSS Feed