Breaking News

Fanatec and Trak Racer showcase the future of simulation at SimRacing Expo Frankfurt 2026 Razer Unveils the Barracuda V2 Pro ASUS Republic of Gamers Announces Bulwark Dock DG310 Akasa Announces Fermi CM5 Fanless Case for Raspberry Pi Compute Module 5 LG Electronics Advances the LG Sound Suite Experience With New DTS

logo

  • Share Us
    • Facebook
    • Twitter
  • Home
  • Home
  • News
  • Reviews
  • Essays
  • About
    • Submit News

    • Contact Us
    • Privacy

    • Promotion
    • Advertise

    • RSS Feed

Search form

JingTing Force (JTS-0005)

Apr 27,2006 0

2. Installation


Review Pages

1. Introduction
2. Installation
3. Performance
4. Conclusion


The Force cooler looks quite impressive, well for a chipset cooler anyway. There is no comparison between the stock cooler and the Force's copper base and 29 fins.

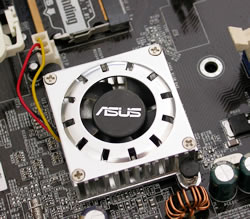
Stock Cooler

The retail package includes all necessary components in order to install the Force cooler.

Consult your motherboard's manual in order to find which chipset is the main one. Usually, it is quite easy to spot. On our ASUS motherboard, the NForce4 is located just away from the processor, on the corner formed by the RAM and VGA card sockets.

If you uninstall the stock cooler, you will then see the main chipset, which in our case was the NForce4.

First, you'll have to remove the motherboard from the PC case, since you have pass two of the long screws from the behind, as shown below:
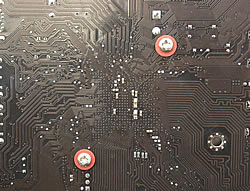
From the upper side of the motherboard, secure the screws with the nuts. There is no need to over tighten, hand tight will do, so there's no need to use a tool here.

Normally, you should use two washers between the board and the nut. The bottom washer is non-metallic and the top is metallic.
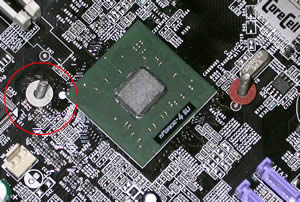
But it may not always be possible with some motherboards, as in the case of the MSI motherboard we tried. As you can see below, there is not enough space for the washers to sit properly, and could do more damage than good here, especially if the metal washer is used. In this case, you would probably only use the non-metallic washer, cutting it so that it doesn't find on any surrounding components.

Don't forget to peel off the transparent protective strip from the copper base before installing it onto the chipset.

Put some thermal compound on the chipset. Included with the Force cooler, is a rectangular piece of spongy material which sits on the outskirts of the chipset as shown below. We believe this is there to help keep the cooler's base at an even distance from the top surface of the chipset although it is so soft, that it can hardly offer any real resistance.

Place the Force cooler onto the chipset and use the appropriate parts to fasten it, as shown below.
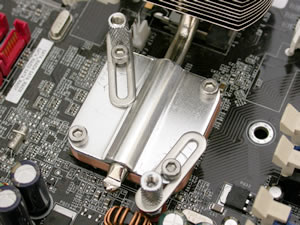
Don't forget to connect the fan's power cable to the motherboard.

The Force is now in place and looks quite impressive.
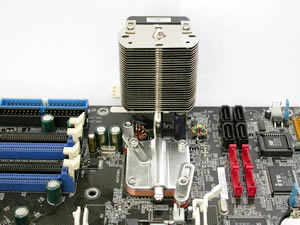
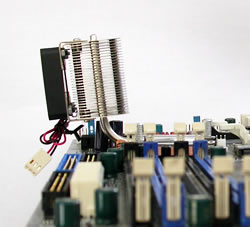
Its dimensions shouldn't extend beyond the motherboard, while it can be positioned at just about any angle, depending on available space and best fit. You shouldn't have any problems, no matter the motherboard, but check first to make sure since there's no way we can test the installation with every available motherboard.
 

Review Pages

1. Introduction
2. Installation
3. Performance
4. Conclusion


Pages

  • « first
  • ‹ previous
  • 1
  • 2
  • 3
  • 4
  • next ›
  • last »

JingTing

Tags: JingTing
Previous Post
LiteOn SLW 831SX
Next Post
Super DVD Creator

Related Posts

Latest Reviews

Fanxiang MP83 M.2 NVMe SSD Enclosure
Enterprise & IT

Fanxiang MP83 M.2 NVMe SSD Enclosure

Ugreen CM642 USB4.0 Enclosure
PC components

Ugreen CM642 USB4.0 Enclosure

be quiet! Dark Power 14 IO
PC components

be quiet! Dark Power 14 IO

SanDisk High Endurance 512GB microSDXC
Cameras

SanDisk High Endurance 512GB microSDXC

Samsung PRO Ultimate 512GB microSDXC
Cameras

Samsung PRO Ultimate 512GB microSDXC

Popular News

MSI’s Latest AMD X870E MAX & EVO Series Motherboards

MSI’s Latest AMD X870E MAX & EVO Series Motherboards

COLORFUL Launches iGame B850M ULTRA Series Micro-ATX Motherboards

COLORFUL Launches iGame B850M ULTRA Series Micro-ATX Motherboards

COLORFUL Presents Limited Edition Chitu MAG-60 Magnetic Keyboard Inspired by the Year of the Horse

COLORFUL Presents Limited Edition Chitu MAG-60 Magnetic Keyboard Inspired by the Year of the Horse

COLORFUL Launches iGame B850I MINI OC V14 Motherboard

COLORFUL Launches iGame B850I MINI OC V14 Motherboard

COLORFUL Launches the iGame X870E VULCAN W OC Motherboard

COLORFUL Launches the iGame X870E VULCAN W OC Motherboard

COLORFUL Presents iGame Z890 ULTRA-S W and iGame Z890M ULTRA Z Motherboards

COLORFUL Presents iGame Z890 ULTRA-S W and iGame Z890M ULTRA Z Motherboards

COLORFUL Expands B850 Motherboard Lineup with New CVN, Battle-Ax, and MEOW Models

COLORFUL Expands B850 Motherboard Lineup with New CVN, Battle-Ax, and MEOW Models

ASRock Adds Support for One Sub-Channel DRAM Module on Intel DDR5 Motherboards

ASRock Adds Support for One Sub-Channel DRAM Module on Intel DDR5 Motherboards

Main menu

  • Home
  • News
  • Reviews
  • Essays
  • About
    • Submit News

    • Contact Us
    • Privacy

    • Promotion
    • Advertise

    • RSS Feed
  • About
  • Privacy
  • Contact Us
  • Promotional Opportunities @ CdrInfo.com
  • Advertise on out site
  • Submit your News to our site
  • RSS Feed