Breaking News

Akasa Introduces M.2 NVMe SSD to PCIe Adapter Card with Removable Tray be quiet! raises the bar with the new Dark Power Pro 14 IO power supply series Geometric Future Unveils Model 3 Case, Eskimo Plus 36 AIO, and Squama 3003-12 Fans ZOTAC GAMING Launches GeForce RTX 5080 SOLID CORE OC 20th Anniversary Edition Google Unveils Pixel 11 Series, Pixel 11 Pro Fold, Pixel Watch 5, and Pixel Tag

logo

  • Share Us
    • Facebook
    • Twitter
  • Home
  • Home
  • News
  • Reviews
  • Essays
  • About
    • Submit News

    • Contact Us
    • Privacy

    • Promotion
    • Advertise

    • RSS Feed

Search form

be quiet! Pure Loop 2 FX (280mm)

Aug 16,2022 0

3. Installation process


Review Pages

1. Introduction
2. Retail Package
3. Installation process
4. Performance
5. Conclusion


Installing the CPU cooler requires several steps. For our tests we used an AMD4 CPU (AMD Ryzen 5600X), so we had either view the online video from be quiet! or simply read the included manual some basic steps are mentioned below:

1. To permit mounting of the cooler please remove both the plastic retainers of the AMD retention module. The factory fitted backplate affixed to the rear side of the motherboard will be needed for subsequent installation of the cooler.

2. Place the 4x AMD spacer nuts onto the backplate bolts protruding through the front side and affix both short AMD mounting brackets with the AMD backplate screws.

3. Affix the fans to the radiator with the fan mounting screws. We recommend installation in a push configuration. With the fans facing towards the model name on the radiator, mount them on the hose side.
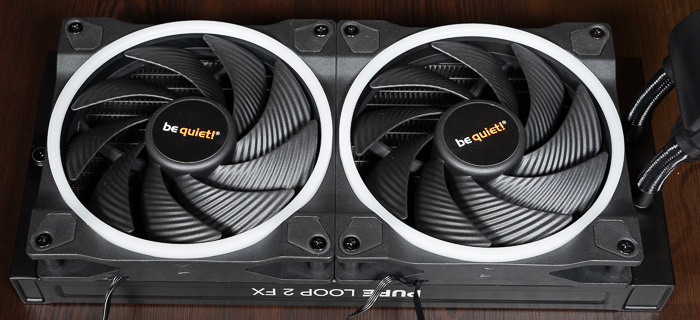
4. Affixing the radiator to the case. That step depending your case may vary. The main idea is to keep the radiator above the CPU level to keep air at the top. Since our case was the bequiet! Silent Base 802 we removed the included top fan tray and we installed the radiator with the fans and secured with the included screws.

Depending to your motherboard you may face installation problems if you try to place the Pure Loop 2 FX at several places as the below picture illustrates

In order to solve this, you simply need to push the radiator full front and you will have no clearance issues.

5. Mount the ARGB-PWM-Hub with the Hub mounting screws or the double sided tissue tape on a suitable position in your PC case. We recommend either the rear of the mainboard tray or a 2.5” HDD slot. Next, connect the 5V ARGB pin and the PWM pin with the mainboard. Then connect the SATA connector with the PSU. Now connect the ARGB connector and the PWM connector of the fans with the ARGBPWM- Hub. The connector marked RPM carries the rpm signal of the connected device to the Mainboard fan header.

6. First remove the protective foil from the underside of the cooler. Spread the thermal paste on the surface of the CPU. The amount supplied is sufficient for one or two applications.

7. Place the CPU block centrally over the short AMD mounting brackets, such that these allow the CPU block to be screwed down. For this you can use a normal crosshead screwdriver. Next connect the pump and the ARGB illumination to the ARGB-PWM-Hub.

8. Pure Loop 2 FX enables you to synchronize the ARGB illumination of up to 6 ARGB devices with the motherboard by the ARGB-PWM-Hub. When the ARGB-PWM-Hub is mounted into the case, the ARGB illumination is being controlled by the motherboard software. Warning: The ARGB connector may only be connected to a 5V ARGB header.

9. Refilling the system: Topup the system after about two years of use. In order to do this, first detach the radiator from the case. The filling port is on the opposite end of the hoses. Open this as well as the bottle with cooling fl uid. Rotate the bottle into the filling port. Hold the radiator so that the filling port is at the highest level with the bottle upended over it.
Then lightly squeeze the bottle. Repeat this until no further air bubbles appear in the bottle.


Review Pages

1. Introduction
2. Retail Package
3. Installation process
4. Performance
5. Conclusion


Pages

  • « first
  • ‹ previous
  • 1
  • 2
  • 3
  • 4
  • 5
  • next ›
  • last »

be quiet!

Tags: be quiet!
Previous Post
Do You Use Edge Browser?
Next Post
be quiet! Pure Rock 2 FX

Related Posts

  • be quiet! raises the bar with the new Dark Power Pro 14 IO power supply series

  • be quiet! expands its peripheral lineup with Light Mount TKL and Mousepad XL

  • be quiet! Light Loop IO LCD

  • be quiet! introduces Light Loop IO LCD

  • be quiet! unveils new power, cooling, and peripheral lineup

  • be quiet! Dark Rock Pro 6

  • be quiet! introduces Dark Rock Pro 6 and Dark Rock 6

  • be quiet! Pure Power 13M 1200W

Latest Reviews

be quiet! Light Loop IO LCD
Cooling Systems

be quiet! Light Loop IO LCD

KIOXIA Exceria Pro G2 NVME 2TB
PC components

KIOXIA Exceria Pro G2 NVME 2TB

Online Casino Games That Offer Something Different
Consumer Electronics

Online Casino Games That Offer Something Different

SOUNDPEATS Air6 HS
Consumer Electronics

SOUNDPEATS Air6 HS

Arctic MX-7
Cooling Systems

Arctic MX-7

Popular News

CORSAIR announces Vanguard Pro 96 and Vanguard 96 Gaming Keyboards

CORSAIR announces Vanguard Pro 96 and Vanguard 96 Gaming Keyboards

MSI Launches FORGE GK600 TKL WIRELESS Special Edition Compact Mechanical Keyboard

MSI Launches FORGE GK600 TKL WIRELESS Special Edition Compact Mechanical Keyboard

TEAMGROUP Launches EXPERT P34F Find My External SSD

TEAMGROUP Launches EXPERT P34F Find My External SSD

Samsung announces Galaxy Tab S11 and Galaxy S25 FE series

Samsung announces Galaxy Tab S11 and Galaxy S25 FE series

Viltrox Showcases Upcoming Lens Lineup and New TTL Flash at IBC 2025

Viltrox Showcases Upcoming Lens Lineup and New TTL Flash at IBC 2025

Panasonic Introduces the First Ultra-Telephoto Zoom Lens in the LUMIX S Series

Panasonic Introduces the First Ultra-Telephoto Zoom Lens in the LUMIX S Series

MSI Launches DATAMAG 40Gbps Magnetic Portable SSD

MSI Launches DATAMAG 40Gbps Magnetic Portable SSD

Viltrox Joins the L-Mount Alliance, Expanding Creative Possibilities

Viltrox Joins the L-Mount Alliance, Expanding Creative Possibilities

Main menu

  • Home
  • News
  • Reviews
  • Essays
  • About
    • Submit News

    • Contact Us
    • Privacy

    • Promotion
    • Advertise

    • RSS Feed
  • About
  • Privacy
  • Contact Us
  • Promotional Opportunities @ CdrInfo.com
  • Advertise on out site
  • Submit your News to our site
  • RSS Feed