Breaking News

ASUS Announces WiFi 8 Router DJI Launches Osmo 360 II Razer introduces Clio X Wireless Speaker Head Cushion That Delivers THX Spatial Audio LiberNovo Showcases Ergonomic Innovation at IFA 2026 with Maxis Series for Big And Tall Users TIMEKETTLE UNVEILS NEW W4 PLUS AI INTERPRETER EARBUDS EXPANDING REAL-TIME TRANSLATION ACROSS CALLS, MEETINGS AND MULTIMEDIA CONTENT

logo

  • Share Us
    • Facebook
    • Twitter
  • Home
  • Home
  • News
  • Reviews
  • Essays
  • About
    • Submit News

    • Contact Us
    • Privacy

    • Promotion
    • Advertise

    • RSS Feed

Search form

be quiet! Light Loop 360mm

Sep 13,2024 0

3. Installation


Review Pages

1. Introduction
2. Retail Package
3. Installation
4. Tests
5. Conclusion


Installing the CPU cooler requires several steps. be quiet! has an installation online video for both AMD/Intel or simply read the included manual some basic steps are mentioned below:

1. To permit mounting of the cooler please remove both the plastic retainers of the AMD retention module. The factory fitted backplate affixed to the rear side of the motherboard will be needed for subsequent installation of the cooler.

2. Place the 4x AMD spacer nuts onto the backplate bolts protruding through the front side and affix both short AMD mounting brackets with the AMD backplate screws.

3. Affix the fans to the radiator with the fan mounting screws. We recommend installation in a push configuration. With the fans facing towards the model name on the radiator, mount them on the hose side.

4. Affixing the radiator to the case. That step depending your case may vary. The main idea is to keep the radiator above the CPU level to keep air at the top.

5. Mount the ARGB-PWM-Hub with the Hub mounting screws or the double sided tissue tape on a suitable position in your PC case. We recommend either the rear of the mainboard tray or a 2.5” HDD slot. Next, connect the 5V ARGB pin and the PWM pin with the mainboard. Then connect the SATA connector with the PSU. Now connect the ARGB connector and the PWM connector of the fans with the ARGBPWM- Hub. The connector marked RPM carries the rpm signal of the connected device to the Mainboard fan header.

6. First remove the protective foil from the underside of the cooler. Spread the thermal paste on the surface of the CPU. The amount supplied is sufficient for one or two applications.

7. Place the CPU block centrally over the short AMD mounting brackets, such that these allow the CPU block to be screwed down. For this, you can use a normal crosshead screwdriver. Next, connect the pump and the ARGB illumination to the ARGB-PWM-Hub. The 0mm offset holes are intended for AM4 and Ryzen 8000 CPUs, where the hot spot is in the center, while the 8mm offset is recommended for Ryzen 7000 and Ryzen 9000 CPUs.Mounting with an 8mm offset improved the results significantly, according to be quiet! Up to 4.5°C better temperatures on some CPUs.
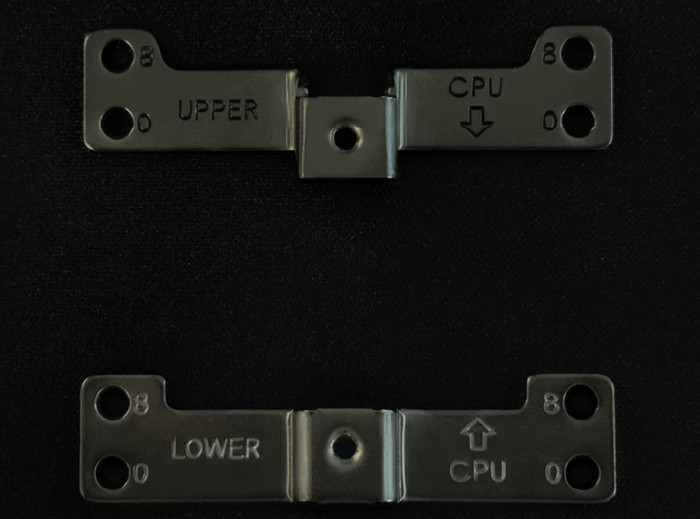
8. Light Loop enables you to synchronize the ARGB illumination of up to 6 ARGB devices with the motherboard by the ARGB-PWM-Hub. When the ARGB-PWM-Hub is mounted into the case, the ARGB illumination is controlled by the motherboard software. Warning: The ARGB connector may only be connected to a 5V ARGB header. The 4-pin connector for the pump should be installed at the main motherboard fan, while the 3-pin PWM hub at the CPU_OPT header or at a similar port of your motherboard.

9. Refilling the system: Top up the system after about two years of use. In order to do this, first detach the radiator from the case. The filling port is on the opposite end of the hoses. Open this as well as the bottle with cooling fluid. Rotate the bottle into the filling port. Hold the radiator so that the filling port is at the highest level with the bottle upended over it. Then lightly squeeze the bottle. Repeat this until no further air bubbles appear in the bottle.

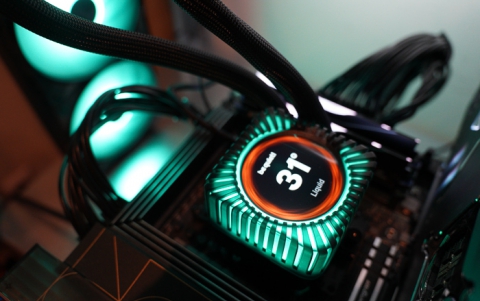
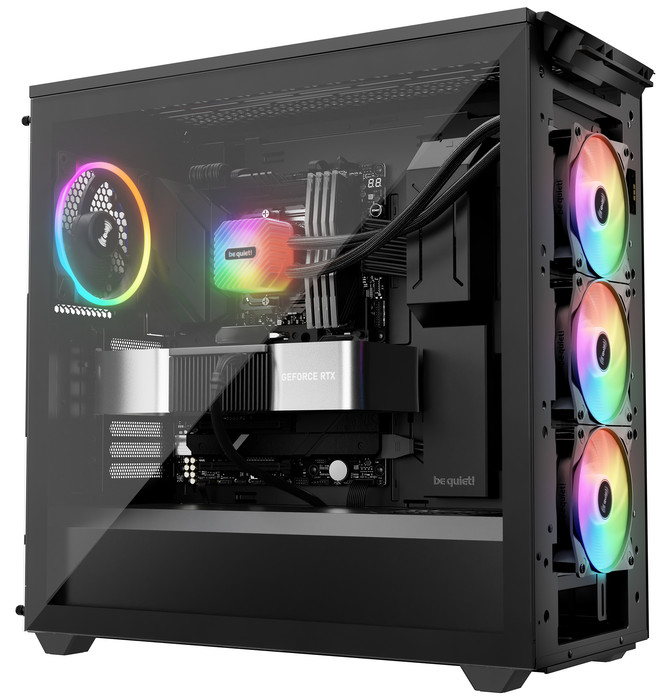
Here is how Light Loop would look alike in an installed system.
 

Review Pages

1. Introduction
2. Retail Package
3. Installation
4. Tests
5. Conclusion


Pages

  • « first
  • ‹ previous
  • 1
  • 2
  • 3
  • 4
  • 5
  • next ›
  • last »

be quiet!

Tags: be quiet!
Previous Post
GameMax GX-1050 Pro PSU
Next Post
What Is the Best Platform for Casino Games

Related Posts

  • be quiet! Dark Power 14 IO

  • be quiet! Light Mount TKL

  • be quiet! raises the bar with the new Dark Power Pro 14 IO power supply series

  • be quiet! expands its peripheral lineup with Light Mount TKL and Mousepad XL

  • be quiet! Light Loop IO LCD

  • be quiet! introduces Light Loop IO LCD

  • be quiet! unveils new power, cooling, and peripheral lineup

  • be quiet! Dark Rock Pro 6

Latest Reviews

be quiet! Dark Power 14 IO
PC components

be quiet! Dark Power 14 IO

SanDisk High Endurance 512GB microSDXC
Cameras

SanDisk High Endurance 512GB microSDXC

Samsung PRO Ultimate 512GB microSDXC
Cameras

Samsung PRO Ultimate 512GB microSDXC

be quiet! Light Mount TKL
Consumer Electronics

be quiet! Light Mount TKL

be quiet! Light Loop IO LCD
Cooling Systems

be quiet! Light Loop IO LCD

Popular News

CORSAIR announces Vanguard Pro 96 and Vanguard 96 Gaming Keyboards

CORSAIR announces Vanguard Pro 96 and Vanguard 96 Gaming Keyboards

MSI Launches FORGE GK600 TKL WIRELESS Special Edition Compact Mechanical Keyboard

MSI Launches FORGE GK600 TKL WIRELESS Special Edition Compact Mechanical Keyboard

Viltrox Showcases Upcoming Lens Lineup and New TTL Flash at IBC 2025

Viltrox Showcases Upcoming Lens Lineup and New TTL Flash at IBC 2025

Panasonic Introduces the First Ultra-Telephoto Zoom Lens in the LUMIX S Series

Panasonic Introduces the First Ultra-Telephoto Zoom Lens in the LUMIX S Series

MSI Launches DATAMAG 40Gbps Magnetic Portable SSD

MSI Launches DATAMAG 40Gbps Magnetic Portable SSD

MSI’s Latest AMD X870E MAX & EVO Series Motherboards

MSI’s Latest AMD X870E MAX & EVO Series Motherboards

COLORFUL Launches iGame B850M ULTRA Series Micro-ATX Motherboards

COLORFUL Launches iGame B850M ULTRA Series Micro-ATX Motherboards

COLORFUL Presents Limited Edition Chitu MAG-60 Magnetic Keyboard Inspired by the Year of the Horse

COLORFUL Presents Limited Edition Chitu MAG-60 Magnetic Keyboard Inspired by the Year of the Horse

Main menu

  • Home
  • News
  • Reviews
  • Essays
  • About
    • Submit News

    • Contact Us
    • Privacy

    • Promotion
    • Advertise

    • RSS Feed
  • About
  • Privacy
  • Contact Us
  • Promotional Opportunities @ CdrInfo.com
  • Advertise on out site
  • Submit your News to our site
  • RSS Feed