Arctic-Cooling Freezer 64 PRO
1. Introduction
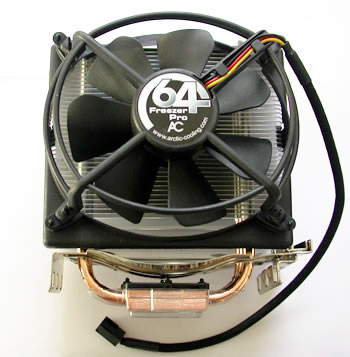
![]() Founded in 2001, Arctic Cooling is a well known manufacturer of cooling solutions for personal computer systems focusing on CPU, GPU and PC-Case cooling. Some time back, we had reviewed the very good Freezer 64 cooling system, designed for AMD Athlon 64 processors. Now, Arctic-Cooling has made another step forward, releasing a new version of the Freezer 64, the PRO version, with better characteristics and even more promising performance. This move is a good from the manufacturer since an already good product has been made even better.
Founded in 2001, Arctic Cooling is a well known manufacturer of cooling solutions for personal computer systems focusing on CPU, GPU and PC-Case cooling. Some time back, we had reviewed the very good Freezer 64 cooling system, designed for AMD Athlon 64 processors. Now, Arctic-Cooling has made another step forward, releasing a new version of the Freezer 64, the PRO version, with better characteristics and even more promising performance. This move is a good from the manufacturer since an already good product has been made even better.
Comparing the Freezer 64 with the Freezer 64 PRO, there are some major differences, evident from a first glance. The heat-pipes in the new model are 6 instead of 4 while the fan and its mounting system are also different. The Freezer 64 PRO has 42 aluminium fins while the previous model had 40. Once again, the base is made of copper.
Following are the most important features as well as the specifications for the Freezer 64 PRO, as provided by the manufacturer.
-Features
Extremely Quiet
The low speed 92 mm fan reduces the noise level to a minimum.
The patented fan holder is able to practically eliminate the typical buzzing sound of 92 mm fans. The noise level is measured in Sone (loudness) instead of dB (sound intensity).
The loudness depends upon the ear's response curves and tells you exactly, how bothersome a certain noise is.
Cooling Performance
6 Heat Pipes (three double sided, visible in the image below) are able to transfer heat up to 200 Watt. The heat exchanger comprises 42 fins and consists of a surface area of over 4700 cm2 and allows for resistant free energy transfer to air.

Thermal Compound
We ship our coolers with the ARCTIC MX-1 thermal compound (image below). This compound hardens during the first 200h while the performance improves steadily. By heating up the paste / heatsink the process can be shortened. The performance is even and from the beginning, is good enough to cool your CPU reliably.

Integrated Cooling of Voltage Converters
Air is drawn in from the side of the fan to cool the components around the CPU.
Some air is blown out towards the voltage converters on the mainboard with the bent fins at the bottom.
Patented Vibration Absorption
The four rubber connectors, shown in the following image, on the fan case act as vibration dampers to absorb the vibration of the running fan and prevent vibration transfer to the heatsink and the case.

Easy Installation
The cooler can be installed without any tools within seconds.
Long Lifetime / 6 Years Warranty
The ARCTIC Ceramic Bearing provides an unmatched Life Time of 137,000h (L10@40°C) resp. an MTBF@70°C of 163,000h and comes with a 6 year warranty.
- Specifications
| Heat Sink | 104 x 58 x 126.5 mm |
| Fan | 107 x 43.5 x 96 mm |
| Overall Dimensions | 107 x 96.5 x 126.5 mm |
| Rated Fan Speed | 300 - 2200 RPM (PWM) |
| Power Consumption | 0.16 Amp. |
| Air Flow | 40 CFM / 68 m3/h |
| Weight | 528 g |
| Noise Level | 0.9 Sone |
| Thermal Resistance | 0.17°C/Watt |
| Bearing | ARCTIC Ceramic Bearing |
| Thermal Interphase Material | Pre-applied MX-1 Paste |
| Warranty | 6 Years |
- AirFlow
The new PRO series, apart from AMD processors, also has models that cover Intel's socket 775. Most things are the same, with only some minor differences between models that we will cover in future reviews for each specific product. However, the airflow is exactly the same for all the Freezer PRO series.
The fan is placed on the front and therefore most air is drawn from the front, which is also the most common air flow pattern in a PC case. The air is drawn in from the side of the fan and for this reason it also cools the area around the processor. The warm air is blown out from the 42 fins while, according to Arctic-Cooling, the three bent fins on the bottom of the rear side, vent some of the air towards the voltage converters on the motherboard.

- Retail Package
The package includes the cooling system and an installation guide. No separate thermal compound is included since it is already placed on the copper base by default. However, if for any reason you need to remove the Freezer 64 PRO, then you'll need extra thermal compound when you reinstall it. An extra tube of compound, as was the case with previous models wouldn't hurt :-)


Let's now move on to the next page which describes the installation procedure...