Arctic Cooling - Freezer 64
1. Introduction
![]() Founded in 2001, Arctic Cooling is a well known manufacturer of cooling solutions for personal computer systems that focus on CPU, GPU and PC-Case cooling. Among its latest products is the Freezer 64 (as it is labeled due to its AMD 64 compatibility), which is the CPU cooler that we will be reviewing in the following pages.
Founded in 2001, Arctic Cooling is a well known manufacturer of cooling solutions for personal computer systems that focus on CPU, GPU and PC-Case cooling. Among its latest products is the Freezer 64 (as it is labeled due to its AMD 64 compatibility), which is the CPU cooler that we will be reviewing in the following pages.


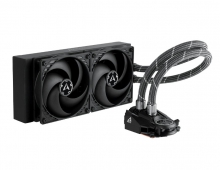
The Copper base, the Heatpipes and the Liquid...
Basically, the Freezer CPU cooler consists of : the copper base, located on the base of the cooler, the 40 aluminium fin heatsink which makes up the larger part of the cooler and finally, the 80mm 5 blade fan. The copper base is attached to the CPU and as the latter becomes hotter, the heat is transferred to the copper base. A special liquid located inside 2 heatpipes, circulates through the copper base and across the fins where the fan gets down to work (and pretty effectively I might add) cooling down the fins and the liquid. The liquid is maintained at the appropriate temperature, cooling down the copper base and consequently the CPU itself.
 |
| A closer view of the cooler's copper base and mounting clips... |
As you can see, the secret behind this design of the Freezer 64 is in the heatpipes. The continuous flow of the hot liquid towards the fan where any heat is dissipated through the fins and returns towards the copper base attached to the processor is what keeps the temperature down.
Here are the detailed specifications as provided by Arctic-Cooling:
| Product name | Freezer 64 |
| Heatsink Dimension | 92 x 72 x 120 mm |
| Heatsink Material | Copper Base & Aluminum Fin (40Fin) |
| Fan Dimension | 77 x 77 x 42 mm |
| Overall Dimension | 92 x 114 x 120 mm |
| Rated Fan Speed | 2200 RPM |
| Power Consumption: | 0.13 Amp. |
| Bearing: | Arctic Ceramic Bearing |
| Air Flow: | 32 CFM / 55 m3/h |
| Weight: | 460 g |
| Compatibility: | all AMD Sempron (Socket 754) AMD Athlon 64 up to 5000+ AMD Athlon 64 up to FX-59 AMD Opteron |
| *Noise Level: | 1.0 Sone |
| Thermal Resistance: | 0.20°C/Watt |
| Retention Module included Warranty: | 6 Years |
*Noise Level
The noise level is measured in Sone (loudness) instead of dB (sound intensity).
The loudness depends upon ears response curves and tells you exactly, how bothering a certain noise is.
The Freezer 64 is a very quiet cooler, one that even at high speeds (2200max RPM) will not disturb or bother you in the least. The patented fan holder is designed to eliminate the usual buzzing sound fans of this size make... Comparing the AMD stock cooler 3200+ which has a value of 2.6 Sones with the Freezer 64 which has a value of 1.0 Sones! Regardless of whether we measure sound levels in Sones or dBs, at the end of the day what we have is a very silent cooler...
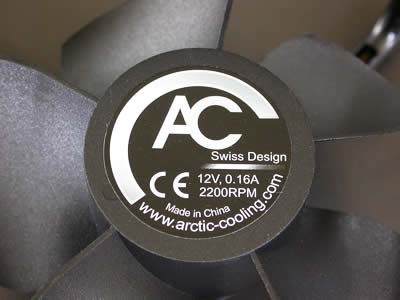 |
| Rear view of the fan where we can see the rated voltage, amps and RPM. |
Apart from being silent, the Freezer 64 is also easy to install. We are pretty sure that you won't have to spend more than 5 mins tops for the installation (thermal paste application included). It's also compatible with a variety of AMD processors, as it can be seen in the specs table.
With a weight of 460 grams, the cooler will not hang from the motherboard and despite the fan being on the side of the fins and not on top of them, will fit right in along with anything else installed.