Another options for people who are buying this drive to replace the current notebook DVD Drive.
If when you install this drive in your notebook, it is recognized as Slave on IDE Channel 1 you have the option of using the 6500Boot.zip flash files to reverse the ATA.
The other option involves soldering so if you are not comfortable using a soldering iron and the proper solder (No 100 Watts iron should be used) enlist a qualified person to do this for you, it takes less than 2 minutes. A 20 to 30 Watt iron with a very fine point and some fine rosin core solder are needed.
The major advantage of this hardware ack/fixup is that you can use all the 2.XX firmware for the NEC ND-6500A and flash it directly in you notebook. Reverse ATA firmware is very limited up to now.
Here are the steps,
1 - remove the 4 screws securing the cover on top of the drive and put them in a secured place (Those screws requires a Phillips #0 screwdiver and they are really easy to loose) and remove the top cover.
2 - Pop open the drawer by inserting a straightened paper clip in the hole beside the eject button (be gentle) and extend the drawer to the full open position without forcing it.
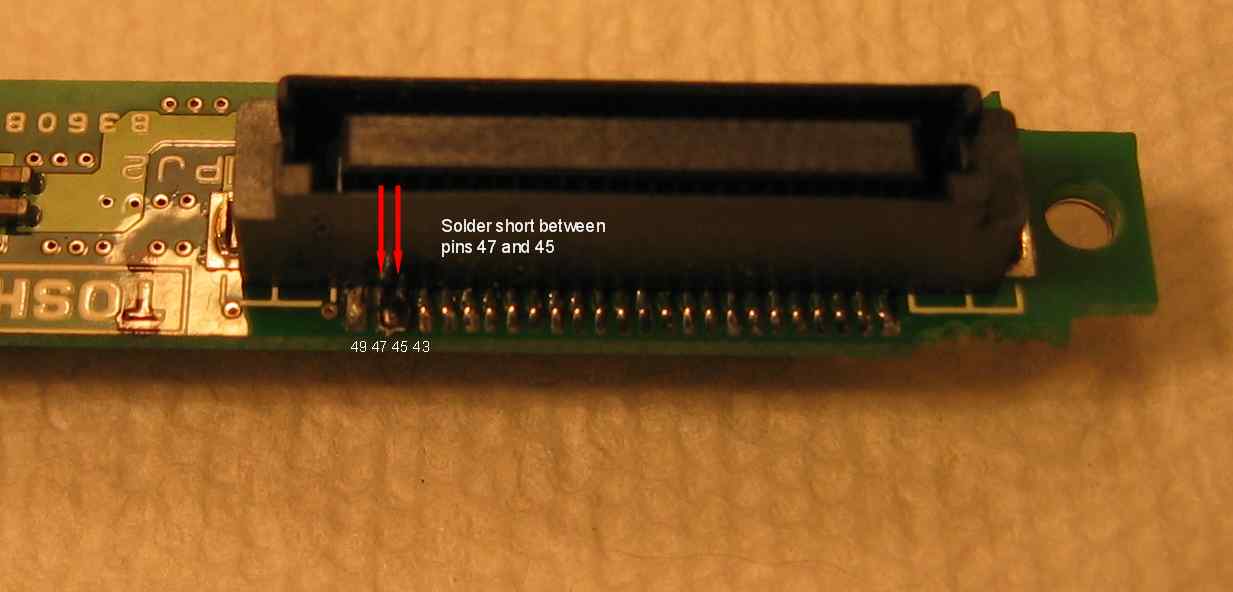
3 - You will see the back of the 50 pin connector that connect to your notebook when you insert the drive in it. If you look on top of the printed circuit board, just beside this connector, you will see some numbers printed on the circuit board on each side of the connector.
Position the DVD Drive with the drawer open towards you.
It will look like this
------------------- 50
| |
1 ------------------ 49
The little wires on the connectors facing the inside of the drive are the one we want , specifically the second and third one from the last on the right where #49 is printed. Those 2 contact are (Counting from the right) 47 & 45.
Contact 47 is the CSEL (Cable Select which usually will configure a drive to Slave if this line is grounded, or Master if left open)
Contact 45 is a ground.
We need to apply just enough solder to connect those 2 contacts together. Make sure that you leave the last contact on the right alone and inspect with a magnifying glass to insure that you did not put solder where it did not belong.
Once everything looks fine, re-install the top cover on the drive and secure it with the 4 screws you previously removed.
Re-install the Nec DVD in the notebook and confirm that the drive is now recognized as MASTER on IDE CHANNEL 1.
I just completed these steps above for my own Notebook Computer (Voodoo Envy M855) which is based on a Mitac 8355 chassis. My notebook came with a Panasonic (Mashushita UJ-811 DVD-R drive) that is not supported by either Mitac or Panasonic.
This Panasonic drive was configured as SLAVE by firmware and the Notebook bios was tricking it (Reversing IT) to MASTER.
I got my NEC ND-6500A with firmware 2.22 and just flash it with the most recent firmware available here (2.23) after backing up the original firmware.
For reference purposes, please check the following (It's in German)
http://www.tks-computer.com/files/Slimline-FAQ.PDF Best regards from Quebec, Canada and Happy New Year to ALL

 You can click here to see
 Today's Posts
|
Today's Posts
|
 Most Active Topics
|
Most Active Topics
|
 Posts Since Last Visit
 Printable Version
 RE: NEC 6500 official firmware overview 26/10/2004 Upda... -


 New Messages
 No New Messages
 Hot Topic w/ New Messages
 Hot Topic w/o New Messages
 Locked w/ New Messages
 Locked w/o New Messages
 Post New Thread