Please wait a few seconds while the next list-box is being populated with
the data that are relevant with your previous selection you have made.
I press ?View? and immediately see the chosen graphic of
a test, or I can continue my selections on the left for adding up to 5 different
disc/drive/etc combinations.
I can not add 2 times the same test, unless it is has been submitted by
a different user (member) or refers to the aggregates ?Best?, ?Worst? or ?Average?.
You can thus repeat steps 3-13 above for making more selections.
I can also remove some of them at any time. The system is clever enough
to keep the state of the page intact, as long as I do not press for a different
media or test type (steps 1, 2).
In this case you must start all over from the beginning. This might be tedious
if you have already made several selections. So, please pay particular attention
on this.
If you would like to be a tester the procedure is very simple. From your home
page click on the link "joining here" as shown in the picture below, from the
arrow.
You will be transferred in a page, like this one below, where
all you have to do is to press the "Activate Membership" button.
Ending you will be informed that the joining procedure is done
and you have joined Media Tests as a Tester. That all!
We assume you have read the previous section on how to become a Member and
Tester of our community and on how to view a particular test.
In this section we will show you how to actually submit a test. We suggest
you also read all other sections of our review in order to grasp all aspects
of the required procedures and have all your questions been answered.
Once you have logged on to the CdrInfo.com Member home-page, one of the available
options you have is to submit Media Quality Tests.
When the new page loads you will have been direct to the MediaTests page.
By using the navigation menu on the left, you are able to view the submitted
tests, post new tests and edit previously posted tests .
To
submit a new test just press the Submit Test button and you will be
directed to the submit test page
For this test I am going to submit the test results of a Taiyo Yuden (TY)
CD-R, written with a Plextor PX-W1610A. The Program used for the quality test
is
the UMDoctor
Pro II and the reader is the Optorite DD0401 drive. The test type is C1/C2.
In order to proceed to the submit test page i have already saved the required
.dat files from UmDoctor as shown here
On the top left of the submit area, there is the media type selection area.
I choose CD-R for media type because I want to test a CD-R
Below this area, the test type listbox is populated by options accordingly.
I choose C1/C2 as the test type
On the next column to the right, the Recorder Drive column I will select
the specifications of my writer. As soon as I choose Plextor for manufacturer,
the next selection
loads
and
I choose the Model and finally the Firmware of my Recorder, as seen below.
Next to the Recorder Drive column, there is the Disc Column. Here I will select
the specifications of the written disc.
I
select Taiyo Yuden as Manufacturer, CD-R Unbranded silver for Model because
there is no brand on the surface of my disc and finally the ID of my disc
.To find out the ID of my disc I have already used the DVDinfo software available here.
Please notice that on the right corner of both the Recorder Drive and Disc
column there is an Other button, marked
on the above photo, that will direct you to the Data Inclusion Request
page. You can use this
button to request the inclusion of a new drive or a new disc. The fields that
must be filled are shown below. Take a notice that is separated in two categories.
The drive request and the disc request.
In the following step I will choose the program that I used to test (scan)
the recorded CD-R. UmDoctor Pro II is the program used for this demo.
This
is the final step on the selection of the parameters for
submitting a test result. On this menu I have choose the speed that the
disc was
recorded(16x)
and the
speed
that the cd was tested.(24x)
The next step is very important. By pressing the  button
I will check if the parameters that i have entered up to this time
are correct and if the this particular test has already been submitted
by me or not.
you
will have to check for missing parameters, or you will have to change at
least one of them in order to define a non-already posted by you test. (There
is
a requirement for only 1 test per parameter selection and per user.)
Up to this point I have chosen the settings of my test, and I checked my settings
for a test availability. The next thing to do is to locate the
.dat file on my pc. I click on the browse button to load the .dat file from
my pc.
This contains the results of the test whose parameters I have defined
above. Then
I press the "Load Original Csv File" button.When the page loads you
will see the following picture.
On the next step there is a "Shrink Csv File" button that will make my file
shrinked to about 1KB in size. I press the "Shrink Csv File" button and the
.dat file loads on a new panel to the right. Notice
that the new file is now Comma Delimited.
The following picture shows that I have made an invalid submission and informs
me to correct the submission
On the following photo we can see the window that pop-up in case the submissions
is valid
In order to be able to view and submit properly your own tests you need to
have your browser's settings adjusted accordingly. Please read below for each
case (read tests/submit tests) respectively.
For viewing the page with the Tests, there is no other user obligation other
than using a compatible browser (IE has been tested thoroughly on this aspect
already) and having JavaScript (also so-called ?Active Scripting?)
enabled.
In the following the reader can see pictures of how the security
settings for the "Internet Zone" should be set.
There is no ActiveX or other plugin required. Everything transmitted is pure html and JavaScript.
Although everything is now based on the server-side to Asp.Net, our decision here was based only the resources and persons available to help us develop these pages. There is nothing special to .Net here, other than achieving easy user authentication, page state and some structuring of the underlying code. Let?s see how this frame will withstand users appetite for bandwidth:)
Here applies to a large extend what we have said above. With one notable
exception. The user is required to use exclusively Internet Explorer as his
browser and be more tolerant towards security. This is a technical requirement,
because
the format translation from each measuring application (C1/C2-PI/PO for the
time being) has to be done on the submitter?s machine.
Since the time and resources required for this format transformation requires extensive resources both in time and memory, it would impractical to devote all this processing power on the side of the server.
We must make this clear to our users, so that to minimize the criticism
from their part on the way we designed the submission page. Of course, we do
accept this along any any other criticism. In fact we do encourage it. So,
all this is said here for the purpose of saving some of time trying to clarify
and answer identical or similar questions from the part of our users over
and over again.
First, we must stretch the fact that some programs, like KProbe, in the case
of DVD PI/PO measurement, produce text files of over 1 MB length! Posting them
to our servers would be prohibitive anyway. I hope this argument by itself
is enough for justifying the approach we adopted.
For all these reasons, a user will have to use IE 5.5 or higher for being
able to submit tests. (IE 5.0 might suffice, but we have not tested this yet.)
He will also have to enable ?Active
Scripting?,
and relax some other security settings. For this reason the best approach would
be to
set the address ?cdrinfo.com? at the list of trusted sites. Then he will have
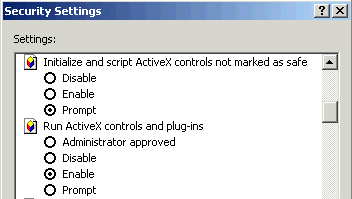
to verify that ?Initialize and Script active X controls not marked as safe
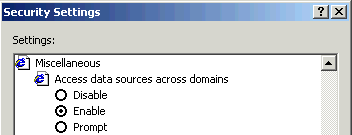
for scripting?, ?Run ActiveX controls and plug-ins? and ?Access Data sources
across domains? are all set as either "enable" or "prompt".
In the latter case the user will be prompted for each test submission about
allowing or not the relevant action. Please take into account that the code
used for this case is pure JavaScript and thus publicly available for viewing
and evaluation by experts. So, we are completely certain that we respect our
users. At least as they do respect our site themselves, along with our continuous
efforts for always bringing them the best news and reviews on the market and
the industry today.
The following pictures will help you adjust the security settings for the "Trusted Sites" zone under IE, after adding CdrInfo.com to the list of trusted sites.
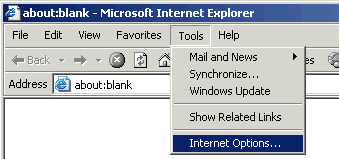
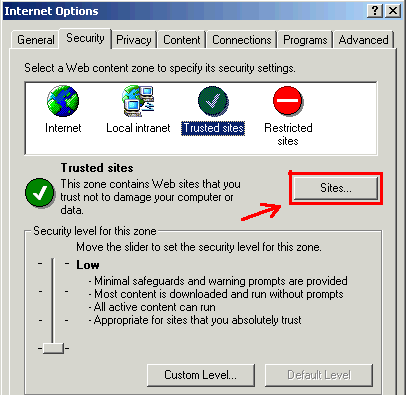
First uncheck the requirement for Https, then add the cdrinfo.com site
to the
list of trusted sites.

Then, please adjust the settings as shown in the following pictures.
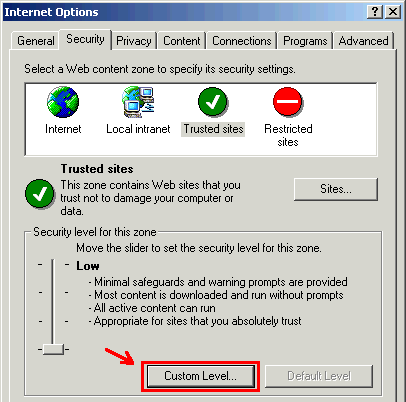
The following setting is the same as in the previous case.
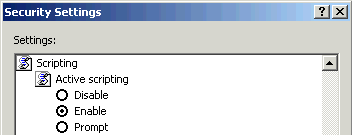
The following settings affect only the submission of new user tests.
You might be able to find answers to some other questions on security in the
FAQ section of this presentation.
10. Csv file format
Csv file format
This is the format of the test files. They are actually normal text files
following a pre-specified pattern of numerals, text and punctuation.
Usually, they correspond to a simple table. This table in turn might be considered
a text form of a typical database table.
A Csv file, consequently, is a series of rows (lines). In our case there are
a few constrains this file should have to follow. On each line there are 3
numbers. The first corresponds to the particular time (in seconds) of each
one of the following 2 measurements. The first measurement is a number representing
the number of C1 errors (in the case of a tested CD) or PI errors (in the case
of a tested DVD). The second number is the corresponding number of C2 or PO
errors.
In some cases it is useful to have a header included in each Csv file containing
an indication for each one of the following numbers, according to the column
they belong.
In an original Csv file the non-integer part of time corresponds to it's normal
fractional part. They do not correspond to sectors (1/75 of a second.). As
a results, the error rates illustrated in the graphs of our database do not
correspond to those absolute values measured by the used programs themselves.
This is due to the fact of summing them up over the period of one minute for
CD's and 8 minutes for DVD's. We do this for easy inclusion in our database.
However, these results are completely comparable with each other, and server
the intended purpose of comparing quality results
from different media.
Non-integer numbers for the other two numbers per each line are due to the
above mentioned summation process (rounded to 2 decimal places) performed on
the original Csv file. Instead of having to show several thousand (perhaps)
numbers for each test result into a single picture, something user unfriendly
and database cumbersome, we only include measures averaged over 1 or 8 minutes.
Below, on the left, is a sample Csv file for the case of a test-result for a CD. On the right, the shown numbers are those appearing after shrinking the original Csv
Typical CD Csv file |
Original .CSV |
Shrinked
.CSV
|
| "DiscTime", "Sum1", "Sum2" |
|
| 69,6,0 |
1,35,0 |
| 157,1,0 |
2,43,0 |
| 239,0,0 |
3,202,0 |
| 321,0,0 |
4,25,0 |
| 403,0,0 |
5,35,0 |
| 482,1,0 |
6,36,0 |
| 561,0,0 |
7,11,0 |
------------------ |
------------------- |
| 359003,2,0 |
74,28,0 |
| 359097,1,0 |
75,26,0 |
| 359184,1,0 |
76,53,0 |
| 359276,1,0 |
77,39,0 |
| 359363,0,0 |
78,44,0 |
| 359450,0,0 |
79,30,0 |
| 359542,0,0 |
80,22,0 |
A sample concerning the test results of DVD are shown below. To the right
is shown the topmost lines of the shrinked file.Both in the previous, as well
as in the present case, the measurements are averaged over1 seconds during
display. During submission, however, the Csv file is further summed-up
down to one result every 8 minutes.
Typical DVD Csv file
|
| Original
.CSV |
Shrinked
.CSV
|
| "DiscTime", "Sum1", "Sum2" |
|
| 144,1,0 |
1,54,0 |
| 275,0,0 |
2,48,0 |
| 410,3,0 |
3,67,0 |
| 541,1,0 |
4,61,0 |
| 675,3,0 |
5,117,0 |
| 807,2,0 |
6,153,0 |
| 949,2,0 |
7,156,0 |
--------------------
|
----------------------
|
| 2213576,31,0 |
487,670,0 |
| 2213716,44,0 |
488,565,1 |
| 2213860,22,0 |
489,582,0 |
| 2213999,26,0 |
490,728,0 |
| 2214135,23,0 |
491,737,0 |
| 2214274,36,0 |
492,1102,1 |
| 2214411,25,0 |
493,84,0 |
11. Some suggestions for the proper submission
Some suggestions for the proper submission of viable Tests
Although many users seem to be aware of the proper handling of tests such
as those submitted in our on-line application page (as judged by reading our
forum topics), we believe adding some of our own arguments here might help
both the starting and the more advanced readers on some simple issues that,
despite their simplicity, might affect significantly the validity of a test
submission.
Please before posting, perform each test at least twice. Use identical testing
conditions (the same PC, identical running software, degree of CPU usage, etc)
and try to use discs from the same batch.
Please handle discs with care. Dust or fingertips might easily produce misleading
test results. Do not touch the lower surface of a disc, as this is more amenable
to scratches and dust particle inclusion that will artificially produce, otherwise
unjustified, errors.
Always use as recorders and readers drives that are known to perform well under regular everyday use.
Use older drives only if they keep to perform flawlessly. Please take into
account that a to become defective drive shows early signs of its attitude
by not recognizing some discs and/or slowing down during parts of the recording/reading
process. In general, any abnormal drive behavior should be enough to keep you
away from using it for submitting tests.
If you do submit them (it?s always up to you fellow!) you might find out soon that your tests deviate too much with respect to other published tests. In this case your test might seem to some readers misleading. It is a good idea to thus withdraw it or otherwise revise it by using newer or more appropriate equipment.
Please have in your mind that by submitting any tests you help both yourself and our user community towards finding out quality hardware for its needs. As more tests are available and the more reliable they are, the more helpful our application can be both to you and all the rest of us.
You have at your disposal freedom and the power you need in order your work to be seen and we encourage you to attain the best outcome.
12. Measuring the quality of recorded media
Measuring the quality of recorded media
General Considerations
There many factors that influence the quality of a particular media recorded on a particular recorder drive. There are also many ways to identify and qualify these factors as well.
Different media are based on different chemicals and differences in the manufacturing
process followed during the making and packaging of a disc might largely influence
the outcoming media quality when testing them after recording. For example,
the so called yellow dyes (phthalocyanine) used by some manufacturers require
less
laser power for recording and consequently a different recording strategy in
part of the recording drive?s firmware for obtaining optimum quality. On the
other hand, discs based on the same chemicals, when produced by different manufacturers
have been identified to produce large deviations in quality. (We won?t name
any of then here, but it is a good idea for the reader to experiment himself
on the quality tests page itself!:)
Even drives from the same manufacturer based on the same model and firmware
might produce different quality measurements. This is not strange in itself,
all sections of traditional industry have learned to live with such discrepancies
for nearly a hundred years now. The industry has also exercised the use of
the so-called "statistics" for
dealing with these phenomena. A large number of samples, with averaged "quality"
measurements over the number of units produced offers an acceptable measure
of quality in most cases.
There are many indicators of quality when dealing with CD?s and DVD?s in the labs. These are based on both mechanical and optical measurements of the surface of a recorded disc or a pressed one. Even unrecorded discs can be measured against some specific test for identifying imperfections on the ATIP or the disc geometry itself. All these measurements are of some importance to industry engineers for locating manufacturing process flows or when working towards disc and recorder improvements in research and development groups.
Most of the above measures are "analogue" in their nature. They
offer some sort of a numeric value along the changes of a geometric, optical,
or otherwise physical property of the medium, the recorder or some other aspect
of a process. Examples of such measures is the focus/tracking deviation of
the spiral of a disc with respect to the laser diode beam. They are of particular
importance for drive and production machine calibration, for developing better
algorithms and strategies for encoding and
recording, but in the final end, these seem to be of lesser importance to end-user
requirements. This might sound as a bold statement, but actually it is not.
Please read below.
The final end of any "quality" measurement for a particular user
is the playability or not of a particular disc on his/her player under most
circumstances. Consequently, when it comes to pure user understanding of quality,
of prominent importance becomes not some sort of an analogue measure in general,
but the number of reading errors the drive encounters per second during playback.
These errors are either of a minor importance to overall disc readability
or constitute a major and thus deterministic factor of reading quality. In
the former case these errors, in the case of compact discs, are defined as
C1 errors and are only indicative of the quality of the disc. The latter type
of errors are called C2 errors and in the case of audio CD?s, when encountered
in sufficient consecutive numbers, will most probably result in audible clicks
during playback. When encountered in large quantities over a very small amount
of time will most probably heard as glitches or not heard at all (muted music
due to consumer player built-in algorithms).
This outcome depends on the type of a player and the playback method. For
example, consumer players are self-embodied by better C2 error concealing algorithms
with respect to PC drives. PC drives, on the other hand, will bypass the built-in
error concealing/smoothing algorithms and will produce audible glitches when
playback is done digitally (ripping or digital extraction to an outer D/A decoder/booster
or an included sound card)!
As long as data CD?s (and PC backup admins) are
concerned, there is also a third layer of error correction, applied only on
data discs.
The
errors
produced
at this level are characterized as L3 (layer-3) errors. Encountering such an
error once per disc usually means that at least one backup file is corrupted.
In the case of our tests here, we will not have to deal with such errors
at all. We consider already a major event the existence of even isolated cases
of C2 errors. The non-existence of errors of this type, already eliminates
any possibility of L3 errors.
Implementation details
In the case of our tests, we restrict our selves to only those types of tests that are easily conducted by the average user (or, at least, by those users somewhat more technically inclined). This was the first requirement in our design board. Secondly, a number of other factors influenced our decisions and practices. Each test should be technically well recognized, widely acceptable and easily implementable by products offered in the market at reasonable prices. Since most professional equipment is out of the reach of the budget of the everyday user, we thus restricted our tests to only those offered by some program developers on market drives.
(We can very easily include professional tests if we decide to do so, and
we already have included many tests we have performed during our regular drive
reviews using our own expert equipment. In the future, all tests and reviews
of new hardware will also be appearing in this section of "Media Quality
Tests" as
well.).
Having expressed the above requirements, we must state that, thus far, we
are aware of only 4 such programs. PlexTools Professional, CdSpeed, UMDoctor
and KProbe. It is important to point out that not all of these programs work
on any available drive. In particular, PlexTools Professional works only with
the Plextor Premium (523252), CdSpeed works with those drives based on the
Plextor Premium chipset and the MediaTek chipsets, UMDoctor requires a Sanyo
chipset with an accompanied firmware and KProbe is restricted in it?s use to
only drives based on the MediaTek chipset and firmwares.
We have thus restricted our prospective drive readers to only to only a few
dozens of CD and DVD readers drives. But still, we have left open the possibility
of using an arbitrary recorder. This is certainly good news,
as any user can find out the best disc for his recorder, albeit he will not
be able to submit any tests himself!
13. Frequently Asked Questions
Frequently Asked Questions
1. Why some selections in the View Tests page are grayed out?
Depending on the grayed out option, this might happen due to several reasons.
For the case "Enhanced Recording Mode" (RecModeEnhanced), we decided,
for the time being, not to offer this option publicly, in order to keep the
user selections as simple as possible. We might reconsider this in the future
if there is a many members? request for doing so. The same applies in the
case of "Enhanced Audio Recording Mode" (RecModeAudioEnhanced).
In the case of the reading Program, we have restricted the available options
(presently) to only 2: KProbe and UmDoctor, because currently these are the
only programs offering text output in the form of the so-called csv file.
Otherwise, each user should have to use a graphics to vector translation application
(like the one included with CorelDraw, for example) for doing it. We think
there is no much sense into pursuing such an endeavor and hence we have presently
disabled the inclusion of tests produced by PlexTools and CdSpeed.
2. I have fixed some selections on some list-boxes and there is no way now for me to add additional tests. Can you please fix the page?
This not a problem of the page. You have just imposed restrictions on the
degrees of freedom of the system that lead to tests that do not exist in our
database. So, this is a problem related not to the page design itself, but
rather to the use of it made by our users.
Please unfix some of the list-boxes (just try one-by-one) until you are led
to cases were there are available tests in our database, among which you can
make more selections.
3. I choose one particular test for viewing. It shows OK. Then, keeping the same test selection parameters, I choose the [Average] of the available tests. Instead of seeing 2 tests, I see only 1. What's the problem? The same holds when I choose [Best] or [Worst].
You have chosen parameters which lead to only 1 available test. In this case
the Average is the same as the test itself. The same holds for the Best and
Worst cases. So this is normal, as each curve overlaps another one. In order
to be
able to get distinguishable curves you will have to choose parameters which
lead to more than 1 available tests!
4. I have measured the same disc with the same reader/software,
but the results are different. In the first case I chose the 4x reading speed,
while in the second one I chose the maximum allowed by the reader. What is
the problem?
Considering the fact that the reported results are closely related to the
reading quality of your drive, we could say that such results were expected.
Higher reading speeds could affect the results, not always negatively, however.
For this reason, we have chosen to include the reading speed selection in our
test suite, in order the user to be able to identify the speed at which each
disc was read at. It is up to you whether you want to compare discs tested
at the
same
speed to keep a reference, or not.
5. Latest versions of KProbe have an "ECC" setting
at the left of the main PI/PO window. Which ECC setting should I select from
the
available 1-10 scale?
There is not any clear answer to this, since the KProbe measuring mechanism
is not clearly defined until now. Again, keeping a stable setting for your
measurements could make things easier in order to have a reference when comparing
the test results. In most cases, CdrInfo.com sets the ECC setting to 8.
It might be the case that this value defines the mesh of the graph, which
essentially refers to how distant one measurement lays from the previous
and the next ones. In this case choosing a particular scale number is irrelevant.
This is due to the fact that before submitting your test results, these are
necessarily summed-up per 2 minutes for database storage efficiency.
6. What is the acceptable levels of PI/PO and C1/C2 error rates?
1. Parity Inner and Parity Outer Errors for DVD (ECC=8):
- DVD PI<280/sec (standard)
- DVD PI<<280/sec (good quality)
- DVD PO = 0
2. C1 and C2 errors for CD:
C1=E11+E21+E31
C2=E12, E22 and E32
- E22- Approaching uncorrectable error
- E32- Uncorrectable
- CD E22 and E32 = 0
BLER (Block Error Rate – CD only) = E11 + E21 + E31 per second averaged
over ten seconds.
One or more bad bits in any frame
- CD BLER< 220/sec (standard)
- CD BLER<< 220/sec (Good quality)
6. KProbe offers 3 different options regarding the address
on the CD and DVD. The MSF, LBA and Disc size. What should I choose for measuring
my discs?
In general, the "Disc Size" option will work with your CD and DVD
media. You should choose this option in order the software to automatically
measure
the whole disc inserted to your reader. (Please also choose to fill the disc
with data completely during recording.)
Generally for a CD:
M:S:F (Minutes:Seconds:Frames) is the original unit used for addressing
the positions of a CD. A frame is actually a sector and the unit corresponds
to 75 frames in
1 second.
LBA (Logical Block Addressing) is also known as sector of a CD. In
the MMC specification document where it is described, there is a defined range
for the mapping
of MSF to LBA values.
Sectors of the CD are defined as signed long integer values
to account for negative values. Here's the relationship:
Positive values are
mapped:
MMC LBA:0~403964 to MSF: 00:02:00~89:59:74
and negative values are mapped accordingly:
Below 2 secs (MSF), ranging from 00:00:00 to 00:01:74 (MSF) are represented
as
MMCLBA: -150 to -1.
The range from 90:00:00 to 99:59:74 (MSF) are represented as MMC LBA: -45150
to -151.
The range of MMC LBA is a linear range with the integer values starting from
-45150 to 403964. However, it is not linear comparing with Red Book Addressing
(MSF) because it wraps around.
Logical Block Addressing are the mapped integer numbers from CD Red Book Addressing
to MSF. It is also known as sectors of a CD. Other people may have different
interpretations
for LBA, or simpler:
The starting sector is -150 and ending sector is 449849, which correlates
directly to MSF: 00:00:00 to 99:59:74. This removes the wrapping as in MMCLBA
representation and the transformation will be linear when comparing with the
Red Book Addressing (MSF).
14. Glossary of Terms
Glossary Terms
Below is a list of terms (in alphabetical order) that appear in this guide and might be of help to our readers. Please ask us to add more terms by submitting the form here.
ECC
Error Correction Code
MSB
Most Significant Byte
LSB
Least Significant Byte
Channel bit (DVD)
The elements by which, after modulation, the binary values ZERO and ONE are
represented on the disk by pits.
Physical sector number (DVD)
A serial number allocated to physical sectors on the disk.
Track
A 360° turn of a continuous spiral.
Track pitch
The distance between the centrelines of a pair of adjacent physical tracks,
measured in radial direction.
DVD Disc Types
Type A
Consists of a substrate, a single recorded layer and a dummy substrate. The
recorded layer can be accessed from one side only. The nominal capacity
is 4,7 Gbytes.
Type B
Consist of two substrates, and two recorded layers. From one side of the disk,
only one of these recorded layers can be accessed. The nominal capacity is
9,4 Gbytes.
Type C
Consists of a substrate, a dummy substrate and two recorded layers
with a spacer between them. Both recorded layers can be accessed from one
side only.
The nominal capacity is 8,5 Gbytes.
Type D
Consists of two substrates, each having two recorded layers with a spacer
between these two recorded layers. From one side of the disk, only one pair
of recorded layers can be accessed. The nominal capacity is 17,0 Gbytes.
Track modes
Tracks can be recorded in two different modes called Parallel Track Path
(PTP) and Opposite Track Path (OTP). In practice, the lengths of the Data Zones
of both layers
are independent from each other.
In PTP mode, tracks are read from the inside diameter of the Information Zone
to its outside diameter, this applies to both Layer 0 and Layer 1 for Types
C and D. On both layers, the track spiral is turning from the inside to the
outside.
In OTP mode, tracks are read starting on Layer 0 at the inner diameter of
the Information Zone, continuing on Layer 1 from the outer diameter to the
inner diameter. Thus, there is a Middle Zone at the outer diameter on both
layers, see figure 5b. The track spiral is turning from the inside to the outside
on Layer 0 and in the reverse direction on Layer 1.
PO
Parity (of the) Outer (code)
PI
Parity (of the) Inner (code)
DVD ECC Blocks
ECC of DVD block is a self-contained block of data and error correction
codes that grouped into a sequential series of
16 DVD sectors.
An ECC Block is formed by arranging 16 consecutive Scrambled Frames in an
array of 192 rows of 172 bytes each. To each of the 172 columns, 16 bytes of
Parity of Outer Code are added, then, to each of the resulting 208 rows, 10
byte of Parity of Inner Code are added. Thus a complete ECC Block comprises
208 rows of 182 bytes each.
PI/PO
Type of measured errors for DVD's. The I corresponds to "inner",
the O to "outer". This is a distinction being made when each sector
along with the error correction data is presented in a tabular form. The I's
and O's then correspond to the 2 different directions of the 2-dimension Euclidean
space (plane).
Recording Frames
Sixteen Recording Frames shall be obtained by interleaving one of the 16
PO rows at a time after every 12 rows of an ECC Block Thus the 37,856 bytes
of an ECC Block are re-arranged into 16 Recording Frames of 2,366 bytes. Each
Recording Frame consists of an array of 13 rows of 182 bytes.
Random errors (DVD)
A byte error occurs when one or more bits in a byte have a wrong value, as
compared to their
original recorded value.
A row of an ECC Block that has at least 1 byte in error
constitutes a PI error.
If a row of an ECC Block contains more than 5 erroneous
bytes, the row is said
to be “PI-uncorrectable”.
During playback after the initial recording, the errors as detected by the
error correction system
shall meet the following requirements:
- in any 8 consecutive ECC Blocks the total number of PI errors before correction
shall not
exceed 280,
- in any ECC Block the number of PI-uncorrectable rows should not exceed
4.
Jitter (DVD)
Jitter is the standard deviation s of the time variation of the digitized
data passed through the equalizer. The
jitter of the leading and trailing edges is measured to the PLL clock and
normalized by the Channel bit clock
period.
Sector
In case of CD media, “Sector” refers to the data contained in one
frame. In the CD-ROM standard document the term
block is used for this unit.
In the case of DVD media, “Sector” is the smallest user addressable
part of media. The user data contained within a
sector is 2048 bytes.
Physical Sectors (DVD)
The structure of a Physical Sector shall consist of 13 rows, each comprising
two Sync Frames. A Sync Frame shall consist of a SYNC Code from table 4
and 1,456 Channel bits representing the first,respectively the second 91 8-bit
bytes of a row of a Recording Frame. The first row of the Recording Frame
is represented by the first row of the Physical Sector, the second by the
second, and so on.
Recording shall start with the first Sync Frame of the first row, followed
by the second Sync Frame of that row, and so on row-by-row.
Data Frames (DVD)
A Data Frame shall consist of 2 064 bytes arranged in an array of 12 rows
each containing 172 bytes. The first row shall start with three fields, called
Identification Data (ID), the check bytes of the ID Error Detection Code
(IED), and Copyright Management Information (CPR_MAI), followed by 160
Main Data bytes. The next 10 rows shall each contain 172 Main Data bytes,
and the
last row shall contain 168 Main Data bytes followed by four bytes for recording
the check bits of an Error Detection Code (EDC). The 2,048 Main Data bytes
are identified as D0 to D2047.
Reed-Solomon code
An error detection and/or correction code for the correction of errors.
BLER
Block Error Rate. The total number of C1 errors per 10 consecutive sectors.
It should be below 200, for perfectly readable disc.
C1/C2
Type of errors during reading a recordable or pressed disc. It is evaluated
per sector and presented (usually) averaged or summed-up over a number of sectors.
(This gives rise to the various BLER measurements.)
CD-R
A glorious recordable disc:)
DVD-R
The recordable DVD Forum defined format. The term might also refer to the
media or a drive capable of handling (recording) these.
DVD-RW
Re-writable format/disc/..., according to the DVD Forum specifications.
KProbe
A program for detecting reading errors that works on drives (readers, recorders)
based on the MediaTek chipset.
LBA
Logical Block Address. The disc is measured (addressed) according to 1/75
of the second intervals (sector, frame), in 1x speed.
MSF (CD)
MSF Address
(Minute/Second/Frame) The physical address, expressed as a sector count relative
to either the beginning of the medium
(absolute) or to the beginning of the current track (relative). As defined
by the CD standards, each F field unit is one
sector, each S field unit is 75 F field units, each M field unit is 60 S field
units. Valid contents of F fields are binary
values from 0 through 74. Valid contents of S fields are binary values from
0 through 59. Valid contents of M fields are
binary values from 0 through 74.
For example 63m:45s:70f. An alternative disc addressing
scheme. It is essentially the same with the LBA method, in case you divide
LBA by 75 (the number of frames per second) and then transform the seconds
to minutes by dividing by 60. In the literature there is an arbitration of
a 2 second track lead-in.
UmDoctor
A program by Sanyo for estimating and writing down disc reading errors (in
the form of C1/C2 for CD's and PI/Unc-PI for DVD's). It works on drives based
on Sanyo chipsets. In case of DVD, the software measures PI/Unc-PIU errors
on each 8 ECC.
Groove
A trench-like feature of the disk, applied before the recording of any information,
and used to define the track
location. The groove is located nearer to the entrance surface than the
land. The recording is made on the centre of
the groove.
Land
The area between the grooves.
CIRC
Cross Interleaved Reed-Solomon Code (CIRC) is the error detection and correction
technique used within small frames
of CD audio or data. The CIRC bytes are present in all CD-ROM data modes.
The error correction procedure which uses
the CIRC bytes is referred to as the CIRC based algorithm. In most CD-ROM
drives, this function is implemented in
hardware.
Frame (CD)
A sector on CD media. Also the F field unit of a MSF CD address. The smallest
addressable unit in the main channel.
DVD Control Area
The DVD Control area is comprised of 192 ECC blocks in the Lead-in Area of
a DVD medium. The content of 16
sectors in each block is repeated 192 times. This area contains information
concerning disc.
Lead-in Area
The CD Lead-in area is the area on a CD-ROM disk preceding track one. The
area contains the TOC data and precedes
each program area. The main channel in the lead-in area contains audio
or data null information. This area is coded as track zero but is not directly
addressable via the command set. The Q sub-channel in this area is coded with
the table of
contents information.
The DVD Lead-in area is the area comprising physical sectors 1.2 mm wide
or more adjacent to the inside of the Data
area. The area contains the Control data and precedes the Data area.
Lead-out Area
The CD Lead-in area is the area on a CD-ROM disk beyond the last information
t rack. The main channel in the leadout
area contains audio or data null information. This area is coded as track
AAbcd but is not directly addressable via
the command set. The READ CD-ROM CAPACITY data is the first logical block
address of this area minus one.
The DVD Lead-out area is the area comprising physical sectors 1.0 mm wide
or more adjacent to the outside of the data
area in single layered disc for PTP (Parallel Track Path) disc, or area
comprising physical sectors 1.2 mm wide or more
adjacent to the inside of the data area in layer 1 of OTP (Opposite Track
Path) disc.
DVD Reference Code
The DVD Reference code is comprised of 2 ECC blocks (32 sectors) in the Lead-in
Area and used for the adjustment of
equalizer system of the drive hardware.
15. Programming decisions
Programming decisions for developing the Media Quality Tests
During the preparation of this section of our site, we understood that the user interface would play a significant role in the satisfaction of our readers while they would be involved in querying our database for quality tests.
From many respects pure html is inadequate in handling highly interactive scenarios as that we felt our solution represented . We had thus have to make some decisions in advance.
Instead of having each user press a dozen of buttons on scattered pages for finding the tests he wanted to find, we felt we had to offer him a seemingly simple approach of the feel and taste of an interactive (windows) program.
All options should be available under a single page. All interactions with
the page controls (buttons, list-boxes, etc) should not distract the user attention
by imposing postbacks to the server, at least not in a viewable way:) Taking
a look at both the initial and final state of the main Test
Page (see below), shows that we have succeeded into devising the
illusion that the user is actually working on a "pure" (windows)
program. In fact, any such program, in reality, would be as fast as our Dhtml
code, not a single
second faster!
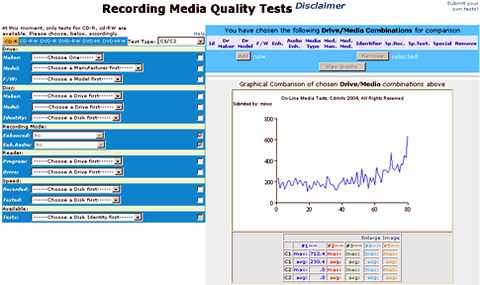
In the above picture (showing the selections leading to a particular test) we see that the user interface has been kept constant throughout all user interactions with the page.
In order to achieve all this, we had to make some browser compatibility sacrifices. We could achieve the same result by either using iframes or webservices/remote-scripting. In all cases the use of Dhtml is essential for a technically acceptable outcome. In the latter case we would have to restrict our audience to users of Internet Explorer 5.5 or later. In the former case, in general any series 4 or newer browser might be able to handle our page.
We have not tested (yet) thoroughly the compatibility of our solution with the latest Netscape/Mozilla and Opera browsers versions. This would be beyond our site?s capabilities (both in terms of personnel and necessary work-hours), for the time being. We will try to improve, in the future, compatibility with these browsers, in case the lack of standards implementation weights more towards our side.
(Given the record of thin standard Dhtml implementation in both the cases
of these 2 genres of browsers (NS and Opera), however, might limit our efforts
for reaching a wider browser use.)
View Page criticism
We have been hearing some persons arguing about the method we chose for displaying
of the tests. We accept and understand each and every one of them. Please before
sending us you opinion, try to think of a different way of arranging the user
interface that takes into account all aspects of the needs the View Page has
to serve. We expect this way you own opinion will come closest to the one we
finally adopted. If, however, this is not the case, we are glad to hear it
by sending an e-mail to us here with
the appropriate subject.
16. APPENDIX 1. UmDoctor Pro II
APPENDIX 1. UMDoctor PRO II
In this and the following apprentices you can find some useful information
on the 4 particular programs that are able to reproduce C1/C2 and/or PI/PO
errors on regular production level recorder drives. We include a brief program
description, information about the features and possible restrictions, especially
those concerning our case of quality tests.
At the end of each page you can find a table with the drives compatible with
each program, as long as error estimation in the form of C1/C2 and PI/PO is
concerned.
UMDoctor Pro. II is an accurate and easy to use program.
Within just a few steps the user is able to test the C1/C2 errors for a written
CD-R and the
PI/UncoractablePI errors of a DVD or DVD-R. For this demonstration we will
use a CD-R disc.
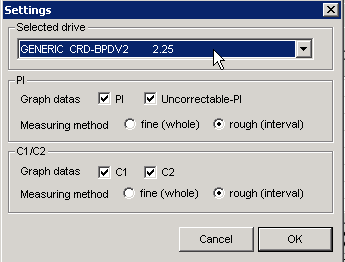
This is the main screen of the UMDoctor Pro II. Lets take a look to the settings
by pressing the settings button:
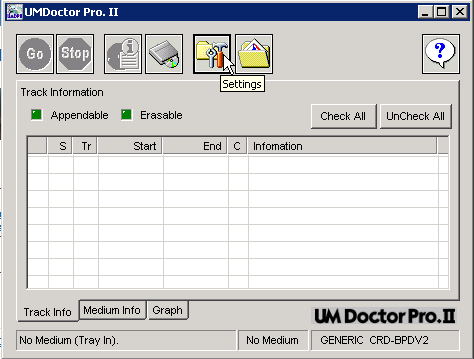
On this window we choose the test device we want to use. Note, that the
software works only with DVD recorders that support the Sanyo's HD-BURN feature,
which
are the Optorite DD0401, DD0201 and DD0203. Here, we can also select the type
of data displayed in the graph (PI, Uncorrectable-PI, C1 and C2). User is also
able to adjust the accuracy of the graph in relation to the data addresses
(fine, rough).
According to Sanyo, the UMDoctor PRO II measures PI and Uncorrectable-PI errors
for every 8 ECC.
We press the Go Button and the test process starts
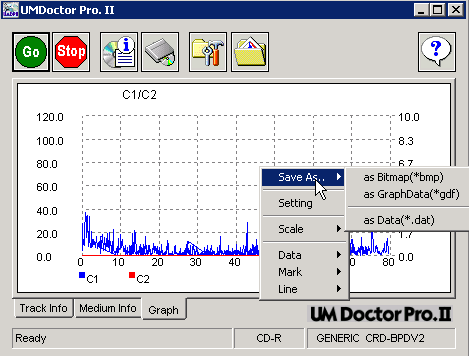
After the end of the test we do a right click on the graph area and from
the menu we choose "Save As Data" (*.dat) and we choose the destination folder.
For the DVD test, just follow the same steps, UMDoctor Pro II will automatically
recognize the inserted DVD and adjust the settings for you.
As pointed out UMDoctor Pro II works with Optorite DD0201, DD0203 and DD0401
drives. Newer versions of the software will add support for more drives. The
UMDoctor
PRO
II is available in the Sanyo website.
17. APPENDIX 2. KProbe
APPENDIX 2. KProbe
With this software you can measure the writing quality on both
CD/DVD media, the C1-C2 error rates on a CD or the PI/PO levels on a DVD.
It is very simple. Be sure that you are using a LiteOn drive
(CD-RW, DVD recorder or CD-RW combo), otherwise you won't be able to use KProbe.
Insert the media and open (run) the program. Check the "Write Strategy" tab.
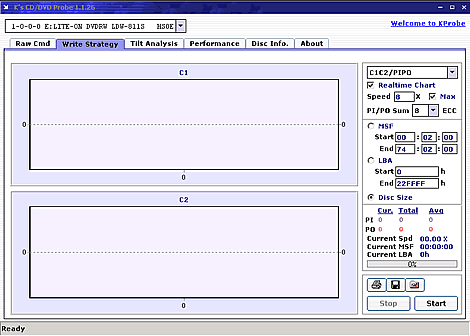
We suggest you to adjust the measurement settings as illustrates
below, the first is for DVD and the second for a CD. The "Realtime Chart" is
not necessary but you can see in realtime the whole process.

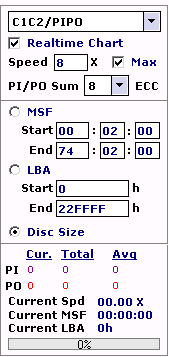
In both the cases of a CD
and DVD, it is recommended to to choose the "Disc Size" option.
The software will automatically read the whole disc without further adjustments
by user.
Optionally, the user is able to manually set the measuring margins, by setting
the MSF or LBA starting and ending addresses. More information about the
MSF and LBA are available in the FAQ section. For submitting your own tests
it suffices to choose the whole disc option, provided you have also made
the disc full of data during recording.
The selected reading speed is sometimes critical for the reliability
of the results. In case of both CD's and DVD's, you can select either to manually
enter the reading speed, or check the max speed option. When you select the
max option,
the software will scan your CD/DVD for errors at the maximum reading speed
available by the reader you use. However, testing the same disc at the maximum
and a lower speed do not always give the same results. For this reason, we
ask users to clearly define the reading speed they have selected for their
measurements, during the "Submit Test" page. After all, everyone
will be able to compare results with the same or different error scanning speed.
In case of DVD's, the user is able to select the ECC value (1-10).
Setting different ECC for each scanning gives different error level values.
As in the previous case, keeping the same ECC value for your scannings will
give more comparable results.
As soon as you press the "Start" button the process
will begin. If you have inserted a CD media you will see C1/C2 measurement.
Otherwise, with a DVD, you will get the PI/PO errors.
When the procedure finishes, you will see a chart as this one below.
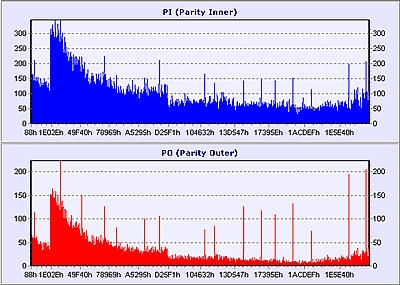
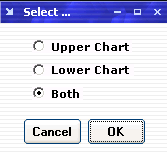
Now, you have to save the results. Just press the save icon, this with the
disc on it, and you will be asked to select which chart you want to save. Check
both ( as below) and press OK.


Give a short name to the file and set it to .csv type (as
you can see in the photo above) so you will be able to use it in the CdrInfo
media quality. Press "Save". Please do not use extra periods for
the file-name you choose. This will be troublesome during submission of the
tests, because there are not allowed more than one periods (for .csv) by our
submitting application.
18. APPENDIX 3. CdSpeed
APPENDIX 3. CdSpeed
For CD quality measurements of the type discussed in our review, you will
need the Nero CDSpeed v2.11 or higher. Notice that you can only measure CD
media at this time.
Unfortunately,
the
software does not allow to save the quality results in a *.csv or *.dat format.
Hence you can not presently use this program for submitting your own results.
However, we hope Ahead will add support for this type of file-saving, along
with support for DVD checking (PI/PO) in the immediate future.
Run the program and select its "CD Quality Test..." option,
in the "Extra" drop-down menu, as shown below.
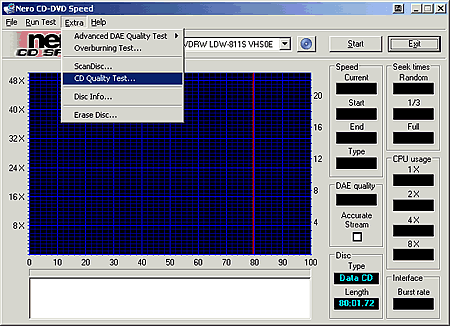
As soon as you do this, you will see the next screen:
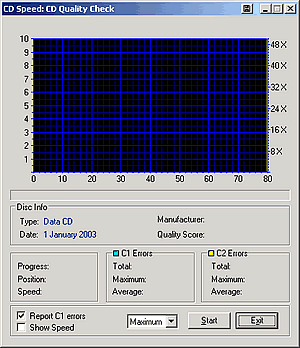
Check "Report C1 errors", if you want to see the C1
error level in the graph. You must check the "Show speed" option
if you want to include the speed graph. Adjust the speed and press Start.
 Before
the process begins, you will have to wait for the drive to spin up.
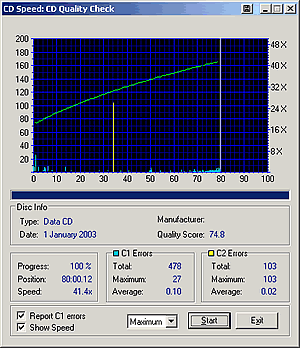
Below is a complete quality test with a data CD. The green line
is the speed while the blue and the yellow refers to the C1 and C2 error-levels
respectively.
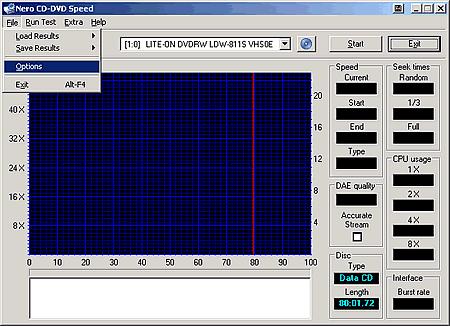
If you want to adjust the setting, you can easily do it from
the File menu and the "Options", as seen below.
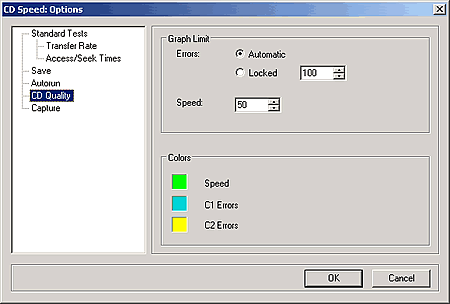
Check the CD Quality on the left and adjust the setting according
to your needs. Change the graph limit for errors and the maximum speed. You
can also select a color of your choice for the speed, C1 and C2, by pressing
on each color and adjusting accordingly.
CdSpeed works with Plextor Premium and LiteOn CD-RW recorders, as readers.
19. APPENDIX 4. PlexTools Professional
APPENDIX 4. PlexTools Professional
Plextools Professional offers detailed quality scannings for CD's. The user
is able to run the Q-Check C1/C2 test, the FE/TE (Focus-Tracking Errors) test
and the Beta/Jitter tests. Note that the software works only with the Plextor
Premium
CD-RW drive,
and
as in case of CdSpeed, the user is not able to save the results in a numerical
format. (We expect this behavior to change in the foreseeable future.)
The
following picture shows the main screen of the PlexTools professional program.
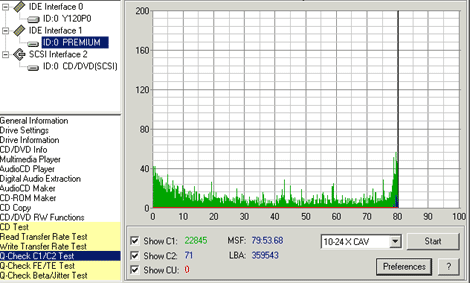
The C1/C2 read test applies to both written
CD-R/RW media and stamped CD's. The test will measure the quality of the written
or pressed media by counting the number or low-level errors. Note, that most
of these errors (C1) are correctable by the drives in the case of absence of
C2 errors. The software offers C1, C2 and CU (Uncorrectable) error measurements.
The C1 values indicate BLER (Block Error Rate), which is the number of E11+E21+E31
errors.
C2 indicates the number of E22
CU indicates the number of E32.
More information about the nature of these errors is available in our FAQ
section. In order to achieve reliable results independent of the influence
of the drive's performance, the tests should be performed at the lowest speeds.
You are free, however, to use speeds near the top available, provided the disc
is well balanced. Noisy discs during the tests should be avoided, as the consistency
of the tests over repetition will be questionable.
We have selected the Q-Check C1/C2 Test. The
first step is to select the device we are
going to use (reader):

There is no need to change options for this measurement. Choose the Q-Check
C1/C2 Test mode and just make sure that the C1,C2 and CU checkbox are checked.
We choose the reading test speed and we press Start:
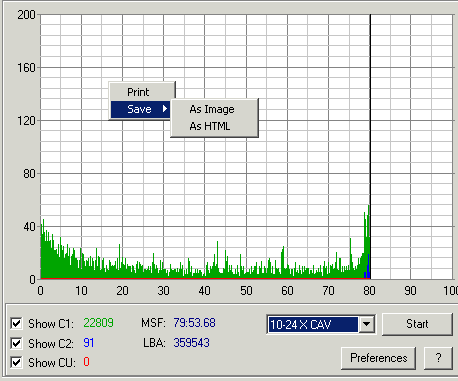
When the test ends, there is a pop up window informing the user about the
C1 and C2 error but we don't actually need that window, so just press close.
To save the graph right click on the graph area and choose "Save as...",
then select the destination folder.
For the Beta/Jitter Test we select the appropriate option.
The test applies to written CD-R/RW's. Below, we will check the write quality
of a disc by checking the jitter rate and the Beta value. The Beta value is
an indication how well
the recorded signal pits and lands are balanced in (asymmetry). An horizontal
line would mean perfect balance and would give the best readability result.
The Jitter function, as it is currently estimated by this program, shows the
average jitter rate in the 3T~11T range. A lower jitter will indicate
better results for
readability
and
less
chances
on
(un)correctable
errors.
More information about Beta/Jitter is available in our FAQ
section.
We select the Q-Check Beta/jitter Test as illustrated below:

We make sure that the "Show Beta" and "Show Jitter" checkboxes are marked
and we press the start to begin the test
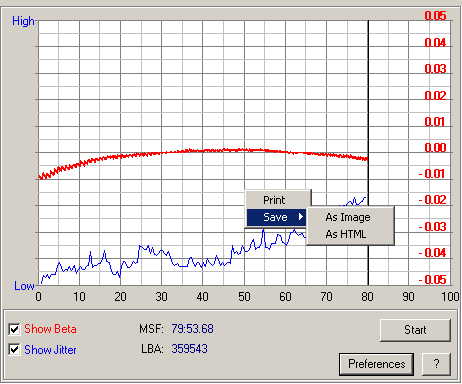
The method of saving the test results is identical to the previous case of
the C1/C2 test, just right click on the graph and from the popup menu choose
"Save as..."
to the
the
destination
folder.
Q-Check FE/TE test
This is a write test for blank CD-R/RW media. It will measure the mechanical
characteristics of the media. FE (Focus Errors) indicates how well the pickup
can focus the laser beam on the disc surface. TE (Tracking Errors) indicates
how well the pickup can follow the spiral track of a disc.
None of the above tests offer any numerical output, and thus, they are not
included in our test results suite, at least for now.