1. Introduction
Nero Recode 2 software - Page 01
Introduction
 Ahead
announced the second version of the very promising solution for fast transcoding
and burning
of
DVD-Video
titles a couple of weeks ago. Today we have the chance to take a look to the
first Beta version of the software. Nero Recode 2 offers importing, transcoding
and burning of non CSS-encrypted DVD Videos, while you can keep the original
menu,
select desired video titles,
audio tracks, and subtitles. An advanced fit-to-disc option as well as an integrated
movie player makes it a very powerful tool in your hands. The basic features/capabilities
are the following:
Ahead
announced the second version of the very promising solution for fast transcoding
and burning
of
DVD-Video
titles a couple of weeks ago. Today we have the chance to take a look to the
first Beta version of the software. Nero Recode 2 offers importing, transcoding
and burning of non CSS-encrypted DVD Videos, while you can keep the original
menu,
select desired video titles,
audio tracks, and subtitles. An advanced fit-to-disc option as well as an integrated
movie player makes it a very powerful tool in your hands. The basic features/capabilities
are the following:
Recode an entire non-copy-protected dual layer DVD movie. Create a backup
on a standard 4.7 GB DVD media or your Hard Disk. Thus you can select which
subtitle, audio, and video contents you want and remove the others, keeping
the original
menu.
Convert parts from different DVD sources to Nero Digital (MPEG-4) format.
Trim videos, choose one audio track and subtitle and stores them on a standard
700 MB CD media or your Hard Disk.
Create your own DVD using parts from different DVD sources. You can remove
audio and subtitle you don't want, trim videos and recode the contents so that
it fits on a standard 4.7 GB DVD media.
Important note: The program is compatible
with no-copy-protected
movies.
In the following pages we offer a brief presentation of the software
as well as the basic steps for some essential tasks through Nero Recode 2.
2. DVD9 to DVD5
Nero Recode 2 software - Page 02
DVD9 to DVD5
One of the most popular tasks today: Fit the contents of a DVD9
disc on a blank DVD5. First thing you have to do is to run the Recode 2 program.
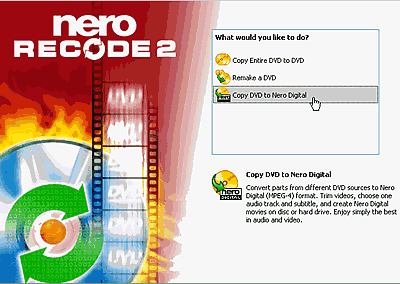
In the opening window you choose the appropriate task:
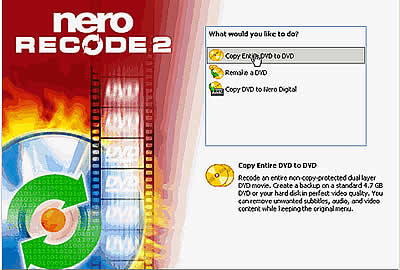
In this page we will try to explain how to
fit a non protected DVD9 movie (approximately at 7~8GB)
on a blank DVD recordable/rewritable 4.7GB disc. So we choose the first selection "Copy
Entire DVD to DVD", and proceed:
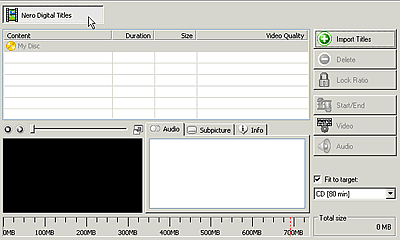
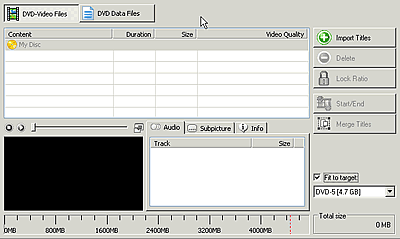
The following picture is the main screen of the program.
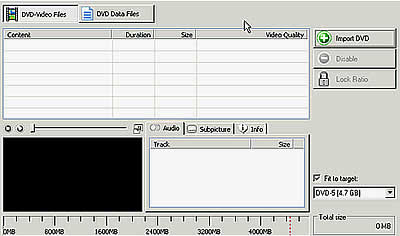
Afterwards you have to import the movie files you want to process.
This is very simple, just press "Import DVD" button. The browse menu
will be appear and you must choose the folder, which contains your movie. For
example:
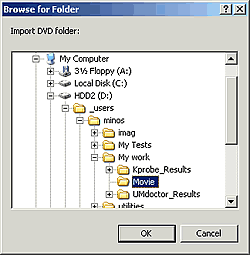
We press "OK" and the import procedure
begins. During this process you will be able to watch the movie in a fast preview
by enabling
the video preview. By default this feature is enabled. Personally I don't recommend
this to all you that you haven't seen the movie, you don't want to know the
end of the movie :). The remaining time until finish is illustrated accurately:
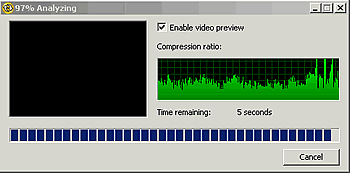
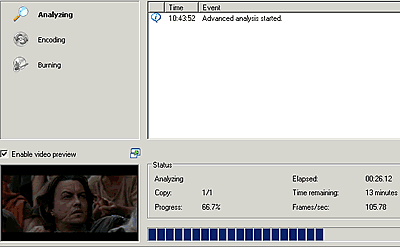
When the analyzing process take place, the following picture
is what you will see.
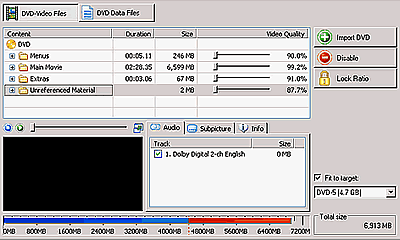
Now depending to your needs you can adjust the Audio, subtitles,
menus etc. The program selects by default some settings which of course you
can change. Otherwise press "Next".
Before see what will happen we will give some information how
to adjust the setting.
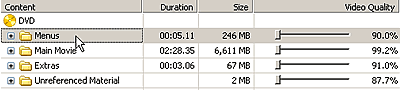
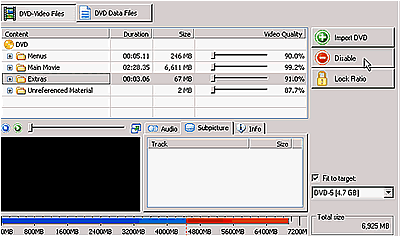
On the left you can select among the movie contents. In the
middle there are three tabs about Audio, Sub picture and Info. Now according
to which part of the movie you want to adjust, you select Menus, Main Movie,
Extras and anything else that might be exist, as in our example Unreferenced
Material. Just for example we selected the "Menus" option.
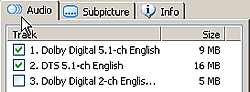
After you have to choose what you want to change; Audio or Subtitles?
For Audio we press the "Audio" tab and we see a list of the available
output audio formats in the provided languages. In our example, we chose both
Dolby Digital 5.1 and DTS 5.1 formats, in order to have high audio quality
in our final compressed movie. In case you watch your movies on your 2-ch PC
speakers, you should also check the 2-channel Dolby Digital output:
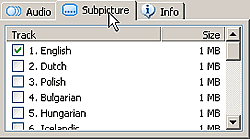
For subtitles select "Subpicture" and and check which
ones you prefer. For those you don't just uncheck them. For example:
Audio and Language settings are available for your movie Main
Movie, Extras etc.
If you want to exclude something from the final compilation,
(sub content, extras e.t.c) just select it and press "Disable". Note
that you cannot simply delete these files, as they will interrupt the flow
of the movie and possibly make your DVD unplayable to DVD players. So Nero
Recode 2 allows you to disable all or a few of the extra items.
As soon as you press the "Disable" button you will
see the following picture:
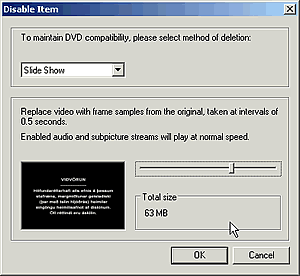
A very useful option is that you are able to watch all the parts
of the movie you are about to exclude.
 Here
you can replace the selected item with one of the options illustrated on the
left. By selecting the "Slide Show" option, you will replace the
video with frame samples from the original video, taken at intervals of 0.5sec.
If you choose "Custom Picture" you you 'll be able to replace the
selected video with a picture, default by Nero or one of yours. Last if you
select "Custom
Color" you will replace the video with a color that you may choose from
a palette by Nero. Just make your choice and press "OK".
Here
you can replace the selected item with one of the options illustrated on the
left. By selecting the "Slide Show" option, you will replace the
video with frame samples from the original video, taken at intervals of 0.5sec.
If you choose "Custom Picture" you you 'll be able to replace the
selected video with a picture, default by Nero or one of yours. Last if you
select "Custom
Color" you will replace the video with a color that you may choose from
a palette by Nero. Just make your choice and press "OK".
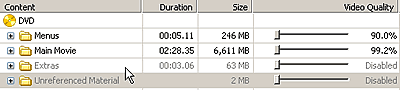
You will be returned to the main screen. Notice that the section
you have chosen are disabled.
Before proceeding make sure you have enable the "Fit to
target" option and you have set it to DVD-5 4.7GB. The video quality settings
will be automatically adjusted to maintain the highest quality for the available
capacity. However, additional slight adjustments can be done manually through
the slide bars.
After we have finished with the settings adjustments, press "Next".
In this step I describe you how to burn your project in
a DVD media or your Hard Disc. After we pressed the "Next" button
from the previous page, we will see the following screen.

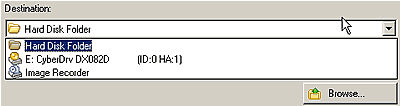
From the drop down menu you can select where you want to write
your project. If you choose "Hard Disk Folder" or "Image Recorder",
click "Browse" to define the destination folder. After that, we recommend
you to enable the "Advanced analysis" feature for better results.
If you want to burn your movie on blank media select your burner's
name option. You must define a temporary folder, by pressing "Browse",
where Recode will make the temporary compressed/encoded file.
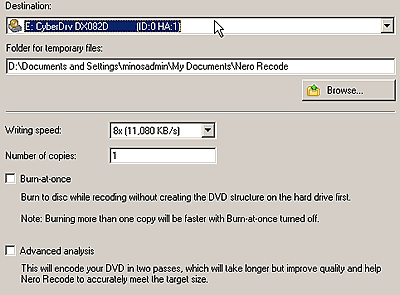
Thus you have to adjust the writing speed, depending on what
speeds are supported by your drive, and the writing method. We recommend to
check the "Advanced analysis", it takes more time but it worth it.
This will offer a two-pass encoding for improved final quality.
So we press the "Burn" button and the whole procedure
begins. While analyzing, encoding and burning there is a preview of the movie.
That's all, our new DVD-Video disc is ready.
3. DVD5 to MPEG4
Nero Recode 2 software - Page 03
DVD5 to MPEG4
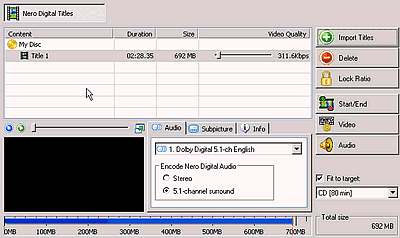
Nero Digital can convert a 4.2 GB DVD-Video movie to an
MPEG-4 video file of 692MB, which fits on a CD-R!
This time you should select the last option of the three as illustrates
in the picture below:
Here is the main screen, almost the same as in the previous section.
Next you should import the movie. Follow the same steps
as in the previous description, "Import Titles", "Browse",
analyzing etc. Notice that in this project you should import only titles, not
all the folder. Choose
the titles you want and press "Add Title" for each title and "Finished" for
return to the main screen.
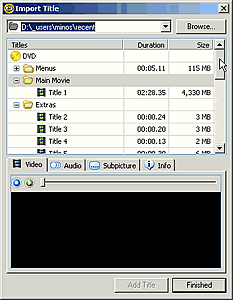
Below is what you will see after those steps. We selected only
the "Title 1" from the main movie:
You can also define the start and the end of your movie
by pressing the "Start/End" button. This means that the movie can
be cut or changed (shortened) according to your personal taste For example,
you are able to start your movie from chapter 4.
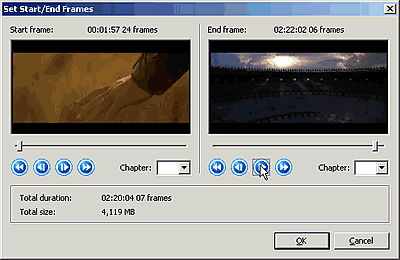
Set the starting and the finishing chapter and adjust the slide
bars, if you want to remove some frames. When you finish press "OK". You will
return to the previous screen. Select the audio and subtitles you want (as
we have describe in the previous page) and press "Next".
User is able to select the size of the final MPEG-4 video to
fit on a 74min CD-R, 80min CD-R, 4.7GB DVD recordable or any other custom capacity.
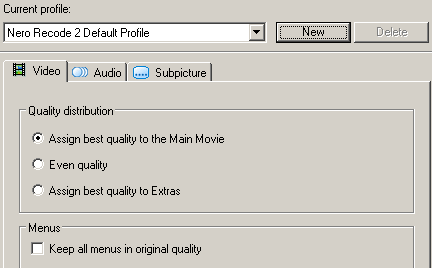
The basic quality settings are gathered in the following screenshot.
The quality settings (profiles) can be set either by the user or the Nero Recode
(default profiles). For example, you can assign the best quality for the main
movie only, extras only or choose the even quality option, for a flat encoding
bitrate:
More details about the MPEG-4 encoding capabilities of the software will be
added in this section soon. Notice that the MPEG4 conversion will take much
time, which is strongly related to your CPU power.
After encoding, we proceed to burning the video files to our
CD-R/DVD discs, as we mentioned in the previous page.
4. Remake a DVD
Nero Recode 2 software - Page 04
Remake a DVD
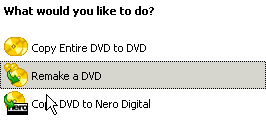
This time choose "Remake a DVD". This is the screen you will
see after your selection:
Once again you import the titles you want, even if they are
from different movies. You can create your own DVD using parts from different
DVD sources, remove subtitles or audio tracks, trim the movie and fit it
in a blank 4.7GB DVD disc. The settings are familiar with those in the previous
pages. If you read carefully the
two
other projects
we have
described,
you
will easy manage to continue with this one.
This time of course you can burn the compilation you have chosen
in a 4.7 GB media or to your hard drive. The output format is either DVD-Video
or DVD ISO/UDF (data). No MPEG-4 encoding is available in this task.
In case of DVD-Video, user should import DVD files from a
Video TS folder on his hard disk. Note that Nero Recode 2 will only work
with VOB, IFO and BUP files. You cannot import MPEG, AVI, WMV, ASF, MP4 or
DV files directly.
Of course there are many other setting that will probably make
your work easier. We hope you have get a basic idea of the software. More
information will be available very soon. Stay tuned!