1. Introduction
“Nero Burning Rom DVD-ROM (ISO)”
INTRODUCTION
This is a simple guide for creating a DVD-ROM (ISO) project using what is
probably the most popular and best known ROM burning software, Nero. Using
this method
you can backup data onto
blank DVD media. While there are several ways of creating such a project,
we will explore the simplest way of going about the task.
The software version used here is 6.0.0.19.

2. Step1
“Nero Burning Rom DVD-ROM (ISO)”
Running Nero
Begin by putting your media into the DVD recorder drive (if you
haven't already done so) and launch Nero (you should have a shortcut on your
desktop, or select it by going Start>Programs>Nero>Nero
Burning
ROM).
As soon as the application opens, a dialog box is briefly displayed
with the program's version details, owner, etc. This is followed by the "New
Compilation" dialog screen.

Select the option DVD from the drop-down menu
located on the top left corner.
Below the drop-down selection will appear a series of icons listing the various
activities that can be performed on DVD media. For our purposes, select
the
DVD-ROM
(ISO)
icon. In the Multisession section (screen shot below), select one of the following:
- Start
Multisession disc if this is a new media that has never been written
to. With this option
selected,
it is possible to burn more data on the media sometime in the future,
hence the name multisession.
- Continue Multisession disc if the media has been created
at a previous session using the Start Multisession disc option. In this way
it is possible
to append or
update data already written on the media.
- No Multisession if this is going to be a one time
burn and no more data is going to be written in the future. This restriction
also applies to
rewriteable media, which will require that you erase the rewriteable
media first, before being able to write new data.
Since we are starting with a new, unwritten to media, choose
Start Multisession disc
.
Next, select the Label tab as shown below, and enter a volume
label for your media. By default, Nero enters the label NEW, but you can enter
any name you like, up to a maximum of 32 characters. Applications such as Windows
Explorer show the volume label along with the drive letter which can help identify
the media in the drive. If
you
forget
or don't want to enter a volume name at this point, you can enter a volume
label later on.

 On
the top right corner of the dialog screen, press the "New" button.
Only if under the Multisession section
you chose Continue Multisession
disc, you will now see a screen similar to the following:

This lists any previous sessions written on the media. Choose
the last session and press OK.
Regardless of the multisession options chosen, the following
screen should now appear.

3. Step2
“Nero Burning Rom DVD-ROM(ISO)”
Disk info
At this point you are ready to begin. But before we start the
"drag and drop" procedure used in creating our DVD, there are a few
pointers that maybe
worth
knowing.
First
of
all you
can obtain information regarding the media that you want to burn: whether it
is blank or
if previous sessions exist on it, the total media capacity (both in megabytes
- MB and in duration mm:ss:hh), and so on. This information is available at
any time, not just during a burn process.

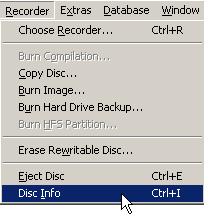
From the main menu bar, choose the Recorder
option. A drop-down menu should now appear as shown below.
 Select
the Disc
Info option. Alternatively, you can also activate this option at any time by
pressing the keyboard shortcut keys
Ctl and I (simultaneously), or by seelcting
with your mouse the disc info icon
  from
the toolbar .
In any case, the following dialog box should appear with information
for the media that you have inserted.

Just press OK to close the window.
4. Step3
“Nero Burning Rom DVD-ROM (ISO)”
Choosing the Recorder
This is an option for those that have more than one recorder
installed in their computer. You can select or change the recorder you want
to use each time.
It is also possible that Nero recognizes by default your CD
recorder while you want to use your DVD recorder. Select the Recorder option
from the main
menu bar
and choose the "Choose Recorder "option. Here again, there is the
keyboard shortcut (Ctrl +R) available or select the  icon
from the tool bar.

The following screenshot is a sample. As can be seen, this PC
had only one recorder installed. The first device listed, Image Recorder,
is a virtual device whereby an exact copy of the contents of a CD or DVD media
can be
stored
on a hard disc
and
is refered
to as an image. This is not an option in our case, so we make sure our DVD-RW
drive is selected. If you have more
than
one
RW drive installed on your PC, select the desired drive (mouse click on it)
and click the OK button.

5. Step4
“Nero Burning Rom DVD-ROM (ISO)”
Erase RW Disk
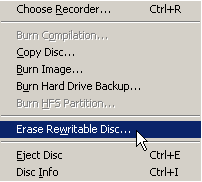
If you are using a rewritable disk and you want to erase it before
proceeding, choose the Recorder option from the main menu bar and select "Erase
Rewritable Disk"
from the drop-down menu as shown below.

The following selection list will appear. Select
either "Quick-erase"
or "Full-erase". The basic difference is that Quick Erase erases
the directory and file structure on the media but not their contents.
So, while you can't see what files were previously stored on the disc, in truth
their contents will still be somewhere on the disc. Choose
quick rather than full since it is faster. Next select the recorder
in which the RW media is inserted and select
the Erase button. Wait for
the procedure to finish afterwhich you can
close the window.


6. Step5
“Nero Burning Rom DVD-ROM (ISO)”
Burn
You should now have the screen shown below, with the split display
showing the files on your PC on the right pane (File Browser), and the contents
of your DVD on the left pane. If this is a new, unwritten DVD, the left pane
should
be
blank. If this is not the first session to be written on the media, then the
left pane should display existing files already on the DVD media. Locate and
choose in the File Browser pane, the folders and/or files to be written.
For example, by selecting Local Disk (C:) in
the
right
pane,
the contents
for the drive appear under the Name column along with respective sizes.
Once you have selected any folders or files in the right pane, with the
mouse drag and drop your selections into the left pane. Repeat this process
for as many folders or files you want to back up. At the bottom of the display
window, a bar will fill up indicating how much space the intended folders and
files will take up. You should not exceed the capacity of your DVD media.

Once you have finished dragging all folders and files to be
backed up, select Recorder from the menu bar, and then "Burn
Compilation..." from the drop down menu, or press the  icon
on the toolbar menu.

You should now have a screen similar to that shown below. In
the Action options list, select one of the following:
- Write if you want to burn the media immediately
- Simulation if you want to
test the burn process before burning
- Determine maximu speed if you want Nero to determine the
maximum burn speed for you
You can also set the write speed from
the "Write
speed" drop-down
menu (which is dependent on the maximum available write speed of your DVD drive
and the maximum write speed possible for the DVD media), and how many copies
to be made. One final detail is the volume label given to the
media
which
can
be
changed
or
corrected
by
selecting
the Label tab
(along the top of the dialog window) and entering the required name. To begin
the burn process, select the Burn button.

The burn process can take several minutes depending on the total
size of all the folders and files to be written, and the writing speed selected.
Simply be patient and watch the progress bar which indicates percentage of
the compilation completed so far.

As soon as the procedure is complete, the following confirmation
dialog box will be displayed. You have now successfully backed up your files
onto DVD media.
