1. Introduction
PRIMERA BRAVO
OPTICAL PUBLISHING SYSTEM - Page 1
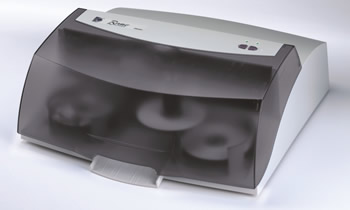
 On
September 3rd Primera technology announced the availability of "Bravo
Disc Publisher", an automated CD/DVD duplication and printing system.
Bravo is designed for hands-free, automated production of up to 25 CDs or
DVDs per job. A robotic mechanism is used to transport discs into the built-in
40x CD recorder or an optional Pioneer combo DVD-R/CD recorder. After recording,
discs are automatically transported to the integrated printer and printed
in full color at up to 2400 dpi resolution.
On
September 3rd Primera technology announced the availability of "Bravo
Disc Publisher", an automated CD/DVD duplication and printing system.
Bravo is designed for hands-free, automated production of up to 25 CDs or
DVDs per job. A robotic mechanism is used to transport discs into the built-in
40x CD recorder or an optional Pioneer combo DVD-R/CD recorder. After recording,
discs are automatically transported to the integrated printer and printed
in full color at up to 2400 dpi resolution.
Main specifications
Bravo combines automated robotic disc duplication and full-color printing
in a compact, "all-in-one" desktop unit. Up to 25 discs per job
are automatically produced. The available models are the CD Publisher for
writing / printing on CD-R media and the DVD Publisher, for writing / printing
on DVD-R discs respectively. The Bravo CD Publisher uses a built-in 40x CD-R/RW
recorder from Teac, allowing users to write a full 650MB disc in less than
3 minutes. The DVD Publisher produces both DVD-R and CD-R recordings. The
built-in drive comes from Pioneer, and supports both 2x DVD-R and 8x CD-R
writing.
Bravo incorporates high-resolution ink-jet printing technology. You'll be
able to produce graphics, photos and text with photo-realistic 2400 dpi print
resolution (maximum). Using printable-surface media, Bravo prints directly
onto the surface of discs.
Bravo produces not only standard 120mm CD's and DVD's, but also several of
the most popular business card-shaped and mini-CD formats. However, an optional
adapter kit is required in this case.
The attached CD/DVD burning software from Veritas allows virtually any digital
information to be duplicated. SureThing CD Labeler First Edition software,
is also included.
The detailed specifications are illustrated in the following table.
|
Disc Capacity
|
25 disc input/output or 50 discs in “kiosk”mode
|
|
Recording Speeds
|
CD-R: Up to 40x
DVD-R/CD-R: 2x/8x
|
|
Recordable Formats
|
CD: CD-R, CD-RW, CD-Audio (CD-DA),
Video-CD, MP3 to CD-Audio, most other
industry-standard CD formats
DVD: DVD-R,DVD-RW; other formats to be
added as they become standardized
|
|
Print Method
|
Ink-jet
|
|
Print Resolutions
|
2400x1200 dpi, 1200x1200 dpi and 600x600
dpi
|
|
Maximum Print
Width
|
4.724" (120mm)
|
|
Ink Cartridges
|
Dual CMY color and black monochrome
|
|
Colors
|
16.7 million and black monochrome
|
|
Color Matching
|
PrimaColor™ color matching software
included
|
|
Label Software
|
SureThing CD Labeler First Edition
|
|
Media Types
|
Printable-surface CDs and DVDs
|
|
Operating Systems
|
Windows 2000 and XP
|
|
Weight
|
18 lbs. (8.2kg)
|
|
Dimensions
|
17.25"W x 7.25"H x 16"D(438mmW
x 184mmH x 406mmD)
|
|
Interfaces
|
Control and printing - USB2.0
Image data - FireWire (IEEE1394)
|
|
Minimum System Requirements
|
Pentium III (or equivalent) at 450MHz or
higher256MB RAM, an available PCI slot for the FireWire (IEEE-1394)
adapter card or a built-in FireWire portAn available USB portNote: For
the DVD-R model you must have Windows 2000 or XP with a NTFS drive partition.
(This is required for being able to write files larger than 2GB.)
|
Package
 As
we mentioned, Bravo CD/DVD Publishers include built-in either a CD-R or a
DVD-R/CD-R recorder and an integrated 2400 dpi disc label printer, black and
color ink cartridges, Prassi PrimoCD/DVD 2.0 for Windows 2000/XP, power supply,
USB and FireWire (IEEE 1394) cables and instructions.
As
we mentioned, Bravo CD/DVD Publishers include built-in either a CD-R or a
DVD-R/CD-R recorder and an integrated 2400 dpi disc label printer, black and
color ink cartridges, Prassi PrimoCD/DVD 2.0 for Windows 2000/XP, power supply,
USB and FireWire (IEEE 1394) cables and instructions.
Installation requires
an available FireWire (IEEE 1394) port or add-on board (sold separately) and
an available USB port.
Except from the main device, the Publisher package includes all the essential
accessories for the complete and hassle-free operation of the unit.
The accessories supplied are the following. (More information for the usability
of each accessory is given later in this article):
o Gray Plastic Input and Output Bins
o Switching Power Supply with Power Cord
o One Three-Color (CMY) Ink Cartridge
o One Monochrome Black Ink Cartridge
o Quick Start Installer Disc (for use with both CD-R and DVD-R models)
o IEEE 1394 FireWire Cable (Black)
o USB Interface Cable (Biege)
o Warranty Card
o Operator's Manual, Quick Start Guide and other printed information
Price
The Bravo CD Publisher package costs $1995.00 and the CD/DVD Publisher $2495.00.
The price of the color and monochrome ink cartridges is $ 42.95 each.
Written by: A. Papantoniou
2. Identifying the parts
PRIMERA BRAVO
OPTICAL PUBLISHING SYSTEM - Page 2
Identifying the parts
The following illustration shows the Publisher, its Control Panel, the Buttons,
LED indicator lights, Input and Output Bins and other components.
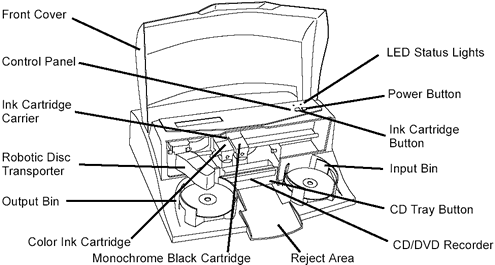
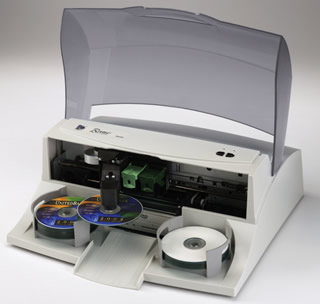
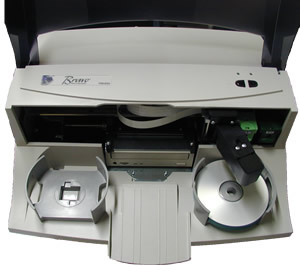
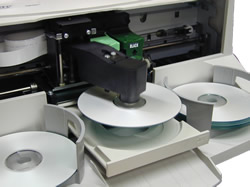
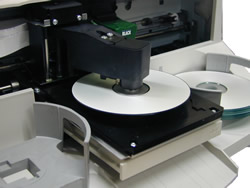
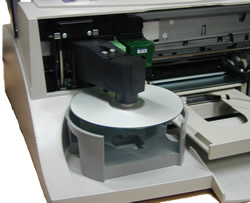
The Robotic Disc Transporter moves the discs from the Input Bin, to a CD/DVD
Recorder, next to the printer, and finally to the Output Bin. Hence, the CD/DVD
Recorder is automatically loaded and unloaded by the Publisher's Robotic Disc
Transporter.
The Recorder Tray Button manually opens or closes the Recorder Tray. Under normal
operation, the in/out movement of the Recorder Tray is controlled automatically
and this button is not used.
The Control Panel contains LED Status Lights and Buttons to control the Publisher.
These indicate that Power is ON. They also blink in certain patterns to indicate
an error or other exceptional condition of the unit. The following table explains
briefly these conditions.
|
Power LED
|
LED
|
Publisher
|
| on solid |
off |
Is ready to receive job |
| on solid |
on solid |
Has received a job and is waiting for the Robotic Disc
Transporter to load a disc |
| both lights are blinking alternately with one
another |
Waiting for a cartridge to be installed and the lid to
be closed. |
| on solid |
flashing rapidly |
The printer tray or ink cartridge carrier has
stalled. Press the Ink button to retry the operation. |
| flashing rapidly |
on solid |
The Publisher has a cartridge problem. Check to make certain
that the cartridges are installed correctly and that the bar code labels
on the underside of the cartridge are not damaged. |
| repeating pattern of both lights flashing in
unison, then one light momentarily on solid. |
This indicates low ink warning. If the left light stays
solid after the flash, the Color cartridge is low. If the right light stays
on after the flash, the Black Monochrome cartridge should be replaced. |
 The
Power Button turns the Publisher's power ON and OFF. When the front cover is
opened, the "Ink Cartridge Button" is used to position the Cartridge
Carrier for easy ink cartridge replacement.
The
Power Button turns the Publisher's power ON and OFF. When the front cover is
opened, the "Ink Cartridge Button" is used to position the Cartridge
Carrier for easy ink cartridge replacement.
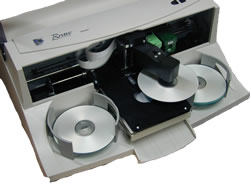
The Input/Output Bins are situated under the top cover of the Publisher. The
bins will hold up to 25 discs each. The right-side bin is the Input Bin for
blank media; the left-side bin is the Output Bin for finished discs.
The Reject Area is where discs are dropped if they do not pass a software verification
test. The discs slide down the ramp, out in front of your Publisher.
 The
Front Cover is a durable plastic cover that will protect the Publisher from
dust and interference.
The
Front Cover is a durable plastic cover that will protect the Publisher from
dust and interference.
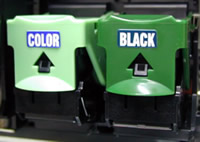
The Ink Cartridge Carrier holds both a color ink cartridge (left side pen) and
a monochrome ink cartridge (right-side pen).
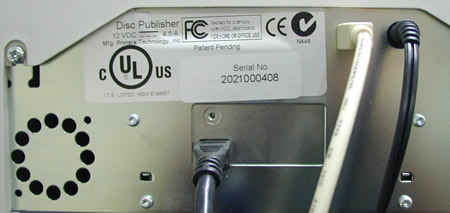
The input ports found on the rear panel of the Publisher are the following:
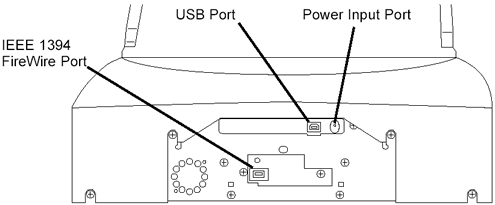
The FireWire (IEEE 1394) Port receives data that is to be passed on to the
recording drive from a PC.
The USB Interface is connected to an open USB port on your PC with a standard
USB cable, included with your Publisher.
The Power Input Port connects to the included 100V~240V, 12V switching power
supply.
3. Hardware and Software Installation
PRIMERA BRAVO
OPTICAL PUBLISHING SYSTEM - Page 3
Hardware and Software Installation
Hardware
The installer CD-ROM bundled in the package guides the user through the process
of setting up the duplicator. First of all, you have to apply the power to the
device. The power adapter supplied with the Publisher is connected into the
rear power port of the Publisher.
 Next,
you have to load the discs. All you have to do is to open the Publisher cover
and load the Input Bin with 25 blank discs. Both Output and Input bins can be
placed on the mounting pegs.
Next,
you have to load the discs. All you have to do is to open the Publisher cover
and load the Input Bin with 25 blank discs. Both Output and Input bins can be
placed on the mounting pegs.
In order to install the Ink Cartridges you have to press the cartridge button
to move the Ink Cartridge Carrier to the load position and open the ink cartridge
covers. Slowly remove the tape covering the cartridge's print head, being careful
to avoid damaging the barcode label on the underside of the cartridge. Insert
the ink cartridges into the carrier, copper end first, and snap the cartridge
cover in place. Insert the color one in the left holder, the monochrome black
in the right cartridge holder. In the following picture you can see the cartridges
as they are normally installed on the printer.
The next step is to connect the FireWire cable. The IEEE 1394 cable carries
the data that will be sent to the recorder when producing discs. If necessary,
install first a compatible FireWire board in your PC. Connect the 6 Pin FireWire
cable included with your Publisher. Connect the other end to the FireWire board's
output port on your PC. After the connection, Windows will recognize the built-in
recorder of the Publisher. In our case, the Teac recorder was identified as
"Initio W540E", as the following picture shows:

Driver Installation
The data are transferred to the Publisher through the USB cable, also available
in the Publisher package. Connect the Publisher to your PC using the beige USB
Cable. After a few moments, Windows 2000 will tell you it has found new hardware
and is looking for software to install it. By allowing Windows to install the
software automatically, you may see a notice like the one shown here stating
that the Optical Disc has not passed Windows Logo Testing.
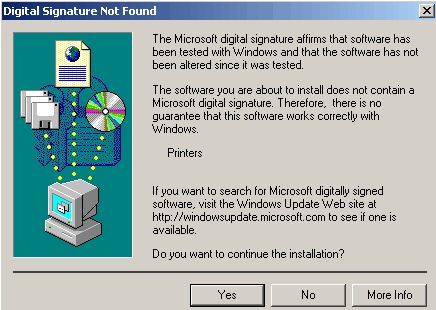
Click Install Anyway to continue installing the printer driver for your Publisher.
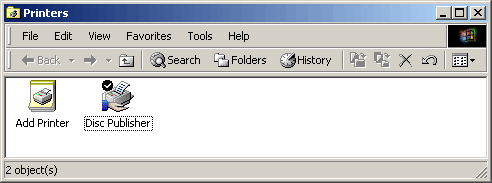
Windows 2000 recognized the new device as "Disc Publisher", as you
can see below:
After connecting all the essential cables the rear panel of the Publisher must
look as the following picture shows:
After the printer driver software for the Publisher has been installed, click
Next and you will see a screen to select the language for the software. Select
a language and you will be guided through installing both SureThing CD Labeler
and Prassi PrimoDVD 2.0. Once installation has completed, reboot your computer.
4. Overview of operation
PRIMERA BRAVO
OPTICAL PUBLISHING SYSTEM - Page 4
Overview of operation
Let's take a look at the complete process of duplicating and printing a single
CD/DVD job. After having loaded up to 25 blank discs into the input bin, the
Robotic Disc Transporter "picks" one disc at a time and places it
into the recorder, which has already its disc tray been open.
The Recorder Tray then automatically shuts. Through software control, you can
perform a test on each disc before recording. If a disc does not pass (meaning
that all or part of that disc is not recordable), the Robotic Disc Transporter
picks it out of the CD Tray and sends it to the Reject Area.
The Recorder is now able to write to the disc. The average recording time on
a 650MB CD-R disc is about 3½ minutes. A full DVD records in about 30
minutes. After recording, the Recorder Tray opens automatically. The Robotic
Disc Transporter will lift the disc out of the Recorder Tray.
Then, the Recorder Tray will close, and the Printer Tray will open. The Robotic
Disc Transporter will lower the disc into the Printer Tray, and the Printer
Tray will then automatically close too.
If publishing more than one disc, the Robotic Disc Transporter will load the
Recording Drive with a blank disc from the Input Bin to start recording the
next round. Once recording has started, the Publisher will start printing directly
onto the surface of the previously recorded disc. This simultaneous recording
and printing of discs increases the throughput of Publisher.
Print time varies according to the print mode being selected . Primera notes
that in most cases, print time takes no more than 2 minutes. After printing
the first disc, the Publisher's Printer Disc Tray opens automatically. The Robotic
Disc Transporter moves the finished disc to the Output Bin.
5. Creating a publishing job
PRIMERA BRAVO
OPTICAL PUBLISHING SYSTEM - Page 5
Creating a new publishing job
As we have mentioned the software bundled in the Publisher package is the Prassi
PrimoDVD 2.0 and the SureThing Disc Labeler. With Prassi PrimoDVD 2.0 you will
be able to create your data, audio or any other type of CD/DVD compilations
or copy your favorite CD/DVD discs, while SureThing Disc Labeler is the tool
for creating your own designs on your DVD/CD media. Both software are available
in the installation CD-ROM in the package.
After a successful installation of the Publisher and the software suite, we
are free to launch the PrimoDVD 2.0. The following picture will appear when
you launch the Primo, asking you to select the drive to be used with the Publisher:
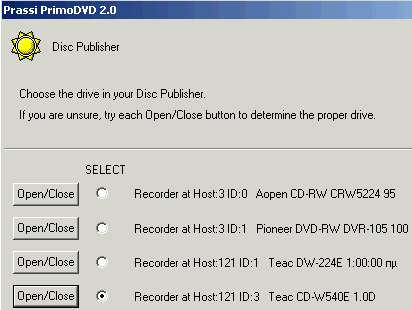
We chose the "Teac CD-W540E" drive, since this is the drive available
in the CD Publisher we tested. The next dialog box appears and prompts the user
to launch the SureThing CD Labeler program in order to design a print image
for the disc before proceeding to the recording process:

 Let's
select "YES" to launch the SureThing CD Labeler.
Let's
select "YES" to launch the SureThing CD Labeler.
A wizard window comes up and lets you adjust the basic settings for your new
design. You can select the printer you want to use, among other possible printers
connected to your PC. In our case, we select the "CD Color Pinter"
and continue with the selection of the background of our design. We can choose
among the built-in background or import our own.
Next, we can select any layout or start from an existing Smart Design in order
to create our own. This is the last step of the wizard and after that, the main
design window appears. Note that user can also proceed to the main design window
(blank design) from the first step of the wizard.
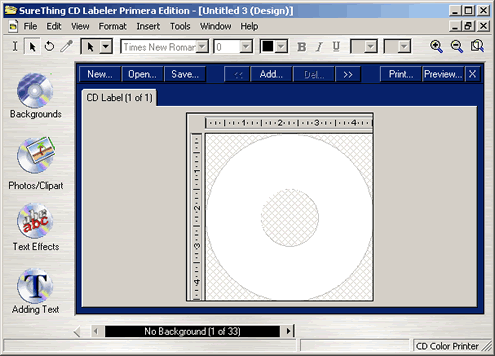
As you can see below, in the main window there is a circular CD layout that
offers the user the chance to easily add text on the layout and also to take
a first look at the printing output. On the left you see the design bar where
you select the type of the background, the text or the logos you can add to
the CD layout. On the top there are two more toolbars, the design editor Speed
Tools and the design editor Control Strip toolbars.
 The
speed tools enable the user to manage the items of the template, change the
text formatting, calibrate the printer, and print. The design editor Control
Strip helps the user to change the text formatting by choosing among various
fonts, the Bold, Italic, or Underline attributes, text color, etc.
The
speed tools enable the user to manage the items of the template, change the
text formatting, calibrate the printer, and print. The design editor Control
Strip helps the user to change the text formatting by choosing among various
fonts, the Bold, Italic, or Underline attributes, text color, etc.
You can select one of the 32 Smart design backgrounds for your printings or
use your own background from a file on your hard disk. You have also the chance
to set the background color (shade and pattern) in the "set background
color" window.
The user can add some logos and clipart in his design using the Logos/Clipart
tab. The software provides some ready to use CD & Media symbols to insert
or you can use the Picture Tool, where you select the inserting image from your
disk and then you can easily place it anywhere on the CD printing area, with
the additional capability for precise size adjustment.
The Text Effect tab offers the user two choices: Using the text effect wizard
to insert text in the layout or to use the text effect tool. In a four step
session you select the shape of your text from eight sample patterns, the variation
of the text, the text color, the text shadow, border color, and font and text
size.
Using the text effect tool we are offered more detailed choices. Text shades,
text color, background color, text borders and much more can easily be adjusted.
Some sample text types are also provided for quick and easy selection. The inserted
text can be printed in a circular, angled or straight perspective, satisfying
any possible layout preference. For adding text, the software gives four choices,
three for adding text and one for symbol insertion. The first choice is to add
text using the New Text Fame option. A box will appear into the CD printing
area and user can write the text there. You can move or change the text size
using your mouse with a simple right-click and turning to the object mode. The
second choice is the use of the Text Frame tool where you manually select the
text inserting area and then move the text potentially. The program also provides
some ready to use text forms about User Info, Name, country, address and many
more. Also you can choose from a variety of symbols classified in five different
fonts.
Once we have finished our design, we could save it as a SureThing Design (*.STD)
file format. Moreover, the Publisher also supports print files (*.PRN) from
any application (including SureThing), such as Adobe Illustrator and CorelDraw!.
This flexible option might be very handy for all those who wish to print their
favorite designs already made by these popular design applications.
6. Printer driver-settings
PRIMERA BRAVO
OPTICAL PUBLISHING SYSTEM - Page 6
Setting up the printer driver
The printer driver settings affect the print quality of your discs. The default
settings of the Publisher printer driver will fit most printing needs. You can
see access the printing preferences window through either SureThing CD Labeler
or PrimoDVD 2.0 software, or through the Control Panel-àPrinters under
Windows 2000 or Windows XP.
The following picture comes from SureThing CD Labeler after selecting the Printer
Setup option.
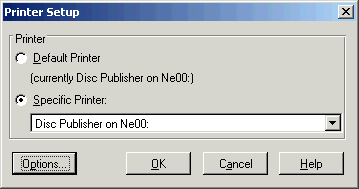
Through PrimoDVD2.0, the following window comes up after selecting the Printer
Setup Settings..
In both cases, the Options/preferences buttons leads to the detailed
print preferences window.
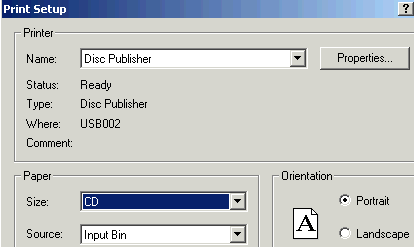
The Paper Size options are the Custom and the CD. The Custom option allows
the user to customize the width and the height of the printing area. The CD
option uses the default settings for an accurate print on a CD/DVD media surface.
The print orientation can be set to Portrait or Landscape, among with the number
of copies desired for printing.
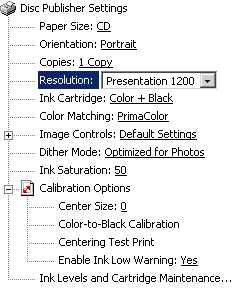
 The
printing resolution list box offers four different choices: The Normal and Best
options at 600 dpi resolution, the Presentation at 1200 dpi and the Super quality
at 2400 dpi. The last option provides the highest quality but slowest speed
as well. You may wish to experiment with these options to see which one is the
best for your particular CD media and print quality needs.
The
printing resolution list box offers four different choices: The Normal and Best
options at 600 dpi resolution, the Presentation at 1200 dpi and the Super quality
at 2400 dpi. The last option provides the highest quality but slowest speed
as well. You may wish to experiment with these options to see which one is the
best for your particular CD media and print quality needs.
According to the desired print result, the user can set the Ink Cartridge setting
to Color+Black, Color or Monochrome.
 Click
on the Color Matching down narrow and choose the color matching option that's
right for you. Select None if you are more interested in printing speed rather
than color accuracy, if you have already color corrected your image for printing,
or if you are using some other third party color matching software.
Click
on the Color Matching down narrow and choose the color matching option that's
right for you. Select None if you are more interested in printing speed rather
than color accuracy, if you have already color corrected your image for printing,
or if you are using some other third party color matching software.
Select Algebraic if you would like the printer driver to make very simple color
balance adjustments based on an RGB color model. This option gives you more
natural looking images without actually utilizing any specific color matching
software.
Select PrimaColor to enable color-matching profiles written specifically for
the Publisher by "Candela Color Management System". This setting automatically
adjusts the color of your image according to predetermined printer profiles
and default system profiles. This results in a very precise color match when
attempting to print photographic images.
 The
"Image Controls" settings are set to the default values, and the user
cannot change them.
The
"Image Controls" settings are set to the default values, and the user
cannot change them.
The Dither mode list box has two selections, the "Optimized for Photos"
and the "Optimized for graphics". Select the first if printing a design
primarily composed of photographic images and the second choice if you intend
to mainly print text, lines, and graphics.
In the same tab you can also adjust the ink saturation of the printed image.
When printing onto the printer manufacturer's TuffCoat CD media, this option
can be left at its default setting of 50%. When printing onto other brands of
printable CD media, you may need to adjust this control in order to optimize
the ink saturation for the printable surface of your specific CD media. You
will certainly have to experiment yourself when changing media types.
 The
Calibration options tab displays options for fine-tuning the position of the
printed image, changing the size of a CD's non-printable center, and also performing
a bi-directional calibration. The Color-to-Black Calibration properties button
will print a reference disc with calibration numbers in order to use them in
the corresponding window that appears after printing the calibration disc. Note
that the Publisher is factory-calibrated and changing these settings might offer
unwanted results.
The
Calibration options tab displays options for fine-tuning the position of the
printed image, changing the size of a CD's non-printable center, and also performing
a bi-directional calibration. The Color-to-Black Calibration properties button
will print a reference disc with calibration numbers in order to use them in
the corresponding window that appears after printing the calibration disc. Note
that the Publisher is factory-calibrated and changing these settings might offer
unwanted results.
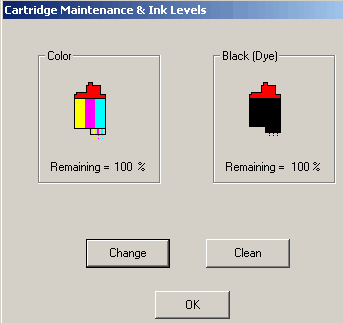
Last, the user can choose to be warned for the ink levels, and change or clean
the cartridges, through the Ink and Cartridge Maintenance feature.
7. Finishing publishing job - Prassi PrimoDVD2.0
PRIMERA BRAVO
OPTICAL PUBLISHING SYSTEM - Page 7
Finishing the publishing job - Prassi PrimoDVD2.0
 Prassi
PrimoDVD2.0 is a professional mastering software designed for DVD-R and DVD-RW
and CD-R/RW Recorders, as well as for autoloaders, such as the Bravo Disc Publisher.
The software offers many recording features such as direct disc copy, disc imaging
to file, ISO/UDF/Joliet mastering, and Audio disc compilation from Wave or MP3
files.
Prassi
PrimoDVD2.0 is a professional mastering software designed for DVD-R and DVD-RW
and CD-R/RW Recorders, as well as for autoloaders, such as the Bravo Disc Publisher.
The software offers many recording features such as direct disc copy, disc imaging
to file, ISO/UDF/Joliet mastering, and Audio disc compilation from Wave or MP3
files.
Several recording jobs can be prepared and run simultaneously, or queued and
run in sequence. If the autoloader is equipped with a printer, this application
takes care of handling the disc printing as well.
An activity log, full error code return, support for fast computers equipped
with several SCSI boards and many recorders (up to 16), make this application
a very powerful tool for the professional in disc mastering and replication.
Prassi PrimoDVD2.0 Build 2.0.837, that came with the Bravo Publisher, allows
a user to test the robotics system of the attached Publisher / Disc printer.
By choosing Robotics-Options/Services on the top task bar of the software, the
following window appears.

The user can check the communication between the PC and the attached Printer/
Publisher and choose to record and print simultaneously when a multiple disc
print/recording job is selected. This saves time, but at a possible extra load
on the resources consumed by the PC.
Another robotic test through software is the Manual Movement option. The following
window appears, and the unit is ready to perform a complete movement test of
the robotics. By clicking the Start Test button, the robotic arm will move through
its entire sequence automatically. If you specified more than one disc, it will
continue until the number you specified is completed or it runs out of discs.
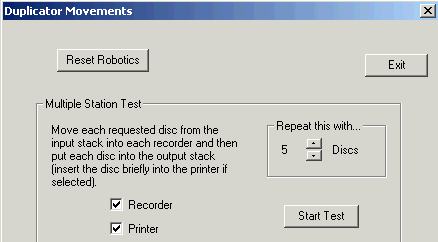
These tests can be used to assure the smooth operation of the Publisher. We
are now ready to write some data on a disc and print it. As we said, Prassi
PrimoDVD2.0 supports all the basic recording operations. User can create a data
CD/DVD, an audio CD, copy a CD/DVD and many more. In each case, the user can
choose to print a desirable design on the disc surface, even after burning.
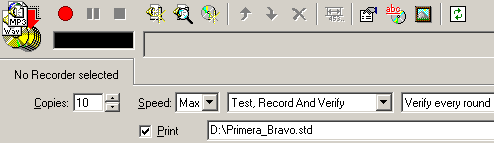
Let's see an example of the above in the case of an audio CD. Apart from choosing
the files to be recorded in a specific recorder, checking the writing speed,
enabling the Buffer Under Run option etc, we choose the number of copies to
be made, and check the box labeled Print (printer installed). In the right box
we select the path on our hard disk where we have saved our design. There are
two types of design files supported:
*.prn files we've previously created using almost any Windows graphics application
and
*.std files created using SureThing CD labeler.
In the drop down box to the right of the Print checkbox, we can select any recently
used *.prn or *.std files. Note that print files labeled as *.PXF created by
Disc Face Editor are not compatible with the Publisher. Disc Face Creator is
a very limited graphics program built in Prassi PrimoDVD 2.0.
8. Performance
PRIMERA BRAVO
OPTICAL PUBLISHING SYSTEM - Page 8
Performance
Printing times and Quality
Using the Sure Thing CD/DVD labeler program, anyone can create his favorite
design and print it on disc. As already mentioned, the Bravo Disc Publisher
offers four different printing modes for printing at 600dpi, 1200dpi and 2400dpi.
We measured the printing times for each mode and the results are illustrated
in the following table. Notice that the times represent the total duration of
a single printing job, by the time we press the "print" button until
the printed disc is placed to the output bin. For this test the Dither Mode
was set to "Photo" and all the other printing settings were left to
the default values.
|
Printing Modes
|
Duration (min) |
Quality
|
|
600dpi Normal
|
1:50
|
Medium
|
|
600dpi Best
|
2:20
|
Good
|
|
1200dpi Presentation
|
2:45
|
Very Good
|
|
2400dpi Super Photo
|
4:15
|
Best
|
Printing in low resolutions is less time consuming but the printing result,
as expected, cannot be compared to the output of printing at higher resolutions.
The 600dpi Normal mode should be preferred for simple graphical designs and
is more acceptable when the alternation of the colors is not continuous. Otherwise,
the rasterizing effects are visible and the result is not the best you can obtain.
On the other hand, printing at 600dpi is cheaper and saves ink. The overall
result, could also be considered as a personal taste and can be validated according
to the user's needs. Printing a test disc with a specific design before going
on into feeding the unit with multiple printings jobs would definitely lead
to the appropriate resolution choice.
The 600dpi Best mode gives a smoother printing result than the Normal mode.
According to the selected design, the user can select the "Photo"
or "Graphics" dither option and come up with a good overall printing
quality. The duration of the print job is approximately 2:20 minutes per disc.
The 1200dpi Presentation mode is the default printing resolution. It is recommended
for graphics for fast and high quality results. The duration for a single print
job is just 25 seconds higher than the 600dpi Best choice.
Last, the best quality available comes with the 2400dpi Super Photo mode. As
you can imagine this mode is optimized for printing photos on your discs, but
also gives the best results you can have with any kind of design. The printing
process lasted 4:15 min and is the longest we had in the test, but the performance
is very high, with colors coming out alive and an overall result of high fidelity.
The printing results can vary widely, according to the type and the manufacturer
of the discs you print on. Printing on silver surface may be more suitable in
some cases than printing on white discs. Of course, this largely depends on
personal taste, but usually graphics look more clear on white-coated discs,
where photos seem to require a silver surface for more realistic results.
Full Publishing job
Working with Prassi PrimoDVD2.0 allows any user to burn and print his discs
easily and fast. The software seems to collaborate well with the printer and
the robotic mechanism is accurate and fast enough.
We created a test job with Primo DVD2.0. This included the recording of 800MB
of data at full speed on a blank CD-R and printing on the disc surface at 2400dpi
Super Photo mode. The duration of the whole process was 9 minutes. In the following
table we give the approximate time values for each phase of the publishing job.
| Pick up disc-Load Recorder |
Recording |
Unload Recorder-Load Printer |
Printing |
Unload Printer-Output Bin |
TOTAL DURATION |
| 15sec |
240sec |
20sec |
240sec |
16sec |
8:50min |
Notice that the above times are not to be considered as absolute values and
might vary slightly from job to job. They are presented here in order to give
an indication of the different steps involved in the operation of the unit and
the partial time-cost of each phase.
What is more interesting, however, is the behavior of the Bravo under a multiple
disc-publishing job. The user can take advantage of the "Record and Print
Simultaneously" option and save valuable time in a massive publishing process.
We chose to repeat the previous data job with 2 discs. As it was expected, the
robotic mechanism loaded the first disc to the recorder and after burning had
finished, the disc was loaded on the printer. While printing of disc 1 was ready
to start, the second blank disc was loaded on the recorder. Both recording and
printing processes started, and finally the disc 1 was placed in the output
bin in approximately 8:10 minutes. Printing of disc 2 was finished and the whole
job was completed in 11:20 minutes total. As you can see the simultaneous printing
and recording makes the publishing job faster and easier.
However, the mechanical design of the robotic arm does not allow printing and
disc loading / unloading operations at the same time. As a result, a finished
disc is placed in the output bin only after recording of the previous disc is
finished. A possible modification in the robotic arm could save even more time
when multiple publishing jobs take place.
Ink consumption
Bravo Disc Publisher was surprisingly economic regarding the consumption of
both black and color inks. Usually inkjet printers show their weakness in this
area and the replacement of the ink cartridges is very usual after some heavy
usage, especially when printing in high resolutions. As a reference we could
say that we printed more than 50 fully colored discs in all the available resolutions,
and the built-in Cartridge Maintenance monitor showed that we could almost print
the double number of discs with a single pair of cartridges.
9. Conclusion
PRIMERA BRAVO
OPTICAL PUBLISHING SYSTEM - Page 9
Conclusion
 Primera
Bravo Disc Publisher is a very attractive solution for easy and automated disc
publishing. The device combines quality printing and recording on CD/DVD media
and comes to meet the needs of the proffessional for mid-volume promotion, marketing
and presentation of his work. Bussinesses and all those who have a need for
in-house copying and printing of CDs and DVDs should consider Bravo as a reliable
alternative.
Primera
Bravo Disc Publisher is a very attractive solution for easy and automated disc
publishing. The device combines quality printing and recording on CD/DVD media
and comes to meet the needs of the proffessional for mid-volume promotion, marketing
and presentation of his work. Bussinesses and all those who have a need for
in-house copying and printing of CDs and DVDs should consider Bravo as a reliable
alternative.
The Publisher offers fast installation through plug and play USB2.0 and FireWire
interfaces, is fully supported by Win2K and WinXP and the attached user-friendly
software cooperates adequately with the main device, making the Publisher a
powerful tool in the hands of the candidate user.
The retail package includes all the nessecary kits for quick understanding
of the Publisher's operation, among with ink cartridges and connection cables.
As for the performance, Bravo supports publishing of up to 25 CD/DVD discs per
job, while the smart operation of the robotic arm offers competitive publishing
times.
User can choose among the economic and fast low resolutions or the 2400dpi
Photo-quality mode according to his needs. The 2400dpi mode offers high quality
printings and realistic colors, and is appropriate for printing photos on the
disc surface. On the other hand, the ink consumption should be considered as
low for an inkjet printer.
Bravo Publisher is available in two versions with 40X CD-RW recorder or DVD-R/RW
recorder. The CD Publisher is priced at US$1995 (MSRP) while the DVD Publisher
at US$2495 (MSRP). More information is available on the Internet at www.primeratechnology.com.