1. Introduction
Seiko
Precision CDP-4000 CD-R Printer -
Page 1
Introduction
 Europe was under the name of SEIKOSHA, a well-known printer manufacturer, until
1997 when was renamed to SEIKO Precision, Hamburg. The mother company (SEIKO)
is established in Japan in 1881 and since then is dedicated to the development
and production of high tech products. SEIKO Precision manufactures camera components,
IT products, develops network technologies. However, the company is known as
a printer manufacturer. SEIKO Precision CD 4000 inkjet CD printer is SEIKO’s
proposal for high quality CD labeling. The device supports high resolution 1440
x 720 printing and comes to complete the CD inkjet printer line already represented
by SEIKO CD Printer 2000, its “brother” printer by SEIKO. SEIKO Precision
CD 4000 entered the market in Cebit, on February 2001. We are looking forward
to seeing what the printer can offer…
Europe was under the name of SEIKOSHA, a well-known printer manufacturer, until
1997 when was renamed to SEIKO Precision, Hamburg. The mother company (SEIKO)
is established in Japan in 1881 and since then is dedicated to the development
and production of high tech products. SEIKO Precision manufactures camera components,
IT products, develops network technologies. However, the company is known as
a printer manufacturer. SEIKO Precision CD 4000 inkjet CD printer is SEIKO’s
proposal for high quality CD labeling. The device supports high resolution 1440
x 720 printing and comes to complete the CD inkjet printer line already represented
by SEIKO CD Printer 2000, its “brother” printer by SEIKO. SEIKO Precision
CD 4000 entered the market in Cebit, on February 2001. We are looking forward
to seeing what the printer can offer…
- Main specifications
· Parallel and USB Interface
· 256 KB memory
Printable Media: · Paper to cardboard up to 2.5 mm in
thickness, Printable CDRs, Plastic cards
Single sheet feeder: Paper: A4, letter, transparencies (A4),
labels (A4), B5, legal, executive and user defined formats. Inlay –and
bottom cards for CD cases. Roll paper
Resolution: 1440 x 720 dpi micro piezo technology
- Unpacking
 The
printer was provided by AVD
Computer Services Ltd. Except from the printer the supplied package contained
the essential printer operation equipment and some other consumables available
for the CD Printer 4000. These are the paper support, the power cord, the black
and color ink cartridges, the roll paper holder, the caddy, the driver-CD with
user’s Guide, printer driver and software, the CD-R attachment, the protective
cover and the “Getting Started ” manual.
The
printer was provided by AVD
Computer Services Ltd. Except from the printer the supplied package contained
the essential printer operation equipment and some other consumables available
for the CD Printer 4000. These are the paper support, the power cord, the black
and color ink cartridges, the roll paper holder, the caddy, the driver-CD with
user’s Guide, printer driver and software, the CD-R attachment, the protective
cover and the “Getting Started ” manual.
 As
for the media supplied, there are printable plastic cards, business cards, 80mm
CDs (Ritek Co 180MB), and printable CDs (Vivastar AG 700MB). For the business
and plastic cards printing there is a special adapter providing the proper media
placement on the printer tray.
As
for the media supplied, there are printable plastic cards, business cards, 80mm
CDs (Ritek Co 180MB), and printable CDs (Vivastar AG 700MB). For the business
and plastic cards printing there is a special adapter providing the proper media
placement on the printer tray.
The main printing unit as shown in the picture on the right has
many different parts. Let’s see some of them:
 1.
Paper support: supports the paper loaded in the sheet feeder.
1.
Paper support: supports the paper loaded in the sheet feeder.
2. Sheet feeder: Holds the blank paper and automatically feeds the paper during
printing.
3. Printer cover: Covers the printing mechanism. Open only when handling the
following items. Ink cartridges, CD-R attachment, Caddy
4. Output tray: Receives the eject paper.
5. Output tray extension: Supports the ejected paper.
6. Edge guide: Help load the paper straight.
 7.
Roll paper holder: Holds the roll paper to the printer.
7.
Roll paper holder: Holds the roll paper to the printer.
8. Adjust lever: This selects the gap between the print head and the paper.
“ 0 ” position : for plain paper,
EPSON paper (excluding Matte Paper), paper 0.08 to 0.3 mm thick.
“ + ” position: envelopes, Matte paper, paper 0.4 to 1.6 mm thick
“ ”
position: released position
”
position: released position
9. Manual feed slot edge guide: This ensures that paper or caddy
loaded in the manual feed slot is inserted straight.
10. Manual feed slot: This slot is used when printing on Matte Paper or paper
0.4 to 2.5 mm thick. The CD-R caddy is also inserted here.
11. USB interface cable connector: Connects USB cable from the PC to the printer.
12. Parallel interface connector: Connects parallel cable from the computer
to the printer.
13. AC inlet: Insert the power cable here.
 The
picture on the left shows the front buttons and led of the printer. Starting
from the right there is the power button, which obviously turns the printer
on and off. Also it clears the printer’s memory if pressed twice while
the power is on. Next you see the maintenance button, which loads or ejects
paper if pressed and released within two seconds. It resumes printing if pressed
and released after a paper out error. It is also performs print head cleaning
if pressed for 3 seconds when the maintenance led is off. The roll paper button
loads and ejects roll paper. It feeds roll paper in reverse to a position where
it can be easily removed from the sheet feeder, if pressed for more than 3 seconds.
The
picture on the left shows the front buttons and led of the printer. Starting
from the right there is the power button, which obviously turns the printer
on and off. Also it clears the printer’s memory if pressed twice while
the power is on. Next you see the maintenance button, which loads or ejects
paper if pressed and released within two seconds. It resumes printing if pressed
and released after a paper out error. It is also performs print head cleaning
if pressed for 3 seconds when the maintenance led is off. The roll paper button
loads and ejects roll paper. It feeds roll paper in reverse to a position where
it can be easily removed from the sheet feeder, if pressed for more than 3 seconds.
The Power led is on when the printer is on. It flashes when the
printer receives data, printing, while replacing an ink cartridge or cleaning
the printing head.
The maintenance led is on when the printer is out of paper and
when the paper is jammed. In the first case, load paper in the sheet feeder
and press the maintenance button to resume printing. When the paper is jammed,
you have to take all the paper out of the feeder and then reload the paper.
If the light continues to flash, you have to turn off the printer and gently
pull all the paper out of the printer. The led also flashes when the print head
moves to the ink cartridge replacement position or the inks are out.
- Test Machine
WinMe/Win2k
Soyo 7VCA
Celeron II 566 over clocked to 850 MHz
128MB SDRAM PC 133
WD 18GB UDMA 66
Quantum Fireball EX 6.4GB
SCSI: DAWI 2975 - PCI (ULTRA)
ATI AIW 128
2. Connections - Installing Ink Catridges
Seiko
Precision CDP-4000 CD-R Printer -
Page 2
Connections -
Installing Ink Catridges
 SEIKO
Precision CD Printer 4000 can be connected to the computer via parallel or USB
interface. We connected the printer through the USB port and powered with 220V
AC. The printer accepts colored and black ink cartridges. The cartridges are
equipped with IC chips. This chip accurately monitors the amount of ink used
by each cartridge, so even if a cartridge is removed and inserted again, all
of its ink can be used. To install the cartridges you firstly lower the output
tray.
SEIKO
Precision CD Printer 4000 can be connected to the computer via parallel or USB
interface. We connected the printer through the USB port and powered with 220V
AC. The printer accepts colored and black ink cartridges. The cartridges are
equipped with IC chips. This chip accurately monitors the amount of ink used
by each cartridge, so even if a cartridge is removed and inserted again, all
of its ink can be used. To install the cartridges you firstly lower the output
tray.
 And
open the printer cover. Then you turn on the printer. The print head moves to
the left, which is the ink cartridge installation position. The power led flashes
and the error led comes on. Notice that you should not move the print head by
hand, something like that might damage the printer. Push back the release tabs
and lift up the ink cartridge clamps. Open the ink cartridge packages. Next,
remove only the yellow tape seals from each cartridge. These tapes should not
be removed from the cartridges before installation.
And
open the printer cover. Then you turn on the printer. The print head moves to
the left, which is the ink cartridge installation position. The power led flashes
and the error led comes on. Notice that you should not move the print head by
hand, something like that might damage the printer. Push back the release tabs
and lift up the ink cartridge clamps. Open the ink cartridge packages. Next,
remove only the yellow tape seals from each cartridge. These tapes should not
be removed from the cartridges before installation.
 Then,
place the protruding of the cartridge on the hook of the opened ink cartridge
clamps. Make sure that the protruding of the cartridge is not under the hook
of the opened ink cartridge clamps, as this can damage the clamps. Lower the
ink cartridge clamps until they lock into place, and press the ink cartridge
replacement button.
Then,
place the protruding of the cartridge on the hook of the opened ink cartridge
clamps. Make sure that the protruding of the cartridge is not under the hook
of the opened ink cartridge clamps, as this can damage the clamps. Lower the
ink cartridge clamps until they lock into place, and press the ink cartridge
replacement button.
 The
printer moves the printer head and begins charging the ink delivery system for
about half a minute. Notice that the printer cannot work unless you have installed
both cartridges. While the ink is charging, the power light flashes and the
printer produces a variety of mechanical sounds.
The
printer moves the printer head and begins charging the ink delivery system for
about half a minute. Notice that the printer cannot work unless you have installed
both cartridges. While the ink is charging, the power light flashes and the
printer produces a variety of mechanical sounds.
 These
sounds are normal. When the ink delivery system has been charged, the print
head returns to the far right position and the power light comes on. As for
the ink cartridges price, both color and black ink cartridges are sold at 20
pounds each.
These
sounds are normal. When the ink delivery system has been charged, the print
head returns to the far right position and the power light comes on. As for
the ink cartridges price, both color and black ink cartridges are sold at 20
pounds each.
3. Installation - Printing features
Seiko
Precision CDP-4000 CD-R Printer -
Page 3
Installation
of the Printer
 We
installed the under Windows ME and the printer was recognized as “CDP-4000”
. Let’s have a look at the printer’s properties. In the main menu
you can make Media Type, Mode, Ink, and Print Preview settings. The media
type settings should match the media that are currently loaded in the printer.
The mode settings on the main menu are arranged to give you three levels of
control over the printer software. The mode setting can be Automatic, PhotoEnchance
and Custom.
We
installed the under Windows ME and the printer was recognized as “CDP-4000”
. Let’s have a look at the printer’s properties. In the main menu
you can make Media Type, Mode, Ink, and Print Preview settings. The media
type settings should match the media that are currently loaded in the printer.
The mode settings on the main menu are arranged to give you three levels of
control over the printer software. The mode setting can be Automatic, PhotoEnchance
and Custom.
The Automatic mode provides the quickest and easiest way to
start printing. The PhotoEnchange mode lets you choose from a variety of image-correction
settings specially designed for photos. The Custom mode lets you choose from
a list of ready-made or personalized settings suited to the kind of document
that you want to print. When Custom is selected, the Advanced button is enabled,
allowing you to access the Advanced dialog box.
 In
the advanced dialog box you can choose the media type that is loaded in the
printer, choose the Color or Black as the Ink setting and specify a Print
quality setting. According to your Color Management selection, (Color controls,
Photo Enchance4, No color adjustment, sRGB or ICM), you can make specific
settings about brightness, contrast, saturation, usage of the basic colors,
tone and effect. These settings can be saved for future a possible future
use.
In
the advanced dialog box you can choose the media type that is loaded in the
printer, choose the Color or Black as the Ink setting and specify a Print
quality setting. According to your Color Management selection, (Color controls,
Photo Enchance4, No color adjustment, sRGB or ICM), you can make specific
settings about brightness, contrast, saturation, usage of the basic colors,
tone and effect. These settings can be saved for future a possible future
use.
Another interesting tab in the printer’s properties window
is the Utility tab. Printer utilities allow you to check the current printer
status and perform some printer maintenance from your PC. The Status Monitor
provides printer status information such as the amount of ink remaining, and
checks for printer errors.
 The
Nozzle Check utility checks the print head nozzles for clogging. You should
check the nozzle if you notice that print quality has declined.
The
Nozzle Check utility checks the print head nozzles for clogging. You should
check the nozzle if you notice that print quality has declined.
The Head Cleaning utility cleans the print head.
The Print Head alignment utility aligns the print head. You
should use this utility if you notice a misalignment of vertical lines.
Lastly, the Printer and Option Information allow the printer
driver to confirm printer configuration information. It also provides specific
information regarding certain characteristics of the printer, such as printer
ID.
4. Installation - Printing Software
Seiko
Precision CDP-4000 CD-R Printer -
Page 4
- Loading a CD-R
 When
printing on a CD-R, always fit the CD-R attachment to protect the data recorded
on the disk. To do it, firstly you have to switch off the printer. Move the
adjust lever to the “”
position, as shown next. Then you have to open the printer cover and insert
the caddy straight in with the silver label first and with the surface for
loading the CD-R facing upwards.
When
printing on a CD-R, always fit the CD-R attachment to protect the data recorded
on the disk. To do it, firstly you have to switch off the printer. Move the
adjust lever to the “”
position, as shown next. Then you have to open the printer cover and insert
the caddy straight in with the silver label first and with the surface for
loading the CD-R facing upwards.
 The
next step is to place the protective cover over the carriage spindle (metal
bar). This is to prevent oil on the carriage spindle getting onto your hands.
The CD-R attachment should be slide out to align the two arrow marks on the
printer. Now the protective cover can be removed.
The
next step is to place the protective cover over the carriage spindle (metal
bar). This is to prevent oil on the carriage spindle getting onto your hands.
The CD-R attachment should be slide out to align the two arrow marks on the
printer. Now the protective cover can be removed.
Move the adjust lever to the “++” position and hold
down the maintenance button on the front of the printer so the caddy will
automatically adjusted to the correct position. Close the front cover and
you are ready for your first print.
- Printing Software
 The
software we had in our hands is the “Seiko Precision Designer v1.0”.
We installed the program and tried to make our first prints. Unfortunately,
the printed label had not a good quality and the settings we tried to apply
did not give the expected results. We decided to use the Corel 10 as the main
labeling software instead, and finally had the accepted print result.
The
software we had in our hands is the “Seiko Precision Designer v1.0”.
We installed the program and tried to make our first prints. Unfortunately,
the printed label had not a good quality and the settings we tried to apply
did not give the expected results. We decided to use the Corel 10 as the main
labeling software instead, and finally had the accepted print result.
5. Printing Performance
Seiko
Precision CDP-4000 CD-R Printer -
Page 5
Printing Performance
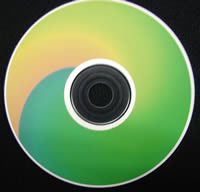 For
our printing tests we used the Taiyo Yuden White Top and the Vivastar AG printable
CDs. The printing result was impressive. The print quality was remarkable in
both 720 and 1440 supported resolutions. The printed colors looked realistic
and very “alive”. The main difference between the two printing resolutions
was that in the 720 dpi you could see some banding on the CD surface. However
the colors were clearly defined in both resolutions.
For
our printing tests we used the Taiyo Yuden White Top and the Vivastar AG printable
CDs. The printing result was impressive. The print quality was remarkable in
both 720 and 1440 supported resolutions. The printed colors looked realistic
and very “alive”. The main difference between the two printing resolutions
was that in the 720 dpi you could see some banding on the CD surface. However
the colors were clearly defined in both resolutions.
The weak point of SEIKO Precision CD Printer 4000 is complicated
loading CD procedure. The printer does not have a built-in CD tray so the user
has to load a blank CD in an external tray provided, and then calibrate the
tray placement in order to print.
Another issue that should interest the user is the ink capacity
of both black and color cartridges. During testing, we had to replace the color
ink after approximately 12 full colored CD prints at 1440dpi. So the print quality
offered demands important ink consumption. However, user can choose the 720
dpi print resolution among with a variety of settings to obtain a lower cost
per print.
In the following chart, you can see the printing time needed
for a 100% covered color CD in the supported resolutions.
* Settings for the 1440 dpi:
Media Type: CDR
Ink: Color
Mode: Custom
Custom settings: sRGB
* Settings for the 720 dpi:
Media Type: Plain paper
Ink: Color
Mode: Custom
Custom settings: sRGB, High speed, Finest details
|
Resolution (d.p.i)
|
Time (seconds)
|
|
1440
|
311
|
|
720
|
204
|
The print times showed above are measured just from the time that
the printer starts printing till the end of the print so the loading and data
transfer time is excluded. Furthermore, the 311 seconds needed for a full 1440
dpi colored CD is not a high performance since the competition can offer a lower
print time.
We also used the same image and settings to print in different
printable media. What we can say is that we had the best quality prints when
we used CDs with white top surface. Using different media affected the total
result and the printed colors seemed kind of faded.
As in the most inkjet printed CDs, the CDs we printed were not scratchproof
or waterproof. The CD label looked delicate just after the printing finished
and you should leave the CD in a dry place for 24 hours to before you will be
able to make a secure conclusion about the overall print quality. The direct
exposure to sunlight could also affect the color density on a printed CD.
6. Conclusion
Seiko
Precision CDP-4000 CD-R Printer -
Page 6
Conclusion
SEIKO Precision CD 4000 is an inkjet CD printer for semiprofessional
and professional use. The printer has great capabilities and is here to fulfill
the CD labeling needs of musicians, software companies, advertising companies.
The print results are more than sufficient even when printing
a CD in 720 dpi, providing a smooth and image true labels. We should note
that the printer is not the fastest in the market and also that printing a
blank CD will not be a one-click procedure. There are significant steps the
user should follow before printing, but the result will satisfy the most demanding
user.
SEIKO engineers could also work on the high ink usage issue. Prints
would be more affordable and the printer would be easily placed on the desk
of the everyday non professional user. So, can the 599 pound price of SEIKO
Precision CD 4000 characterize the printer? Of course not, if you are one of
those who really can valuate the true print quality…