1. Introduction
Following the launch of Level 10 Super Gaming Modular Case, the design collaboration between Thermaltake and BMW Group DesignworksUSA, in 2009, Thermaltake looks to invigorate the PC enthusiasts with the latest Level 10 GT computer case. Smaller in dimensions and also more affordable than its its predecessor, the Level 10 GT has been designed with passion for visual aesthetics, deriving from demanding game play and multimedia entertainment enthusiasm.

Despite the smaller dimensions compared to the original Level 10, the Level 10 GT is a massive full-tower PC case: The first Level 10 weighed 21.4kg and measured 614mm x 318mm x 666.3mm. The new GT version slims down to 584mm x 282mm x 590mm and weighs a more comfortable 12.7kg. In addition, the the GT successor is priced at a mere $260, which is still much although more affordable than the original.
Features
- Cooling: one top 200mm exhaust fan, one front 200mm intake fan, one side 200mm intake fan and one rear 140mm exhaust fan.
- Hinged side panel to enable easier opening of the side door and access to computer for maintenance or upgrade. Improved cable management. User no longer "hides" the excessive cable on the back, the Level 10 GT features numerous holders designed into the chassis for cable management.
- Five hot-swappable hard drive bays, each with its dedicated backplane to support hot-swap. Hard drive mounting supports both 2.5" or 3.5" drives.
- Connectivity array. Four USB 2.0 ports are located on the front bezel including a pair of audio ports. Two USB 3.0 ports and one eSATA port located on the top.
- Water cooling ready - 120mm or 240mm radiators can be attached to the top side of the chassis (top 200m fan needs to be removed)
- Fan speed management control embedded. ColorShift fans can be controlled through controls on the top.
- Fully black-powdered interior.
Basic features of the new case include the EasySwap Pitstop 5, where every HDD/SDD has its own removable tray for easy and fast plug-in, 2 USB 3.0 connectors right on the top of the Level 10 GT and a new cable management inside that bundles respective cables almost like in tunnels behind a back plate.
Thermaltake has also implemented the QuadFan (of which three also feature ColorShift) Ventilation concept with triple ColorShift three LED fans with five sets of illuminations.
The case is also ready for Liquid Cooling Systems and offers ample space for up to 37 cm oversized cards.
- Specifications
| Model |
VN10001WN2 |
| Material |
SECC |
| Front bezel material |
Plastic |
|
Case Type
|
Full Tower
|
| Dimension (H x W x D)
|
584 x 282 x 590 mm |
|
Side Panel
|
Window
|
|
Color
|
Exterior & Interior: Black |
|
Material
|
SECC
|
|
Cooling System
|
Front (intake):
200 x 200 x 20 mm ColorShift Fan x 1 (600~800RPM, 13~15dBA)
Rear (exhaust):
140 x 140 x 25 mm Turbo Fan (1000PRM, 16 dBA)
Top (exhaust):
200 x 200 x 30 mm ColorShift Fan (600~800RPM, 13~15dBA)
Side (intake):
200 x 200 x 30 ColorShift Fan (600~800RPM), 13~15dBA)
Bottom (intake):
120 x 120 x 25mm (optional) |
|
Drive Bays
|
- Accessible : 4 x 5.25? , 1 x 3.5?
- Hidden : HDD EasySwap 3.5?? x 5 |
|
Expansion Slots
|
8 |
|
Motherboards
|
Micro ATX
ATX
Extended ATX |
|
I/O Ports
|
USB 3.0 x 2
USB 2.0 x 4
eSATA x 1
HD Audio x 1 |
|
PSU
|
Standard ATX PS2 |
|
Net Weight
|
28.0 lbs |
| Security lock |
Front HDD Access
Side Panel
Rear peripherals |
| LCS upgradable |
Supports 1/2" , 3/8", 1/4" water tube
CPU cooler height limitation: 190 mm
VGA length limitation: 360 mm |
2. External look
The case arrives in a massive black box. The 'Driving Inspiration' logo on the front indicates that this case was crafted with BMW Designworks:

Inside this black box are some useful accessories. One of most notable mention is an 8-pin CPU extension cable so you can easily route your 8-pin wire behind your motherboard tray. The cable also has an offshoot of a 4-pin plug in case you are stuck with a older system. Also included in the box of course is an instruction manual.
As we previously mentioned, this case is smaller than the original Level 10, measuring 614mm x 318mm x 666.3mm and it's also lighter at a a more comfortable 12.7kg. The case retains the all-black coloring, the handle complete with integrated red LED light strip) and the the vertically oriented front-panel ports.

Let's have a closer look. The front of the level 10 GT is a plastic bezel that features four 5.25" device bays, a 3.5" bay, 5 x 3.5 or 2.5" EasySwap trays for HDDs or SSD, and the front I/O ports. These include four USB 2.0 ports, activity LEDs, a pair of audio ports (Headset and MIC) and the power and reset buttons:
The five hot-swappable hard-disk bays are lockable, and each is released at the push of a button allowing the drive tray to slide out sideways. Drive installation is almost tool-free, as you need to screw in either 2.5" or 3.5" disks. Each of these drive bays can house a hard drive or SSD drive. SSD’s are locked in place with screws from the underside of the bay. Mechanical drives are mounted from the sides.
The row of drive bays can be powered from a single sata connector.
The system is tidy and works well, although the drive trays are plastic as opposed to aluminium for the previous Level 10 model, and there are no longer any status LEDs to indicate which bays are occupied:


Included with the Level 10 GT is also a locking system to protect your components from theft:

Standard ventilation includes a front intake 200 x 200 x 20 mm ColorShift fan (600~800RPM, 13~15dBA) a read
(exhaust)
140 x 140 x 25 mm Turbo Fan (1000PRM, 16 dBA), a top (exhaust)
200 x 200 x 30 mm ColorShift fan (600~800RPM, 13~15dBA), a side (intake)
200 x 200 x 30 ColorShift fan (600~800RPM), 13~15dBA) and optionally a
bottom (intake)
120 x 120 x 25mm fan. All of the case fans are powered from a single molex connector.

Another lock is provided at the flip side of the case, for preventing unauthorized access to your system's interior:

The GT features merely a single steel door that swings open to provide access to the main compartment. The door is opened by a spring-loaded button that's hidden on its bottom edge.
The bottom has a large, dust filtered fan sitting in a protrubence that helps avoid clearance issues. The dust filter for it slides out the side nicely making cleaning a simple procedure.


At the the top of the case, an I/O panel provides a pair of SuperSpeed USB 3.0 ports, eSATA and three buttons to control fan speed and color.

The fan controller is able to reduce the fan speed or increase it to max and is also able to change between the different colored LEDs which include red, blue, and green LEDs, and if it isn't your thing, you can turn off the light show completely.
You can choose between two preset fan speeds - low or high. Even with all 4 fans spinning at high speeds, the produced noise is not annoyingly loud.


Next up we have a close-up shot of the rear of the case, which suggests that the chassis offers ample room to work with. Eight tool-free expansion slots are available, as are a trio of pre-drilled holes for all your liquid-cooling needs:

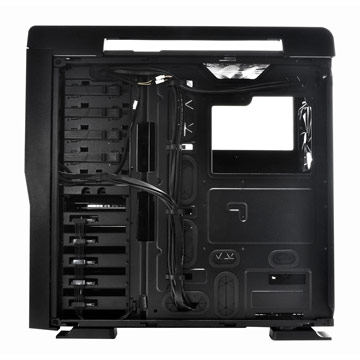
3. Inside the cassis
Below you see an internal view of the case. It isn't as visually striking, but it's easy to work with and there's plenty of room inside. You will be able to install CPU coolers measuring up to 190mm in height as well as graphics cards measuring up to 360mm in length.
Cabling for all the fans is neatly pre-routed and requires connection to only a single molex connector. The are also holes surrounded by rubber grommets to help with cable management.

With the back panel removed, below you can see that cable routing is well catered for. Thermaltake also provides lengthy cables for the front I/O ports, making it easy to route the two top-mounted SuperSpeed USB 3.0 ports to connectors on the rear of your motherboard.


Below you see the 5.25" bays. In order to install a device, first you need to remove the 5.25" drive bay cover.
Place the 5.25” device into the drive bay and make sure that the screw hole lines up as diagram. Then push the latch forward until it locks.
The Easy Swap slots are also embedded to enable
transfer of large data to a SATA III (6.0 GBps) hard disk
without having to use an external storage enclosure. In order to install a device, squeeze to pull the HDD tray out. . Mount the 3.5” HDD into the tray with screws provided.. Then slide the HDD tray back to the HDD cage and connect the SATA cable to an available SATA
connector on the motherboard or SATA controller card. The next step is to connect the power cable to power supply.
In order to use the “hotswap” capability of SATA devices you need to make sure that AHCI (Advanced Host Controller Interface) is
enabled on your motherboard or SATA controller card. This will allow you to install your device without having to turn off the computer.

On the front of the case, you can find some LEDs and switch leads. Nothing new here, just consult your user
manual of your motherboard manufacturer, then connect these leads to the panel header on the motherboard.

The PSU can be mounted at the bottom of the case. As you see in the picture below, there is enough space there to fit any large PSU. Of course, make sure the cables of your PSU are long enough to reach the motherboard and the other components you may install, as the distance among the base of the case and the motherboard is long:

We could not mount all the four screws on the PSU as one of the holes on the case did not match:

Before installing a motherboard, you'd better lay down the chassis first. .Install the motherboard in proper location and
secure it with screws. As you se ion the picture below the motherboard fits perfectly inside the case and there is also enough free space left around it:


Cabling can be conveniently routed through the available holes and behind the motherboard tray:

4. Final thoughts
Thermaltake's Level 10 GT may lack the instant wow factor associated with its predecessor, the Level 10, buy any alterations were necessary to get the cost down. The result is a less striking and special case, made of steel-and-plastic case; a product geared toward everyday tinkerers.
Thermaltake has succeeded in adding some subtle touches to the Level 10 GT, which will be certainly appreciated by most users. The case is offering many great features such as a headset hanger, USB 3.0, convenient and smart wire management features, tool-less installation of basic components, handy security locks to keep the case safe as well as a very smart hinged side panel door for easy access to the internals.
The available external hotswap capable HDD bays are very convenient especially when you have a lot of hard drives. Thermaltake has also managed to keep the case cool by adding four large fans inside the case. The fans are color change capable and are also adjustable to operate in high or low speed, according to the users' demands for increased cooling efficiency or more quiet operation.
As far as inconveniences, the Level 10 GT's rear panel look less strong and durable than its predecessor, some . sections such as the main side panel and the hard drive enclosures required two hands to open them and the headphone hook is also a little hokey.
The original Level 10 retailed at a very unaffordable $800 and sported a many of the features found on the Level 10 GT features also but in a much larger package. The Level 10 GT brings the price down to $270, which is still a little bit pricey. Should you be considering an investment of nearly $300 on a high-performance chassis, the Level 10 GT should be among your choices.