1. About the Thermaltake Element Q
 Thermaltake is one of the most popular manufacturer of PC cases in the world. Following the growing demand for HTPC aka small factor PCs used for watching movies at HDTVs, the company has introduced a new model for mini ATX users, the "Element Q". This compact -sized HTPC offers many expansion slots and can be powered by either Intel Atom boards - which very low priced and have good performance/price ratio- or by an Nvidia ION platform. The latter was also our choice for this review since it is designed for HDTV use.
Thermaltake claims that the Element Q operates quietly and that the onboard 200W power should give enough juice to power 2-3 storage devices inside, such as one 5.25" optical disc drive and two HDDs or one HDD and one floppy drive.
The device has an overall good finish and looks stylish with two operation leds on the front side among with all the standard jacks available in external cases:

Thermaltake is offering two models, the VL52021N2U and the VL52021N2E. Their main difference is that the e N2E model is equipped with a better power supply with Active PFC design and thus, it would cost you a little bit more. Besides that, both models look the same:

- Specifications
| Model |
VL52021N2U |
| Case Type |
Mini Case |
Dimension
(H x W x D) |
130 x 220 x 330 mm /
5.12 x 8.66 x 13 inch |
| Net Weight |
2.7 kg / 5.95 lb |
| Color |
Black |
| Material |
SGCC |
| Drive Bays |
External
5.25” x 1 / -3.5” x 1
Internal
- 3.5” x 1 |
| Motherboards |
Mini ITX form factor |
| PSU |
Built-in 200W SFX PSU |
| Front I/O |
USB 2.0 x 2, HD-Audio |
2. A closer look
The Thermaltake Element Q can be found online at ~$75, which is an average price for an HTPC case.
The retail box is smaller that we expected, indicating the compact size of the product inside. The a glossy surfaced cartboard box that has a photo of the case printed on the side and specifications on one side.
The package includes the "Element Q" case packed in a plastic bag, a power cord, mounting screws, four rubber feet to make the case more stable and reduce the overall vibration noise, one zip tie, optional speaker and installation rails for a 3.5" hard drive. Of course there is also printed manual with many graphs and installation information.

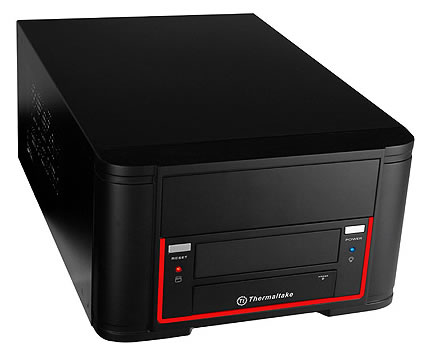
The case is quite compact. It is 22cm wide, 13cm high and 33cm deep. The black color of the case is very attractive to the eye and the red decoration in the front provides a luxury tone:
In the front there is a the 5.25" bay which is needed for installing an optical storage drive and one 3.5" bay for HDDs and floppy drives.
Two buttons (reset/power) and two leds for power/HDD operation are also found there. The dimming of both leds is low enough and not very bright to disturb you while working.

A push-to-open hatch covers the USB2.0 ports and the front panel HD audio jacks:

At both sides you will find the air ventilation openings to that help cool down the internal of the Element Q.

There are not much to see at the back. There are the power supply and an empty space, where a mini-ATX motherboard should be would be installed.

Here is a picture of the installed power supply:

The power supply is equipped with a 80 mm in fan and offers a 20-pin ATX-connector with detachable 4 extra pins for 24-pin setup, 4-pin extra 12V connector, two normal molex connectors, two SATA power connectors and one small connector for a floppy drive.
| Power supply type |
SFX |
| Max. DC Output |
220 W |
Load Range |
| |
+3.3V |
+5V |
+12V |
+5VSB |
-12V |
-5V |
| Max. (Amps) |
12A |
12A |
15A |
2A |
0.3A |
/ |
| Combined +3.3, +5V |
80 W |
| Combined +12V |
15 A / 180 W |
| Input Voltage |
100 V ~ 240 V (Auto Range) |
| Input Frequency Range |
50-60 Hz |
| PFC |
- |
| Operating temperature |
0 ~ 50°C |
| Connectors |
1 x 20+4 -pin motherboard connector
1 x 4-pin ATX12V connector
2 x SATA connector
2 x 4-pin molex
1 x single floppy power connector |
| Cooling System |
Single 80mm fan |
| Dimension |
125 mm (W) x 60 mm (H) x 100 mm (D) |
3. Inside
In order to open the box you need need to use a screwdriver. It would be nice if Thermaltake had used thumb type screws here but but anyway we can live with it. After removing the screws the cover slides back and it can be removed.
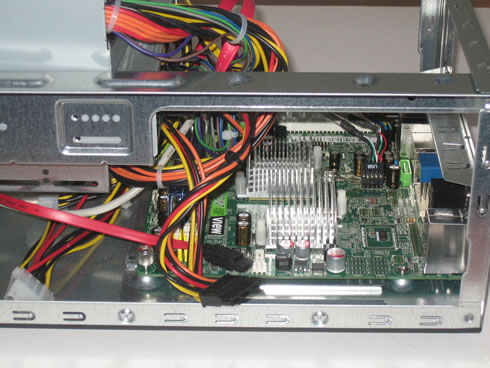
There is a lot of empty space in the box, allowing for easy installation of the mini-ATX motherboard and the HDD. The power supply unit offers many cables in order to power SATA or molex type devices:

Thermaltake suggests to install the 3.5" on the right using the two installation rails, which is very easy to do as we will see later on.


The front cover is also very easy to remove. Just push the four clips inside the case and apply small force.

How about starting the installation? Firstly, you have to attach and secure the mini-ATX motherboard using the screws included in the case bundle. Then you have to install the memory modules and the 24pin power jack. Finally, getting the HD Audio and USB ports for the front panel is highly suggested. Shortly after, here is how your case should look like:


There is a lot of empty space left below the floppy drive area, where you can push all unwanted cables and tide them up. The 5.25" installation requires you to remove the front panel first and then to push the drive inside and fasten it with screws. Again, the procedure is very easy. After getting the SATA/power connected you are ready to go. Make sure to use only SATA optical drives since most mini-ATX motherboards do not offer IDA ports!
Let's put the power supply again at its place get the HDD installed.

The two rails help a lot here and after sliding the HDD in the right position, you will have to fasten the HDD using two mounting screws. Connecting the cabling can be a little bit tricky but you can handle it for sure.

One more picture from the internal. As you can see the cables are enough and a careful tide would help a lot:

OK, we have everything installed and closed the external case, ready for use:


4. Final thoughts

After spending many hours examining the ElementQ, we can safely say that we have to do with a compact and good looking basic case.
Listing the pros we can say that even amateur users will find the installation process very easy and in less than 30mins you can have a complete system up and running. On the other hand, the mini-ATX size limits the usage of this box and its relatively the low retail price would also help it become popular in a specific audience.
The overall build quality is good but not top notch. The included power supply is capable enough to power up the system and the available expansion slots can be used to further add something useful to your system. Finally there is lot of empty space left inside the box to make some proper arranging to the cabling and help device stay cool while operating.
What we didn't like about this product? Probably the high noise coming out of the power supply and despite the rubber feet of the case, it is audible and a little bit disturbing when you are watching a movie. A possible solution here would be to disconnect the fan but it would not be recommended since this would void the product's warranty.
For our tests we also installed a low rotation 120mm fan which was a more effective solution for cooling down the to the motherboard and the PSU. Again that is something you should have in mind before buying this product. We also find the available floppy/HDD bay below the CD-ROM not so useful since floppy disc drives are currently obsolete and the small dimensions of the bay do not allow you to install any HDD there instead.
All in all, the ElementQ will cover your basic needs when you need to build an HTPC system. The product retails for just $75 so it might be a good option after all. No matter if you choose an ION or Intel solution, make sure that your set up fits the case and the PSU can handle it first.