1. The Guide
In this HOWTO/Tutorial, we are going to describe how to compile your kernel in a one of the most famous linux distributions (also called distros). Kernel compilation is a process that is a bit difficult for a new user, but we will try to make it as simple as possible here :-)
Linux Distribution: Slackware
Version:
10.2
Default Kernel Version: 2.4.31
We chose Slackware which has quite a reputation for making things more complicated but it is a clean, clear cut distribution.
REQUIREMENTS-----------------------------------------------------------
Knowledge of our: Graphics card and its Chipset
Knowledge of our: Motherboard and its Chipset (Sis,Intel,Nforce-nvidia,Via are the most usual )
Knowledge of our: CPU and its Architecture
Knowledge of our: Network Card and its Chipset
-----------------------------------------------------------------------
--> The procedure is basically the same but with some differences, in other distros...
Let's begin with the reasons why you would want to compile a new kernel in the first place.
- Security patches
- Installation of a new hardware device.
- Compatibility with some services since most of them cannot "run" without 2.6.* kernel. A great example would be HAL features.
- Greater speed with the reiserfs file system => This tends to mean that operations which touch many files in a directory tree are much faster if that tree was created under a 2.6 kernel. Reiserfs. ..
Hint: At the console command prompt:
- $ indicates ordinary Linux user shell
- # indicates the root user
If you don't have Lynx (a text console based internet browser), you can also install from the GUI environment (graphics user interface) but you will need to reboot. Simply open a command console window.
We are now inside the shell, logged in as root (super user) :
# lynx
This will execute lynx which opens with a screen of help files. Simply enter g which tells lynx we want enter a URL. Lynx should now respond with URL to open:. Now enter www.kernel.org and press enter.
After a few seconds the page should have loaded and at the top of the page should be in red, the first available link for this page, Latest Linux Kernel Version RSS. Other links on the page will be in blue. If you press the down arrow, it will forward to the next link on the page which will be selected (i.e. becomes red). Keep on forwarding with the down arrow key (you can also go back with the up arrow), until you come to a paragraph that begins with The latest stable version of the Linux kernel is: followed by the version number which in our case was 2.6.22.1. To the right of this is the date and time and then a series of single character letters.
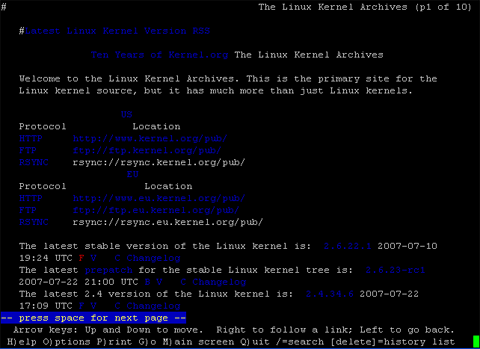
Press the down arrow button until you reach the F. F indicates Full Source.
With the F character
selected, press enter. Lynx will now prompt you whether to D)ownload or C)ancel the file. Press D in order to download the new kernel.
And now, we simply wait for the new kernel to download.
...................................
When the download is complete, go to the "save to disk" option and press enter. You will be prompted to Enter a filename for downloaded file which should have the file's original name as default. Simply press enter here leaving the filename as is.
We have now downloaded the kernel and no longer need lynx, so press q to quit and y to confirm.
So, where is our file. If you enter pwd at the command prompt and ls -l, it should tell you the current directory and its contents.
debian:~# pwd
/root
debian:~# ls -l
total 44108
-rw-r--r-- 1 root root 173 2006-07-18 08:02 dbootstrap_settings
-rw-r--r-- 1 root root 1336 2006-07-18 08:02 install-report.template
-rw-r--r-- 1 root root 45106835 2007-07-21 05:21 linux-2.6.22.1.tar.bz2
debian:~#
Now enter the following commands:
# mv -v *.bz2 /usr/src/ `linux-2.6.19.tar.bz2' `/usr/src/linux-2.6.19.tar.bz2'
# cd /usr/src
And now that we are in the kernel directory, we uncompress our new kernel...
# tar -xjvf linux-2.6.19.tar.bz2
# cd linux-2.6.19
# make mrproper
# make menuconfig
Here, we should explain a few things.
You will see a menu with plenty of options where you choose the setup of the new kernel. There are plenty of options so we have to be careful.
IMPORTANT: We definitely have to include support for all the right filesystems, the motherboard chipset (remember the requirements), and on the right controllers without being paranoid about security level.
IMPORTANT: If you see something you don't understand, the best thing to do is to search for it on google. You might need it, then again you might not. It's your decision ;-)
Unfortunately, when a new version of the kernel is released, compilation becomes a bit more difficult because of the increase in the new features added every time. So be careful with your options....
When you see an M in brackets, then the option is included as a module, when you see an * (asterisk) , it is embedded.
When you have finished with the configuration of your kernel, exit using the ESC (Escape) key,
saving
the new kernel configuration.
Now we are ready to build the kernel.
# make
...............................
Now waiting until the compilation of the new kernel is completed..
then build the modules...
# make modules
...install the modules...
# make modules_install
# clear
# cd arch/i386/boot
# cp bzImage /boot/
# cp arch/i386/boot/bzImage /boot/vmlinuz-custom-test
Now, we make a backup of the previous functioning kernel, and then we edit the /etc/lilo.conf
# vim /etc/lilo.conf
You should now see something like this:
# Linux bootable partition config begins
image = /boot/vmlinuz
root = /dev/hda1
label = Slack
read-only # Non-UMSDOS filesystems should be mounted read-only for checking
# Linux bootable partition config ends
We change the last line in ==>
# Linux bootable partition config begins
image = /boot/vmlinuz-custom-test ===> Our new kernel 2.16.*
Prompt
root = /dev/hda1
timeout=1200
label = Slack
read-only # Non-UMSDOS filesystems should be mounted read-only for checking
image = /boot/vmlinuz ===> Our previous kernel which we keep for backup.
Prompt
timeout=1200
root = /dev/hda1
label = SlackOld
read-only # Non-UMSDOS filesystems should be mounted read-only for checking
# Linux bootable partition config ends
Vim is a text editor. By pressing the button insert (Command -> Input), we can make our changes to the file. When we finish our editing, we press ESC (Escape) and enter :wq (note the colon, it must be entered to go into command mode) and enter to save and quit.
If you don't want to save the file for any reason, press :q! which closes the file without saving any changes. [ The letter w = write q = quit ]
And finally, our last command ...
# lilo
# reboot
and happy Slacking :-)