1. Introduction
Untitled Document
Have you ever lost precious files when your hard disk died suddenly? If yes, then you should know about RAID. For those who haven't heard of it, RAID is a Redundant Array of Inexpensive Disks, ie a way of arranging data on two (or more) disks in order to maximize performance and/or availability. There are many possible RAID setups, most of which are probably too excessive for home/desktop uses (if you need to ask, then you don't need it!). The simplest and most useful one is RAID 1 (mirroring), which maintains at all times a persistent copy of your data on two physical disks. If one disk fails, you can replace it without losing any data.
Let me give you a real life example: On my 24/7 linux file and proxy server I had installed a RAID 1 mirror for the home directory. I hadn't checked the status of the server, but a friend of mine, who was using it regularly, complained of slower performance. Curious to check this out, I went on-site and realized that one disk had failed 15 days ago. I realize that I sound like a crappy sysadmin, but this was really a server for limited use by me and a few of my friends. Nevertheless, no data had been lost from the home directory, the machine had kept running and merely complained about the inability to do reads/writes on the second drive. I replaced the drive and the server was up and running in less than 30 minutes.
The good news is that you can have a RAID setup under linux using only a software driver and two disks (same can also be done under XP, to be fair). Although you probably have a RAID controller on your motherboard, it's a less flexible solution and it's not going to be faster unless you invest on specialized hardware. Most on-board RAID controllers are not “true” hardware RAID.
I'm not going to give an extensive article on software RAID, there are special HOWTOs for that. I am going to show you how to install a very simple RAID-1 setup to protect crucial files (photos, documents and anything that is very hard to replace). You will need:
- 1. Root access (!)
- 2. Two partitions of approximately the same size on separate hard drives. If you're going to use PATA disks, the drives should be connected to different channels, ie not on the same ribbon cable. The location and the number of the partitions do not matter. Neither does it matter if one drive is SATA and the other PATA or SCSI. Any combination can work, including drives from different makers, different sizes and different speeds.
- 3. A recent linux kernel, preferrably newer than 2.6.16 with the appropriate modules. Most probably, your distribution already includes them by default. Note that software RAID has been available for a very long time under Linux, I had been running RAID-0 with 2.2 series kernels.
- 4. The mdadm software.
We will take these steps one by one and in very little time you'll have a “safe” RAID-1 partition that you can use for your most important files.
2. Partitioning
Untitled Document
Get r00t
Ok, I'm not really going to show you how to get root access. Let's assume that you have root access and proceed to the next step.
Partitioning
This is not hard, if you know how to make partitions with any of the popular linux tools, like cfdisk, fdisk, sfdisk and parted. My favorite is cfdisk, because it is relatively easier and confusion has to be avoided when partitioning your drive! Your distribution definitely includes one or more of these tools and, quite possibly, a graphical front-end for KDE or Gnome, so choose the one that suits you best. All you have to do is make two partitions of the approximate same size (say 10GB or whatever you think is necessary for your most important files) and mark them as “fd” instead of “82” or “83”. This last step is particularly important, because “fd” marks the partition as Linux RAID autodetect and enables the kernel to recognize it at boot time as part of a RAID setup.
―DANGER―
Creating and deleting partitions can result in loss of data. Be really careful.
Backup your drives at this point. No, not later. Now.
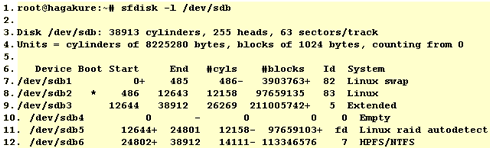
You partition table should contain the new partition, marked as Linux raid autodetect. Repeat the process for both disks, of course. In the following example, /dev/sdb5 and /dev/sda5 will be used as part of the RAID mirror. The fact that they are both fifth is irrelevant, we could have used /dev/sdb1 and /dev/sda3, but not /dev/sda1 and /dev/sda2, because they are on the same device:
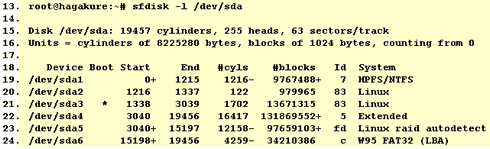
The output from /dev/sda follows, here too we have a partition of equal length (97659103 blocks), marked as Linux raid autodetect (fd):
Now we have to ensure that the system RAID devices are available under /dev (ls -l /dev/md* or ls -l /dev/md/*). Most probably they are available. If not, you can create them with (mdadm can also do that automatically, but you should also know how to do it by hand):

or (depending on your /dev structure)

We will now assume that you will use the /dev/md0 device, so substitute accordingly if you're using /dev/md/0 or /dev/md1, for example. You are free to use any other name, of course, like /dev/md/home or /dev/md/stuff. You only need one md device for every RAID array.
3. Kernel and modules
Untitled Document
You need to check whether your kernel includes RAID support. First try to load the raid modules, if necessary:

Then verify the existence of raid support. Try:

If /proc/mdstat is not available, or if line 32 does not show the [raid1] personality, you will need to enable the following options in your kernel (screen taken from 2.6.18.1) and recompile :


After kernel recompile and reboot, the /proc/mdstat file should be available and showing that you have 2 RAID “personalities” available: [raid0] and [raid1]. You could choose to install RAID support as modules, but since you're going to be using it all the time, it makes no difference if you include it in the kernel, as I did above. Note that the device mapper support is a different thing, but it's useful to have around, so you could just go ahead and install it for future use (encrypted volumes are an obvious application).
4. Making the array
Untitled Document
The 'mdadm' utility
The original way to manage RAID setups were the “raidtools”. These have been deprecated by mdadm, that is much more convenient. Check if you have mdadm installed, it is included in most distributions. You can otherwise try to install from the latest source package (./configure ; make ; make install should suffice) or obtain a package suitable for your distribution. Check to see whether it is available:

Making the array
OK, now that you have made the partitions, verified kernel support and the existence of mdadm on your system, it is time to build the actual array.

At this point, the two disks will start syncing and /proc/mdstat should show something like this:

You can start formatting the array at this point, even while the synchronization proceeds in the background. Use your favorite filesystem. Something like:

Congratulations! You now have a working RAID-1 partition! Make sure to add it in /etc/fstab and start using it right away. Here is an example line from /etc/fstab:

At this point, it would be wise to save your configuration in the /etc/mdadm.conf file. Do this with the following command:

Make sure to read the mdadm manual. There are some very interesting options, like the ability to check the array automatically and the ability to recreate an array that has gone out of sync. You should know in advance how to rebuild the array without losing data if you need to replace a failed hard disk. It's not hard, but make sure to read the instructions and have them printed some where, along with the contents of your mdadm.conf file.
5. Performance
Untitled Document
Performance
The RAID-1 setup has slightly worse write performance than a single disk but slightly better read performance, due to the fact that data may be read, at first, from the drive whose heads are closest. On average, this reduces seek times somewhat. Don't expect to see significant performance gains or losses from this setup, unless your drives differ too much in performance (say, an old 15GB ATA66 drive and a modern 320GB SATA II drive). I have benchmarked the array with the well-known “bonnie++” benchmark using a 4Gb file size. Bear in mind that the array is composed of different disks, /dev/sdb is the fastest, while /dev/sda is slightly slower.
These are the results for the array (/dev/md0):

These are the results for the fastest disk (/dev/sdb):

As expected, the block read and write speed is faster on the single disk, as is the rewrite speed.

The array is noticeably faster when doing random seeks, for the reason we explained above (the kernel is intelligent enough to chose the drive whose heads are closest), and the estimated seek times are 7.1 ms for the single disk and 4.2 ms for the array. This explains the marginally faster character reads and writes, where seek time matters more than throughput. Finally, software RAID 1 does not seem to have a noticeable impact on processor usage, which is comparable between the single disk and array setups.

Conclusion
The RAID-1 setup that we described is an easy way to ensure some extra safety for your data with minimal user involvement. The best thing about it is that after installation you get extra peace of mind automagically. However, do not be fooled into thinking that your data are perfectly secure and do not neglect to take regular backups. There are many, albeit unlikely, ways that can cause both disks to fail at once (fire, computer gets stolen etc) and result in loss of RAID-1 data.
―DISCLAIMER―
Although we try our best to give you accurate and useful advice, we are not to be held responsible if your hard drives blow up or your data are permanently lost or your computer gets abducted by aliens. You really need to be careful and exercise common sense and caution. You did backup your data, didn't you?
PKT
PS. All commands are also available at this .txt file