1. Introduction
 Most of us have at some stage had to burn a large batch of CD or DVD discs for a company presentation, product catalog or other similar job. While one, or even two drives, are more than enough to get the job done for small batches, if it's something that needs to be done frequently and it involves a large number of discs, then it becomes tedious and frankly, it's not worth the effort. There is a better solution, or should I say solutions, available from ACARD. ACARD offers an extensive range of duplicator configurations for any type of CD or DVD duplication job. The duplicator we'll be looking at in this review is their latest release, the ARS-2033N 1-to-21 Copy Controller, which can accommodate up to 21 burner devices at once.
ACARD Technology Corp., based in Taiwan, was founded on September 19, 1996. Since then, ACARD has been engaged in IC design, with its core technologies in the fields of IDE and SCSI, enjoying a high reputation as a leading global provider of storage solutions.
ACARD offers small, medium, and large scale corporations, a broad range of controller chips, SCSI/SATA/IDE RAID controllers, SCSI-to-IDE/SATA converters, CD/DVD duplicators, RAID subsystems, NAS, external storage for DVR, and CD/DVD recording software. ACARD's products are targeted at PC and Macintosh users, as well as OEM customers worldwide.
 At the heart of the 1-to-21 Copy Controller is the ATP867 chip, which is a high performance PCI 64-bit 66MHz 4-channel IDE RAID controller, targeted for server class and high-level workstations. The built-in IDE engine, supporting Ultra DMA mode, can transfer data at a speed of up to 133MB per channel. The IDE channels can operate simultaneously, which is essential for a multi-tasking environment, while a PCI scatter/gather function reduces the interrupt handling and tremendously improves performance.
ATP867PCI 4-Channel UltraDMA133 IDE Controller Features
PCI interface
- 64-bit, 66MHz PCI bus with data rate up to 133 MB/s.
- PCI specification Rev 2.2 compliant.
- PCI Bus Power Management Interface Specification Ver 1.1 compliant.
- Scatter/Gather function compliant to Bus Master Programming Interface to IDE ATA controller Rev 1.0.
- Flash ROM interface For RAID setup utility and booting.
IDE interface
- Up to 4 independent IDE channels. Each IDE supports DMA133 speed.
- PIO mode 0,1,2,3,4 and Multiword DMA mode 0,1,2 to 16.6 MB/s.
- Ultra DMA mode 0,1,0+1,2,3,4,6 up to 133MB/s or higher speed.
- Support RAID0, RAID1, RAID10 function and JBOD.
- Built-in timer for Auto-rebuilding on RAID1 and above level.
- Simultaneous data written to both channels on RAID1 mode.
- Built-in interface for hot swap hard disk caddy.
- Enclosure services for fan, temperature, voltage, caddy insertion can be detected.
Normally, you would buy the ARS-2033N already configured in a cabinet, through one of Acard's worldwide distributors. What we received, were the individual components that make up the entire 1-21 controller. This is a unit that can write simultaneously to 21 CD or DVD burners. That's a lot of drives and it makes quick work of most medium scale jobs.
We'll be taking a look at how to connect the various components together in the next page. The ARS-2033N 1-to21 as it came to our labs, comprises:
- 3 ARS-2033N controller boards
- 4 AEC-4430H SATA converters
- User manual
- IDE and SATA cables
ACARD also offers an AEC-4420P USB link which can connect the ARS-2033N to a host PC, making the ARS-2033N an external writer for the computer. This was not in our package, but it can be requested from ACARD separately. ACARD further provides its own recording software for use in this type of setup, called Ha! DVD Burner. Further details can be found on the ACARD website.
2. Installation
We took all the components out of their boxes and started to read through the manual. The manual is adequate, although when reading through the first time to try and understand how the components connect together, it was a little confusing. This is probably due more to the procedure itself rather than the manual, but I did find it clearer to use the connection configuration tables in the manual (which are reproduced below), when connecting the controllers together.
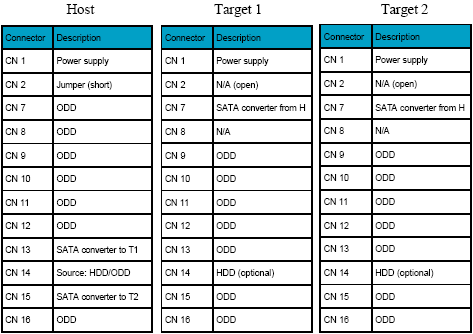
Up to three controller boards can be connected together. Each board can handle up to 7 optical disk drives (ODD), providing a maximum of 21 drives when 3 boards are used. All controller boards are identical, so one has to be designated as the host controller and the others the targets. We also set up a configuration with just one controller board handling 7 ODD and it worked just fine.
To designate a controller board as the host, you need to short out the CN2 jumper pins. This is left open circuit on the target boards. The following pictures show an above-board view and the front panel respectively.

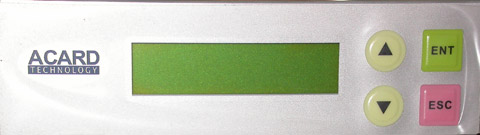
When connecting more than one controller together, only the host controller's front panel is used. We will discuss the front panel functions in a while.
To connect the boards together, you need to use the AEC-4430H SATA converter boards. The picture below, shows the 3 controller boards connected together using the SATA converter boards. The centre board is the host controller and connects to two SATA converter boards which in turn connect to the target controllers.
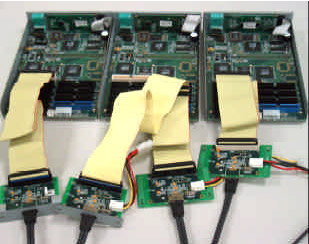
It would have been nice if the functionality of the AEC-4430H SATA converters had been incorporated on the controller boards. Already there's a clutter of cables building up, and we still have the drives to connect. Another issue that soon became apparent, was the power supply. Not in the sense that it couldn't handle the load, but we needed a lot of connector cables. Each controller card requires one power connection, each SATA converter board requires power, and then there are the ODD and the hard disk, which we haven't mentioned yet. That's a lot of cables. Don't forget that there's an IDE cable running off to each ODD as well, so you can imagine the problems with the layout.
Fortunately, you can order your duplicator through an ACARD distributor, so your unit will come ready connected in its cabinet. In our case however, we had to improvise a little. We used a regular ATX power supply. ACARD recommends it have a 300W rating or better. Now, if you take any standalone PSU, plug it into the mains and just feed of its 4 pin power cables, there's no power. The PSU doesn't automatically turn on and there's no way to turn it on or off, as is. In our test setup, we connected a switch between PS_ON and ground on the 20 pin Molex Main Power Connector. This is the wide connector that you would normally connect to your motherboard which in turn controls turning the PSU on and off. The PS_ON pin is (usually) the green cable.
Now that we had power, we connected a DVD ROM drive (Toshiba-Samsung SD-M1912) and a HDD to our setup. Before you can do any copying, you have to be able to read from somewhere (a source), the image or compilation you're going to copy. The ARS-2033N can read from a CD or DVD drive, or you can use a hard disc. The photo below shows a HDD and ODD connected to the controller. The ODD connected is used only as a reader by the controller, so you can use a DVD ROM drive instead of wasting a burner here.
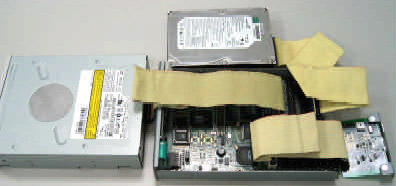
We used both devices in our tests and can recommend the following. If you use the CD or DVD drive as the source, you will be limited in speed since copying is carried out on the fly. So this is good for a small number of copies only. If you're going to be doing a large production run, then you definitely need to use a hard disk. The hard disk and CD or DVD drive connect to the same IDE cable off the host controller. In fact, the IDE cable used, is the only one with 3 connectors on it, all the others have two. (All cables are supplied by ACARD).
Both the HDD and ODD are connected to the controller simultaneously, and in fact you use the ODD to transfer the contents of your project to the HDD. If you don't have an ODD reader connected to the same cable as the HDD, you can still copy your project onto the HDD using one of the burner drives. The system is intelligent enough to be able to detect if a drive has media inserted and can then use that media to copy onto the HDD. However, we recommend using a DVD-ROM drive, which tend to offer better reading performance, especially with problem or defective media.
The next step, was to connect the burners. One important point to note here, is that you need to use the same make and model ODD for all burners, or at least that's what's recommended. This has to do with the command set and response times. We carried out some test runs using just a single controller board and 6 drives, not all of the same model. They were from the same manufacturer however, NEC, and included the ND-3540A, ND-4550A, ND-3520A and ND-3530A.
We had no problems in what was quite a good test run (a batch of 250 CDs). But beware of mixing drives. If you must mix drives (can't think of a reason why you would want to), you need to be absolutely certain of their compatibility. The real question however, is which model burner to use. This depends entirely on the type of copying you will be doing. Will it be on CD, DVD or both? What speeds will you be copying at. You're also better off selecting a good, reliable burner rather than choosing a mediocre one, simply to get a higher writing speed. Another major decision is the media brand you intend using. One of the greatest factors that impacts on the quality of a burn, is the combination of burner and media brand.
The following photo shows our setup with the ARS-2033N host controller front panel on top of our array of ODD. The topmost drive is the DVD ROM source drive, while below we had our DVD burners set up in two columns.

3. Copying and Testing
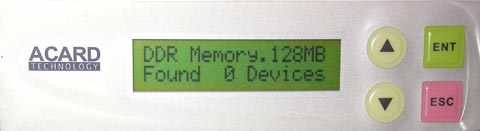
With everything connected and ready to go, we flipped the switch. The controller boards give off a beep and load their operating system as seen in the photo below. This takes a few seconds.

Everything you do with the duplicator is controlled from the front panel. The 4 buttons on the very right, are very similar in operation to the buttons on your LCD monitor which controls the On Screen Display for configuring your display. The up/down arrow buttons cycle through available menu options, ENT selects and ESC exits or backs out. The small but adequate LCD screen provides up to two lines of text display.
The ARS-2033N Duplicator has an extensive list of functions, listed below:
- Copy
- Test
- Test & Copy
- Verify
- Compare
- Prescan
- Disc Info
- Select Source
- Image
- Edit Track
- Setup
- Link Select
- Advanced Setup
These are also the options that appear on the LCD screen as you cycle through with the up/down buttons. For most functions, there are also sub-functions. For example, function 11 has 21 sub-functions, including language, CD & DVD burning speeds, Burn on the Fly and Burn Mode, Eject Disc (this feature selects whether to eject discs or not to eject discs when copying is finished, or the choice I prefer, eject only discs which copied without problems). Function 11 also includes the sub-functions to display the make and model of all ODD installed and the duplicator's firmware version.
Using the duplicator is a fairly straightforward process. You need to initially decide whether you will be using the DVD ROM device or the HDD as the source. To use the HDD, you need to partition it first. Depending on the size of your hard disk, several partitions can be created. What we noticed was that partitions were created in multiples of 1GB. A single 1 GB partition will hold a full CD image. For a single sided DVD, 5 GB are used and for dual layer DVD, 10 GB. You can store several images on the HDD and simply select which image will be used prior to copying.
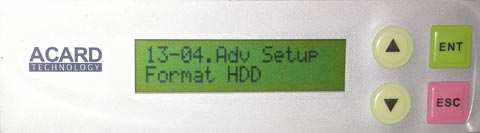
To format the HDD, you need to go to the Advanced Setup function. If you cycle through with the up/down buttons, you won't find function 13. It cycles from 12 back to 1 again. In order to bring up the Advanced Setup functions, you have to press the ESC button for a few seconds. Function 13, like function 11 mentioned previously, also has a large array of options.
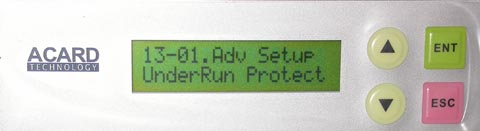
Just a small comment on the function ordering and setout. Other than functions 11 and 13, only functions 9 and 10 contain sub-functions. I feel it would have been better to have grouped functions 2, 3, 4 and 5 together (Test, Test & Verify, Verify, and Compare) and split the sub-functions in 11 and 13 down. Functions 11 and 13 contain 38 sub-functions between them. There are also sub-functions in 13, such as Underrun Protect, Overburn and Read Error Skip which could have been put with CD Burn Speed, DVD Burn Speed, Burn On the Fly from 11, for a more logical grouping. I found I had to continually refer to the manual to find where the burn speed selection was, for example.
With the HDD formatted, we could now transfer our image onto one of the disk's partitions. First though, we have to set the HDD as the source with the Select Source function (8). The controller detects if a HDD and a DVD ROM device are connected to connector 14 on any of the controller boards and allows you to choose which one will contain your image. With the Image function (9), you can transfer multiple images from one or more CD or DVD discs onto the hard disc. In the same function group, you select which image will be used for the current job.
Copying is the easy part. Put discs in all the drives, close the drive doors and go to function 1, Copy. Copying time depends on the size of the image and burning speed. There is no difference here than if you were doing it on your PC using your favourite burning software, with the advantage that you can burn up to 21 discs at a time.
One of the options available under function 11, is Eject disc. This option allows you to set what the controller does with the disc, once burning is complete. It can eject the disc, it can leave the drive door closed in which case you need to press the eject button, or it can eject the disc if the burn was successful and leave it closed if it failed. The last is the default option and is the one we used in all our tests. We did indeed have a case where 3 drives failed to open automatically at the end of a burn cycle. We put those discs aside but saw that they hadn't been written to. What had most probably happened, is that when the controller scanned the drives to detect the presence of media, these drives may have been too slow to respond and the controller simply started the job with the other drives. Out of all the test runs we did (approximately 500 discs), there were no wasted discs.
4. Conclusion
Duplicators have become quite popular in the past few years, especially among those who have to produce product catalogs or company presentations on CD or DVD media. And while with most duplicators available, producing a few hundred discs was a breeze, now with the Acard ARS-2003N 1-to-21 duplicator, even thousands can be made short work of.
The Acard ARS-2003N 1-to-21 duplicator has a complete function set, controlled from a very simple front panel. The 1-to-21 burner is in fact 3 ARS-2003N boards connected together, each handling up to 7 burner drives. One controller is designated the host and it controls all functions. It can read the image to burn, from either a DVD-ROM drive or a HDD connected to the controller. We recommend using the HDD, except for very small jobs.
In our run of various tests, we met with no problems and found the controller to be very stable and reliable. We even made a run using as burners, different model drives (but from the same manufacturer), something which is not recommended by ACARD or any duplicator manufacturer. The unit however, worked without a hitch.
We burnt both CD and DVD compilations, around 500 discs in total. We had no failures or damaged discs. There were two occasions only where some discs were not written to, but the discs were simply used in the next round of writing.
If we have to complain about something, it would be the organisation of the menu, controlled from the front panel. There is a total of 13 main categories or functions. Some of these have sub-functions while others do not. In the case of the Setup and Advanced Setup main functions, there is a total of 38 sub-functions. We feel that this is too many and that they can be split into fewer selections under more main functions and into more logical groupings. The main functions Test, Test & Verify, Verify, and Compare, could then be grouped together under one main function to keep the number of main functions small.
Overall however, this is a very impressive duplicator. For pricing, contact one of ACARD's distributors.