1. Introduction
 The increasing popularity of AMD processors, has increased the demand for extra cooling solutions beyond that offered by the stock coolers, which in their majority are not adequate for OC. On top, PC case styling has also become a priority for the end users. To "answer" these calls, various manufacturers have released their CPU cooling solutions. Spire is among the better known cooling solution manufacturers with several AMD and Intel based coolers. Today, we will be reviewing one of Spire's latest products, the SP741B3 Diamond CoolII, an AMD based cooler, which among other things, promises to give a cool look to the interior of your PC case.
The Cooler...
The SP741B3 Diamond CoolII basically consists of two parts; the UV-reactive 90mm Spider-Fan and the copper heatsink. The UV-reactive fan will give a cool look to the interior of any PC case with the proper UV light installed. Enough about the "modding" aspect of the cooler and on to the technical.
The fan works at 2300RPM creating a 25.78CFM air flow, while the noise levels are relatively low, at around 21.0 dBA.
 |
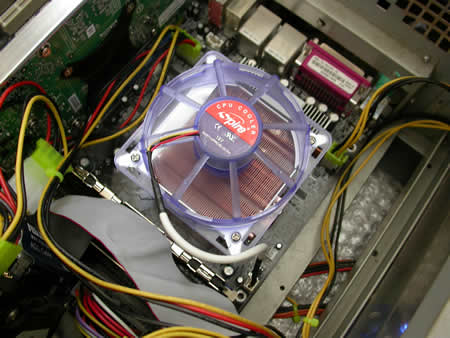
| The all new Diamond CoolII |
No innovative designs are noticeable here, just the standard design from Spire that we have become used to. Under the Spider-Fan, resides a solid copper heatsink, with 40 fins and four copper heat-pipes which run through the fins to the other end of the heatsink, responsible for keeping the base cool and hence CPU temperatures at low levels.
 |
4 copper heat-pipes are responsible for the heat dissipation... |
Here are the detailed specifications as provided by Spire :
| Socket 754 / 940 / 939 Cooling kit |
Product Name |
SP741B3 DiamondCool II |
Dimensions |
Heat Sink : 89×80×53 mm (l × w × h) |
| 12VDC Fan : 90×90×25 mm |
Bearing |
Ball bearing |
Rated speed |
2300 RPM +/-10% |
Rated power |
1.56 W |
Noise level |
21.0 dBA |
Air flow |
25.0 |
Current |
0.13 A |
Life hours |
Ball: 50.000 |
Features |
Blue transparent spider-fan, 4 heat-pipes, all copper stamped fin technology |
Connector |
3 pin, mainboard |
Application |
Athlon 64 ~ 4800+ (K8) |
| Athlon 64 FX-51 (K8) |
| Athlon 64 FX-53 (K8) |
| Athlon 64 FX-55 (K8) |
| Athlon 64 FX-60 (K8) |
| Opteron ~ 2.6 (K8) |
| Sempron ~ 3300+ (K8) |
Thermal resistance |
0.297 °C/W |
Thermal type |
Stars-420 white grease (Injection tube) |


As Spire informs: All Spire CPU cooling products come with thermal compound either pre-applied onto the cooler or in an injection tube. Compound will begin to function at its optimum potential, after a gradual increase in heat-dissipation, approximately 168 hours (7days) after initial application.
Now, let us move on to the next page and to the installation of the cooler.
2. Installation
Installing the Diamond CoolII was easy, even though depending on the motherboard, some users may need to remove their stock backplate and install the bundled one. The procedure took 10mins, including the removal of the stock heatsink. The CPU used for this review was the AMD Athlon 64 3500+ on an ASUS A8N-SLI Deluxe motherboard.

Make sure you clean any of the thermal compound left on the CPU from the previous installation.
 |
| make sure the CPU is clean of any thermal compound... |
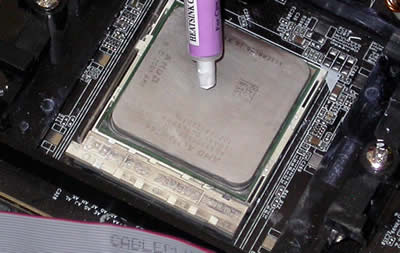
This time, there's no thermal pad as with previous releases. Instead, there's a small tube of thermal compound included in the retail package. We carefully applied the paste on the clean surface of our CPU, making sure than it is spread evenly over the entire top surface of the CPU to provide the best cooling efficiency.
 |
| The Spire Tube of thermal paste... |
 |
spread the paste evenly over the entire surface before mounting the Spire CoolII |
Next step is to install the cooler itself. We placed the cooler on the CPU (having removed the plastic brackets of course) and with a philips screwdriver, fastened the Cooler onto the motherboard.
 |
| a process easier done than said in this case. |
And for the last step, we attached the 3pin power cable to the appropriate power connector on the motherboard.
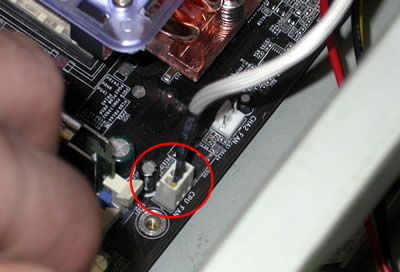 |
| Plugging the power cable. |
With the installation process out of the way, we move on to see how the CoolII performs compared with the stock AMD 3500+ CPU fansink. As already discussed, the installation was easy and should not occupy more than 10mins of your time...
3. Performance
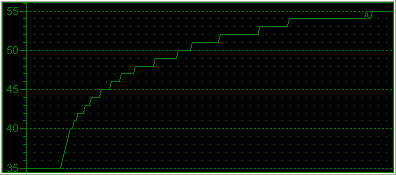
To measure the CPU's temperature, we used SpeedFan v4.28 which provided us with real time monitoring and created a graph of the temperature over time. After letting the processor settle down in idle mode, we fired up Prime95 and ran the in-place large FFT test to heat it up to its maximum level. The following is the graph of the temperature with the stock AMD fansink:
 |
| The temperature started at 38°C |
 |
| and here is the reported fan speed... |
The reported temperature for the AMD 3500+ and with stock fansink, was 38°C at idle and rose up to 55 °C as the Prime FFT torture test was fired up.
We installed the Spire cooler and let the processor idle for a few minutes so that the temperatures could settle. We then went on with the Prime FFT torture test once again, pushing the CPU to full load. This is what we got..
 |
| the temperature in idle mode is the same as with the stock cooler... |
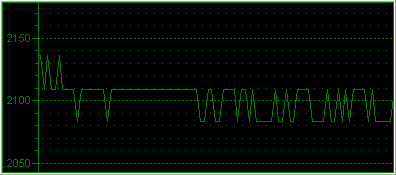 |
| the RPM graph with the Spire cooler |
As one can clearly discern from the above graphs, the Spire cooler did not make that much of a difference from the stock fansink. There was a slight drop in the temperature during idle with the Spire CoolII (2°C), while both fansinks maxed out at 55°C. Notice however, that the Spire cooler works at much lower fan speeds, thus producing lower noise levels.
Summing up, what we gained from the fansink replacement was more of a reduction in noise rather than temperature.
4. Conclusion
The Spire SP741B3 Diamond CoolII's performance can be summed up in three words: lower noise level. Or lower than the stock fan anyway. Unfortunately, the Diamond coolII could not produce much of a temperature drop (only 2°C drop in idle mode). However, the 2300RPM makes the cooler more of a silent solution compared to the stock. The UV reactive fan occupies a large part of the viewable area of the cooler, so what we have is a good cooling solution for the average user.
 |
up and working... |
Some words about the installation. The procedure takes all of 10mins (including removal of the original stock cooler), while backplate removal is not always necessary, being motherboard dependent. So, with some thermal compound and a screwdriver, the task can be described as plain and easy.
The price for the SP741B3 Diamond Cool II is close to €34.
Pros:
- Low noise
- UV reactive diamond fan design
- Easy to install
Cons:
- No significant temperature drop
| Performance: |
 |
| Features/Design: |
|
| Installation: |
|
| Value for money: |
|