1. Introduction
 Spire, the well known computer solutions manufacturer, with a product list ranging from Cooling Solutions to HDD enclosures, has recently released a Multi-Functional Control Panel as it is described by the manufacturer, the SP-206, aka DigiPanel II from the DigiPanel line series. Throughout these pages, we will be taking a closer look at the latest release, the Spire DigiPanel II, it's installation and features.
- Technical Specs
| SP-206 DigiPanel II |
| Dimensions |
148.4 x 42.4 x 69.2 mm |
| Weight |
171 g |
| Material |
Aluminum Alloy |
| Rated Voltage |
12V |
| Thermal Control |
3 sets |
| Fan Speed Control |
3 sets |
| Temperature Control Range |
30 ~ 90 °C |
| Fan Speed Adjustment Range |
60 ~ 100 % |
| LCD Monitor Dimensions |
49 x 26.5 mm |
| LCD Light |
Blue |
| Application |
Any free 5.25 inch the PC case. |
As seen from the above specs, the DigiPanel II is of a standard size and will fit right into any free 5.25 expansion bay on any PC case. Unfortunately, it does not come in any color other than Blue-Aluminum.
- Features
Here is a list of all the available features the Spire DigiPanel II offers to the end user...
- Multi-Functional Digital Command Control which allows users to play with the available fan speed of any three fans they desire to monitor. Also, the appropriate threshold can be adjusted to inform the user of any anomalies with a distinctive sounding alarm that the Panel has.
- 3 Sets of Fan Speed & Thermal Control allowing the user to monitor three different fan speeds and temperatures, switchable with a push of a button.
- The Fan Speed & Overheating Alarm is a useful feature which notifies the user of any overheating or fan failures with an alarm.
- USB, 1394 FireWire, Earphone & Microphone Ports are the available I/O ports the DigiPanel II offers as passthrough connections from the motherboard.
- The Blue Indiglow LCD Monitor is quite impressive and will give a cool look to your PC case.
Now that we have covered the basics, let us move on to the DigiPanel II itself.

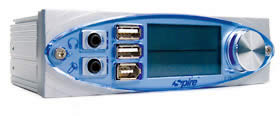
1.Control Button. With the use of this button, we can control all the functions available on the DigiPanel II. By pushing this button, we can navigate among the three available pairs of Heat Sensors & Fan Speeds. Once the appropriate option has been selected, by turning the button, we can adjust the fan speed (only by 60 ~ 100 % as the specs indicate).
2.USB, 1394 FireWire. With these ports, we can use any USB 2.0 device as well as any firewire device.
3.Earphone & Microphone Ports. The available earphone and mic ports for instant access.

The retail package contains several cable adaptors. As seen in the above picture, the package includes (from top left to bottom right) : A 1394 FireWire cable, an earphone-mic cable, a USB cable (resulting in two jacks), the three sensor cables with each sensor labeled as one-two-three and the fan monitor cables used to connect any available CPU-Case-GPU fan to the DigiPanel. The package also contains 4 screws, 3 thermal resistant tape tips, the guarantee and a detailed user manual.
Note here, that the USB, FireWire and Earphones-Mic ports are not expansion ports. The DigiPanel uses those available on the motherboard simply offering easier access. As we will see in the installation procedure further on, the cables are hooked onto the Panel's rear pins and come out of the back end of the box where they are plugged into the appropriate ports.
Now that we've seen all of the components and the Digipanel functionality, it's time to put the panel in the case. This might be considered an easy task by many, as the manual clearly states all the steps required in order to successfully complete the installation of the DigiPanel II.
2. Installation
As mentioned in the specs earlier, the dimensions of the SP-206 DigiPanel II are 148.4 x 42.4 x 69.2 mm, making the device installable in any 5.25" drive bay. Screwing the Panel on the case is quite easy, identical to that of a normal 5.25" drive. After mounting the panel on the 5.25" drive bay, we connected the available cables to the appropriate positions inside the case for monitoring the temperature and fan speed.
Let us first have a look at the inside of the panel and each pin separately.

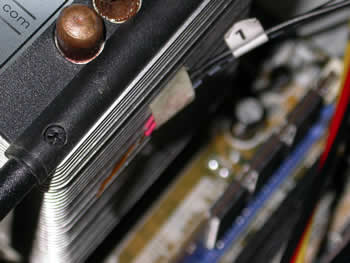
1. Fan slots. Here, we connected the fan cables with the CPU-Case-GPU fan cables inside the case. The slots are numbered as 1-2-3 respectively, indicating their monitored area when functioning the DigiPanel.
2.Sensor slot. Here we hook on the sensor cable which results in three different thermal sensitive tips for temperature monitoring.
3.Power Cable. This cable provides power to the Digipanel which is connected to a power supply cable and bridges with an expansion slot to circulate the power to another device, which in our case was a DVD-RW drive.
4.USB-1394-Earphones-Mic slots. From these connections, the cables run all the way to the back end of the case and into the appropriate connections.
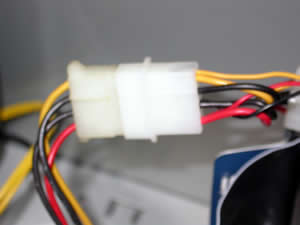 |
the power cable connecting the DigiPanel with the power supply... |
From here on, the installation was easy. We placed the sensor cables at the appropriate positions (note here that the CPU sensor cable is not to be put under the heatsink as is suggested by the heatsink manufacturers).
With the accompanying thermal straps that come with the DigiPanel II, we placed the CPU sensor near the CPU heatsink fins, while we placed the second one near the GPU heatsink of the graphics card. The third was not used.
The temperature readings we got were not 100% accurate, while they differ by 8°C from the reported CPU temperature measurement taken with the SpeedFan utility. Let us say here that the sensors are quite sensitive and will react to any temperature differences occurring.

For the needs of this review, we used only two temperature sensors and one fan cable, that of the CPU fan.

Next, we put the rest of the cables (USB-1394-Mic-Earphones) through the case, to the motherboard connectors at the back of the case...

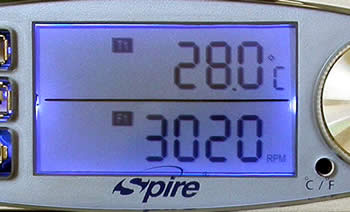
After installing all cables and booting the test PC, we went on to set the threshold for the alarm temperature and the low speed fan alarm.
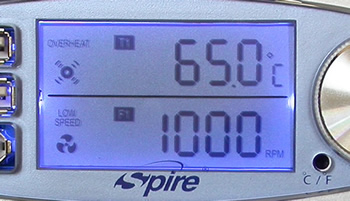
The temperature upon booting was at 28.0°C while the CPU fan was at 3020rpm.
The installation procedure was finished without too much trouble, as the cables were easy to connect, and monitoring started as soon as the PC had been powered up.
Having completed the installation, lets move on to the next page were we test the USB and FireWire ports.
3. Our Tests
Even though the USB and FireWire slots used are the original Motherboard slots, we ran some tests to measure the available speed, to certify that no speed loss is incurred by the DigiPanel. For the tests we used the Sisoft Sandra and HDtach Utilities.
HD Tach Tests
HD Tach tests the sequential read, random access and interface burst speeds of your attached storage device (hard drive, flash drive, removable drive, etc). All drive technologies such as SCSI, IDE/ATA, 1394, USB, SATA and RAID are supported. Test results from HD Tach can be used to confirm manufacturer specs, analyze your system for proper performance, and compare your performance with others.
This benchmark is intended to determine the maximum read or write speed on the device at various locations. Hard drives, for example, have faster read/write speeds at the inside edge (mapped to block 0) of the device, so it is useful to see the difference in speed. The maximum sustained speed (lowest speed on the device) is an important metric for real time sequential access applications. The maximum speed may be important to a power user that would like to partition the drive into a high speed partition and low speed partition.
We performed the test twice, one straight from the mobo USB port and one from the DigiPanel USB port.


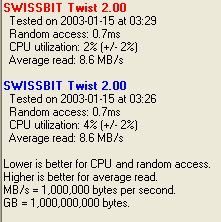
The reported results are the same in both cases.
Sisoft Sandra 2005 SR1 Results
Sisoft Sandra has two series of tests.
The "File system" which tests how your drive(s) and controller(s) compare to other devices in a typical system:
· Read Test: Buffered, Random, Sequential
· Write Test: Buffered, Random, Sequential
· Seek Test
The "Drive Index" mark is a composite figure representing an overall performance rating based on the average of the read, write, and seek tests, and file and cache size. The Drive Index is intended to represent drive performance under typical use in a PC. A larger number means better performance. The weighting of the results is not equal and represents the distribution of different files sizes as used on these devices (obtained through field research).

The drive index for the motherboard (upper results marked in orange) differs from the index reported with the DigiPanel slot and USB stick test device. Even though the reported results are not the same, the differences are not significant and the outcome is more or less the same, as we will see further on.
The "Compact Flash" typical usage model for these devices is File operations, such as writing a file to the device, reading a file from it, and deleting a file. This benchmark exercises the devices in terms of these operations (to measure the “raw” cluster level performance of the device, it is recommended to also test it by means of the File System Benchmark module). The following characteristics are measured for each of the four representative file sizes of 512 bytes (representing a minimal single data cluster file), 32kB, 256kB and 2MB. The weighting of the results is not equal and it represents the distribution of different file sizes as used on these devices (obtained through field research). For each of the four file sizes, a Combined Index is then calculated, stating the combined performance in terms of Combined Operations Per Second, with respect to a mix of write, read and delete operations.
Combined Device Index: is a composite figure representing an overall performance rating based on the average of the Combined Index figures over the four file sizes. (Higher is better, i.e. better performance)
Endurance Factor: is a figure representing the Wear and Life Expectancy of flash devices; this is obtained by dividing the average performance (normal condition, i.e. sequential write) to the lowest performance (high-stress condition, i.e. same block re-write). It measures the relative improvement of endurance caused by the wear leveling or flash management algorithm; the absolute endurance of a device (i.e. its expected life-time) is directly dependent, in addition to this Endurance Factor, on the nominal manufacturer rating of maximum erase/reprogram cycles, which is typically 100,000+ for SLC and 10,000+ for MLC devices. (Higher is better, i.e. longer life-time for the device).

As was the case with the previous reported results, the differences between the motherboard and DigiPanel USB ports are negligible. Results were as expected since in both cases, the USB port remains the same, with the DigiPanel using a cable to connect to the mobo port. Outcome. No loss of speed while using the Digipanel USB port.
4. Conclusion
Looking for easy access to your USB ports, a temperature monitor or an overheat alarm utility? No need to look any further, because Spire has released a solution that might suit your needs. The DigiPanel II is quite a useful gadget that will provide all of the above and more, like FireWire instant access as well as Headphones and Mic ports on the front panel of any PC case, along with a nice cool blue breeze look.
The DigiPanel II offers three pairs of monitors, for temperature and fan speed measurement, while it enables fan speed adjustment, all through the use of one button. And if the heat goes up, or the speed goes down, the Panel will warn you with the use of an alarm which features a distinctive sound that is sure to get anyone's attention. The DigiPanel II is an easy to use and install tool, and the manual included is a great help for those that don't have experience with gadgets and devices.
Unfortunately, the DigiPanel II does not offer an expansion USB or Firewire hub. It simply extends the existing motherboard ports, offering convenience since you don't have to search around the back of your PC for a port, bringing the connections to the front panel. The Panel offers good temperature monitoring, as long as the sensors are put in the right place as the manual indicates, while they are very sensitive and will instantly follow any temperature changes that might take place inside the case.
At the time of this review, the DigiPanel was priced on the e-market at approximately US$35.