1. Introduction
 As long as your graphics card is not passively cooled with just a heatsink, chances are you're already looking for a new cooling solution for your card. Stock fansinks tend to deteriorate in performance easily, make a lot of noise or in some cases are just insufficient when overclocking the card.
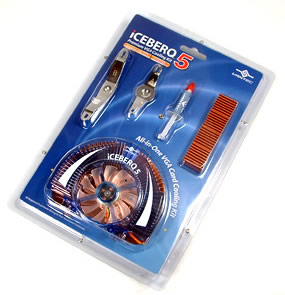
In this article, we'll take a look at one of the few existing solutions for these problems, a VGA cooler from Vantec, the ICEBERQ 5 (CCB-A5C).
 |
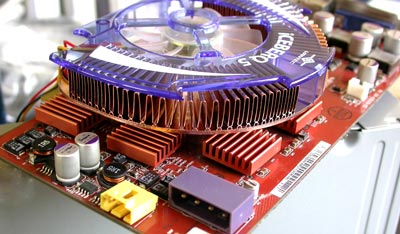
Vantec ICEBERQ 5 (front) |
The ICEBERQ 5 is a very silent, ball-bearing fansink and a great looker. The rotation of the fan activates a bright blue light which will appeal to most case modders. It uses a solid copper heatsink for its base which offers the best thermal conduction but also contributes to its excessive weight compared to other Graphics card coolers.
 |
Vantec ICEBERQ 5 (rear) |
The finish on the bottom of the round copper base is very smooth and initially covered by protective tape to prevent any scratches.
Another great feature of the ICEBERQ 5 is the accompanying heatsinks for the memory modules. The ICEBERQ 5 stands much higher than the round base, which allows enough headroom underneath for you to install the heatsinks without any problems.
 |
The 8 included memory heatsinks |
The ICEBERQ comes with a large compatibility list, that includes almost all the current NVidia and ATI cards.
| Compatible Cards |
ATI Radeon
|
9000/9000 PRO
9200/9200 PRO
9500/9550
9600/9600 SE/PRO/XT
9700/9700 PRO
9800 PRO/9800 XT
RX300/600/800 |
NVIDIA |
GeForce3 Ti 200/500
GeForce4 MX 420/440/460
GeForce4 MX 440 SE/440 8X
GeForce4 Ti 4200/4200 8X
GeForce4 Ti 4400/4600/4800
GeForce FX 5200/5500/5600/5700L
GeForce FX 5600 ULTRA/5700/5700 ULTRA
GeForce FX 5900/5900 XT/ULTRA
GeForce 6600
GeForce 6800/6800 GT/6800 ULTRA |
- Specifications
Model:
|
CCB-A5C |
| Dimension: |
110 x 88.7 x 31.6 mm |
| Fan size: |
60 x 60 x 12mm |
| Fan Speed: |
2500 RPM |
Rated Voltage:
|
DC 12V |
| Rated Current: |
0.15 A |
| Power Consumption: |
1.8 W |
| Weight: |
320 g |
| Bearing Type: |
Ball Bearing |
- Accessories
As with most all-in-one solutions, the ICEBERQ 5 includes a lot of accessories to ensure compatibility with all the supported cards.
|
Two metal clips, type A and B, with insulation tape at the back will be used to secure the fansink to the card. |
| Accessories |
A & B metal clips |
8 thermal tape pieces |
2 gold stand offs |
2 metal screws |
1 molex power adaptor |
2. Installation
Installation of the ICEBERQ 5 was relatively easy and the whole process takes at most 5 minutes.
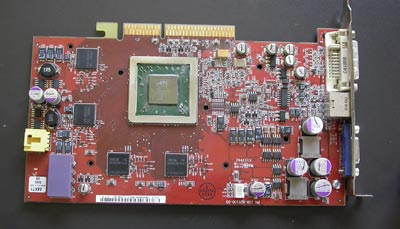
The first step in installing the ICEBERQ 5 is of course to remove the old fansink from your card and clean up the GPU with a smooth cloth. In our case, the card that will star in the following pictures is an Asus X800XT PE. As you can see, the stock ATI fan that was cooling the card didn't cover the memory at all.
When you finish cleaning the GPU and memories, it's time to ready the flower-like ICEBERQ fansink for installation. At the back, there are several screw holes, labeled as 1, 2 or 3. Depending on the card you are about to install, you'll have to screw the 2 gold standoffs to the appropriately labeled holes. The following table states the correct holes for each card (we'll see about clips later).
 |
| ICEBERQ 5 Compatibility Chart |
 |
| Since our X800 XT PE falls in the Radeon X800 category we used the holes labeled with 1. |
Now it's time to reapply thermal compound on the graphics processor.
Normally, a thin layer of paste is enough, as long as it is evenly spread across the chipset. However, since the the paste included with the ICEBERQ was a little too gooey we could not properly spread it. Instead we applied the compound as you can see below, then put the fansink on it and rotated it on the spot twice round so that it gets spread evenly.

When you place the HSF on the card, you have to make sure the two standoffs are directly behind the previous fansink mount holes. Next you have to turn the card around in order to secure the fansink with the metal clips included with the ICEBERQ.
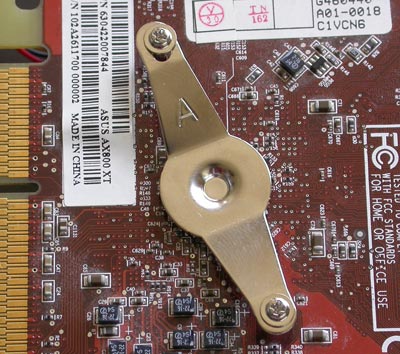
Once again, consult the Compatibility chart to ensure you picked the correct clip. In our case, that was the smaller clip, labeled A. However, in order to install it without damaging the circuitry located behind the card's core, you'll have to attach the insulation tape above them.

Even though that already feels secure, Vantec has attached another tape to the metal clips themselves which is one of the little things that count in the end. Placing the clip and securing it with the screws is very easy as long as you keep the board and stand offs aligned. Again, the screws are quite long (unlike other coolers we've seen) and there's no way you can possibly damage the card by overscrewing the clip.
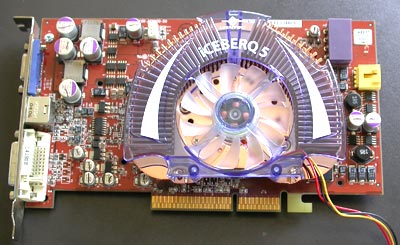
That takes care of the fansink. It's now perfectly installed, doesn't move at all and yet there was nothing risky in the installation process.
The final step is the easiest and most fun: Installing the small heatsinks on the memory modules. These are usually located on the front side of the card but sometimes they are split on both sides as in the X800XT.

There are 8 pieces of thermal transfer tape included with the ICEBERQ 5. Each piece has a removable protective liner on both sides. You'll have to peel off the protective liner from one side and stick it onto the back of the heatsink as shown below.

This special thermal tape is very sticky, but it allows heat to pass through it easily, just like thermal compound. After sticking each piece onto the sinks, now peel off the protective liner on the reverse side (i.e. the side that is now showing) and securely place each heatsink onto the memory chipsets.


That's it. The card is almost ready for use. The only thing remaining is it install the card on the motherboard and give power to the card's fan.
This leads us to one of ICEBERQ's weirdest characteristics. The fan cannot be directly powered from the card's already present fan-power header. Instead, you have to plug the fan's power cable to one of the motherboard's 3-pin power headers or if your motherboard doesn't have one available, you can use a 3-to-4 pin adaptor and connect directly to one of the power supply feeds.
3. Performance
Let's see how good of a cooler the ICEBERQ 5 really is. First, let's start with the stock cooler temperature.
 |
| Stock fansink idle temperature |
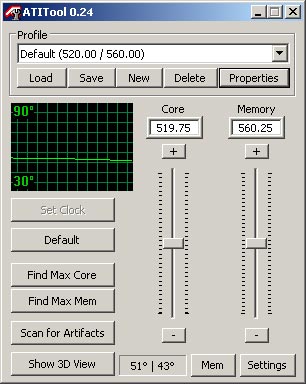
ATITool 0.24 reports 51°C as the lowest temperature the card drops to during idle mode. Firing up the 3D View of ATITool, we let the card heat up while logging the temperature with RivaTuner.
Be default, the stock ATI fan has it's duty cycle automatically adjusted to reduce noise when full speed is not needed. The peak temperature we got was around 85°, but as soon as the fan reach maximum RPMs, the temperature dropped to 76°.
 |
| Stock fansink full load temperature |
We then installed the ICEBERQ5 and ran the same tests. Note that we let the ICEBERQ 5 run at maximum RPMs at all times since we could not hear any noise from the card. The idle temperature was now reported as 42°C, 9 degrees lower than with the stock fansink.
 |
| ICEBERQ 5 idle temperature |
Once again running ATITool's 3D View to heat up the card, we witnessed the temperature rising up but much slower this time. The temperature finally stabilized at around 75°.
 |
| ICEBERQ 5 full load temperature |
4. Conclusion
Performance-wise, the ICEBERQ 5 managed a modest drop in temperature, which is very satisfactory as cooling isn't supposed to be one of its main features. Still, it managed to cool our X800XT PE better than the stock ATI fan and even provide the memory parts with their own cooling, thanks to the 8 included memory heatsinks.
Vantec is known for its very silent coolers and ICEBERQ 5 is one of them. We could barely hear any noise coming from the fan, even with our own CPU cooler running extremely quietly too. Also, let's not forget the LED that emits the blue light. The original ATI stock cooler also had a similar led so it'd be a shame if we had to lose out on the special FX.
What really disappointed us at first was the fact that you have to plug the fan's power cable onto your motherboard or power supply. That way we thought we'd lose the ability to dynamically control the fan's rotation speed. However, once we saw that there wasn't any difference in noise level when running in low or high speed, we were happy to leave it running at 100% all the time.
Installation of the fansink was not only easy but also safe for the card. There's really nothing you can do to damage it, even when tightening the metal clip at the back of the card. What might be a drawback for some users is that the ICEBERQ 5 takes up a second PCI slot in order to fit on your motherboard.
The price of the ICEBERQ 5 is around US$30.
Pros:
- Easy & safe installation
- Great stock-fan replacement
- Heatsinks to cool the memory parts
- Bright blue LED light
Cons:
- Fan can't be powered through the card
- Requires a second slot to fit on board
| Performance: |
 |
|
|
| Installation: |
|
| Value for money: |
|