1. Introduction
 Vantec Thermal Technologies was established in 1994 and since then has manufactured a variety of products for both "mainstream and enthusiast users". Cooling solutions, peripherals, storage devices, power supplies, PC modifications, even Notebook accessories are some of the products from Vantec available on the market.
One of its latest releases is the "Mach1" CPU cooler and we will be taking a closer look at what this Vantec cooler can do.
Design and Specifications...
Vantec has created a very "sleek", as the manufacturer calls it, design. Indeed, for a CPU cooler this is a very interesting design that will catch your eye. But it is not all just looks. The design also helps with the heat dissipation, directing the hot air out of the back of the cooler. The 83x79x84mm CPU fansink consists of a 70x70x15mm fan, two copper heat-pipes and 33 full copper fins.
 |
 |
 |
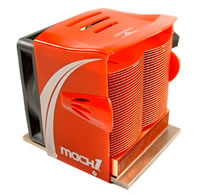 |
| The stylish mach1 CPU cooler... |
Vantec used a copper base located on the bottom of the heatsink. It's not just a copper core like we are used to, but a wide copper base. This is meant to help increase with the transfer of heat, travelling from the base to the heat-pipes to the fins, resulting in better heat management and CPU cooling.
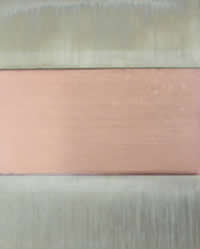 |
| The copper base of the Mach1 |
Here are the detailed specifications as provided by Vantec:
| Vantec mach1 |
Product Name |
MP4-7015-FC |
Dimensions |
Heat Sink : 83x79x84mm |
| Fan : 70x70x15mm |
Bearing |
Ball bearing |
Rated speed |
2800-3800 RPM |
Rate Current |
7-12V |
Noise level |
29-34 dBA |
Weight |
515g |
Current |
0.10 A |
Application |
Intel Pentium 4 (socket 478) |
| AMD Athlon 64 (socket 754, 939) |
| AMD Athlon 64FX (socket 939, 940) |
|
AMD Sempron (socket 754) |
| |
AMD Opteron (socket 940) |
Thermal type |
White grease |
According to Vantec: "Virtually all heatsinks (with few exceptions) utilize copper, aluminum, or a mixture of both. Aluminum is by far the most popular metal used, and for good reason. Aluminum is lightweight (26.9815g/mol), a good heat conductor (237k (W/m·K)), and inexpensive. Copper is the other most popular material used. While copper is a much better heat conductor (401k (W/m·K)), it weighs almost 3 times as much (63.546g/mol) and is more expensive. Copper also takes a longer time to dissipate heat, though it absorbs much quicker.

A large, solid copper heatsink would be best at transferring heat, but the immense weight could literally rip the CPU socket off the motherboard (as they are usually mounted vertically). Most copper heatsinks are either not very large or consist mostly of fins. For this reason, manufacturers often design heatsinks with an aluminum body, but with a copper base and/or fins. This minimizes the weight and cost, while still utilizing the effectiveness of copper at transferring heat. The copper quickly absorbs the heat from the processor, allowing the aluminum to draw the heat from the copper and dissipates it."
The fan rotates at high speeds, ranging from 2800 to 3800 RPM so don't expect a low noise CPU cooler. Even at low speeds, the CPU fansink remains noisy. The RPM can be adjusted with the fan controller switch which is included in the retail package though its installation is not mandatory.
 |
| the airflow as depicted in the above picture... |
A large "plus" for the Vantec CPU cooler is its compatibility with a wide variety of CPUs as the table above shows. So lets move on to the installation, which surprisingly enough was extremely easy on our Intel test PC.
2. Installation
As mentioned on the previous page, the installation was extremely easy without the need to use any tools whatsoever. Before moving on to the installation procedure, lets have a look at our test PC and its specs as reported by the well known utility CPUZ.
 |
| as is reported by the CPU-Z utility... |
Removing the old CPU cooler and cleaning the CPU of any residual thermal compound, was the only time consuming step when installing the Vantec CPU fansink. Other than this, there's no need to remove anything else (base, retention clips, etc) as the cooler is compatible with the already in place fastening hardware.
 |
| all previous thermal compound must be cleaned prior to applying any new compound.. |
Once clean, apply a new, thin layer of thermal compound onto the CPU. The use of Vantec's thermal paste, included in the retail box is recommended, as all reported results and tests from the manufacturer were carried out with the stock paste.
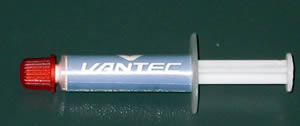 |
| The Vantec stock thermal paste, retail box included. |
The paste must be spread on evenly so as to avoid trapping any air bubbles when the cooler is clamped onto the CPU. To help, when you first place the cooler on the CPU, turn the cooler slightly, clockwise and anticlockwise a few times to spread the compound.
 |
| we don't need to spread it 100% |
 |
| prior to placing the brackets... |
Now fasten the brackets.
 |
| The brackets hook straight onto the retention module. |
After fastening the brackets on each side of the cooler, we attached the power cable to the power socket on the motherboard. Now the CPU fansink is up and ready to work.
 |
| up and working... |
If you want, you can also attach the included dimmer for controlling the fan's rotation speed.
 |
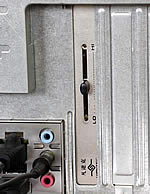 |
| The dimmer in place. Views from inside the case and outside. |
Now that we have covered the installation process, it's time to move on to the performance tests and see how the mach1 does under heavy stress in high and low mode.
3. Performance
To measure the CPU's temperature, we used SpeedFan v4.24 which provided us with real time monitoring and created a graph of the temperature over time. After letting the processor cool down in idle mode, we fired up Prime95 and ran the in-place large FFT test to heat it up to its maximum level. This is the graph of the temperature with the stock Intel fansink:
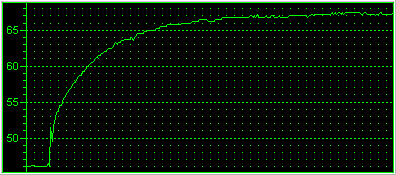 |
| The temperature starts off at 46°C... |
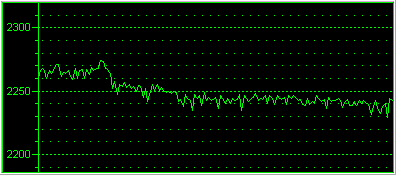 |
| and here is the reported fan rotation speed... |
The reported temperature for the Intel Prescott CPU and stock CPU cooler, was 45°C at idle mode and rose up to 67°C as the Prime FFT torture test was put to work.
We installed the Vantec mach1 and let the processor idle for a few minutes so that the temperature could settle. We then went on with the Prime FFT torture test once again, pushing the CPU to full load. Here we will be testing the Vantec cooler at High and Low Fan speeds. Let us start of with the Low mode first...
It is very likely that the first time you may not notice any great difference in temperatures. You need to give the thermal compound a little time, approximately a day, to reach optimal performance.
Low Fan Speed
 |
| starting from 44°C in idle mode... |
 |
| the RPM graph settling to just under 2900 RPM |
At the low fan speed, the mach1 started at 44°C and after torturing the CPU with the in place FFT prime test, the temperature climbed up to 60°C. What we got was an amazing 7°C drop while the rotation speed ranging between 2850 to 2950 RPM. We then proceeded and set the fan speed switch to "high" to see what more the Vantec cooler could give.
High Fan Speed
 |
| starting form 42C idle mode climbing up to 56C |
 |
| a little higher than the manufacturer states... |
At high speed, the mach1 managed to drop the temperature by a further 2°C in idle mode and 4°C at full load. This is great performance from the Vantec cooler as it managed to reduce the CPU temperature by 11°C at full load compared to the original Intel cooler.
The temperatures reported were reduced dramatically by the Vantec mach1 CPU cooler, but at the cost of noise, which is a slight drawback. Nevertheless, great performance by the mach1 fansink.
4. Conclusion
Vantec's latest product release, the Mach1 CPU cooler really lives up to its name. The high rotation speed of the fan along with the all copper based heatsink result in an overall temperature drop of 11°C over the stock Intel box CPU cooler. Unfortunately, the Mach1 produces a significant amount of noise, even at low fan speeds which is the cost that must be paid for the great temperature drops. It was for this reason that we had to deprive the Mach1 of the fifth star in the ranking table under Features/Design. Other than that, its performance and price make it one of the top cooling solutions on the market.
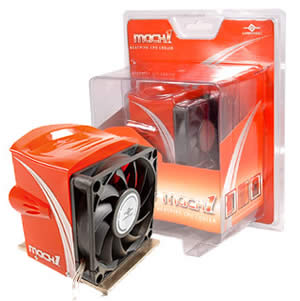 |
| Stylish mach1, stylish retail box... |
Installation of the mach1 was extremely easy as far as our Intel CPU was concerned. There's no need to replace the existing retention module and the brackets fit right in. For AMD processors, the backplate might need changing but again it's an easy task. Finally, do not forget to give the thermal compound time to set, approximately a day, for optimal performance.
The price of the Vantec Mach1 is between US$31~US$35

Pros:
-Performance
-Design
-Easy to install
Cons:
-High noise level.
| Performance: |
 |
| Features/Design: |
|
| Installation: |
 |
| Value for money: |
|