1. Introduction
Thermaltake is one of the most recognized brands when it comes
to cases, cooling solutions and generally modding accessories. Their products
feature great design, efficiency and innovation.
In this review we'll be taking a look at the Thermaltake
Beetle, another Tt 4-in-1
air cooler for AMD x64, XP, Sempron and Intel P4 478 and 775.
How it works :
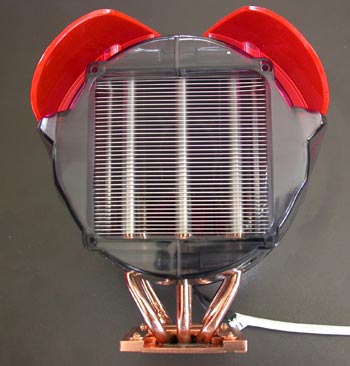
This cooler works just like the previous Thermaltake product
we've seen. The copper base plate at the bottom of the cooler is
attached to your CPU. As the processor gets hot, it heats up the
base plate which
in turn heats up a special liquid contained inside the 6 copper heat pipes.
This liquid flows through the pipes towards the cooler end near the fan
which dissipates the heat across the 142 aluminium fins. There,
the
12cm
fan takes over with its sole purpose being to keep the fins cool.
Again the secret behind this design of the Big Typhoon is located
at the heat pipes. The continuous flow of the hotter liquid towards the fan
and colder liquid towards the copper base attached to the processor is what
keeps the temperature down.
Here are the detailed specifications as provided by ThermalTake:
| Product name |
Beetle |
| Heatsink Dimension |
80 x 75 x 127 mm |
| Heatsink Material |
Copper Base & Aluminum Fin (39Fin) |
| Fan Dimension |
90 x 25 mm |
| Fan Speed |
1600rpm~4300rpm |
| Compatibility |
Intel P4 LGA775
Intel P4 478 Prescott FMB1.5
AMD Athlon 64 / Athlon 64 FX
AMD Athlon XP up to 3400+
AMD Sempron up to 3400+ |
| Heatpipe |
Copper Tube ( 6 mm) x 6pcs |
| Noise |
20dB~44.5dB |
| Weight |
581 g (20.51 oz) |
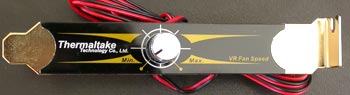
Inside the package along with the Beetle, you will find 2 fan control panels.
The first one is a front panel that fits on a floppy drive slot and the other
you can plug in an unused PCI slot. To install them you have to connect their
cables to a special connector on the Beetle cooler. As there is only one such
connector, that means you can only use one panel at a time.
One more thing to note is that although you can rotate the control knob all
the way around from Min to Max, it doesn't actually work like a trimmer and
there are only
a few scales for fan speed.
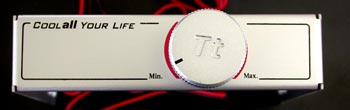
The panels control the Beetle's fan speed and can set it from 1600rpm up to
4300rpm. At the lowest fan speed, the 20dB noise generated is almost undistinguishable.
Even more, the lowest fan speed works great with motherboard noise reduction
features such as the Asus Q-Fan. With Q-Fan, the Beetle gets as good as a silent
cooler.
When you start to increase the speed further, the more you move towards the
maximum level, the more intolerable the noise becomes. At the highest level
where the
Beetle supposedly generates 44.5dB, there is no room for both you and the Beetle
in the same room. Unless of course you're deaf or work in the mines.
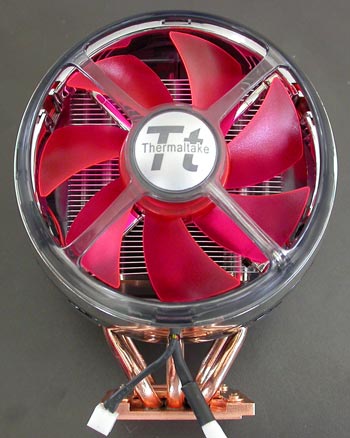
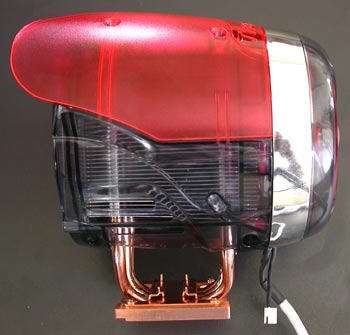
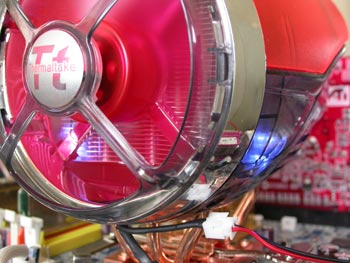
The Beetle's 8cm fan is highlighted by a small led located behind
the Tt logo at the center of the fan.
As the Beetle is working, cooling your processor, the light rotates
through a series of six colors as seen above.
2. Installation
In order to install the Beetle on a K8 motherboard, you normally
have to remove the retention module surrounding the CPU socket. However,
as there are two kinds of back plates supporting the retention module, metal
and plastic ones, the installation varies for each type.
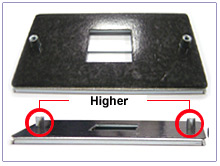
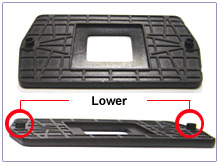
As Thermaltake recently included on the Beetle product page,
installing the Beetle on a plastic back plate board does not require removal
of the retention module, as the back plate is shorter and would give you
a hard time or even damage your processor when you try to screw the I-bar
on
the
board.
That way you don't have to remove the motherboard from the case. Just remove the screws from the retention module, cover your processor with a thin layer of thermal conductive paste and place the Beetle on top of it.
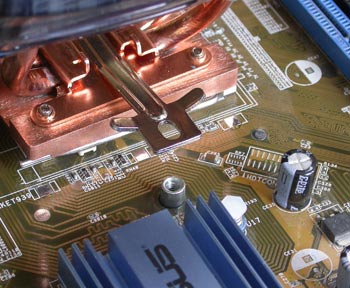
The Beetle has to be placed so that it blows air towards
the case fan that might be located at the rear of your box. After doing this,
get the appropriate K8 I-bar found amongst the Beetle's accessories and place
it on the copper base of the Beetle as shown above.
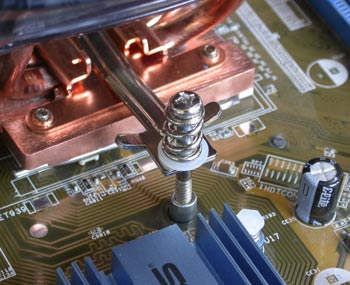
Next, for plastic plated boards, get the two large K8 screws
along with their springs and washers and screw the I-bar onto the PCB.
For metal plated boards, the two large K8 screws are just not
long enough to tighten the I-bar. For this reason, use the screws that originally
held the retention module and also remove the springs.
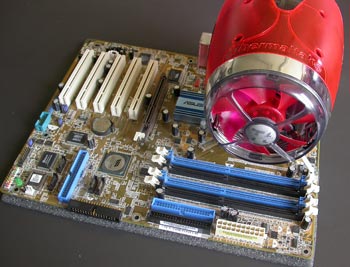
Connect the Beetle's 3-pin power supply cable onto your motherboard's
CPU fan socket and the Beetle is ready for use. The final result should look
something like the picture above.
3. Performance/Overclocking
To measure the CPU's temperature, we used SpeedFan v4.21
which provided us with real time monitoring and created a graph of the temperature
over time. After letting the processor cool down in idle mode we fired up
Prime95 and ran the In-place large FFT test to heat it up to its maximum
level. This is the graph of the temperature with the AMD stock fansink:
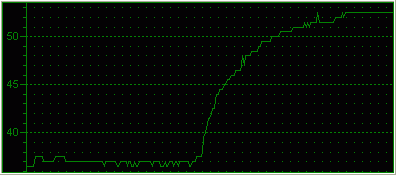
As you can see the CPU starts off at 37C and goes all the way up to 52.5C.
Here's the chart for temperature over time using the Beetle
cooler at the minimum fan speed:
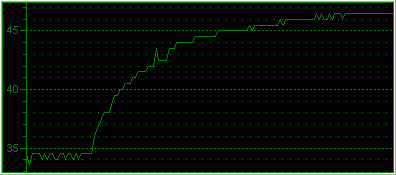
The idle temperature now dropped down to 34.5C. When we ran
it through the paces, the temperature only
rose up to 46.5C.
Although unbearable, we wanted to try out and see how cool
the CPU would get with the maximum speed selected using the control panel.
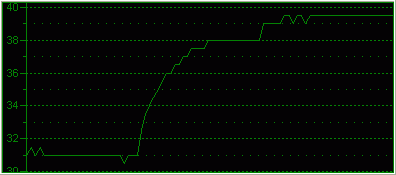
Amazingly,
temperature dropped down to 31 degrees celsius in idle mode and rose to
only 39.5C after some time of running the in place FFT prime95 torture test.
Overclocking
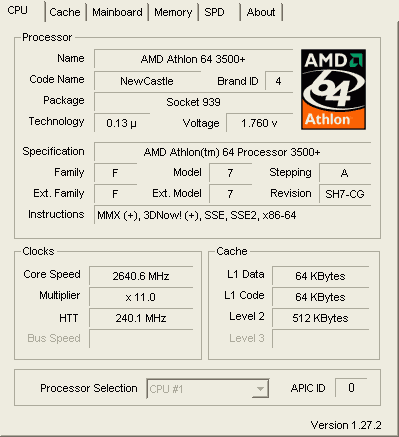
The default setting for our AMD 3500+ (Newcastle) was 11x200
= 2.2GHz. Trying out different Multiplier, FSB and CPU Voltage settings,
we concentrated on finding the highest yet most stable frequency
for our processor.
Through the BIOS, we left the Multiplier to 11 but increased
the FSB to 240MHz. To support this higher frequency, we increased the CPU
Voltage to 1.65V which will heat up the processor a little bit.
Using Prime95's torture test we verified that at that speed,
the system was still able to perform correct calculations and fired up Speedfan
once again to measure the temperature.
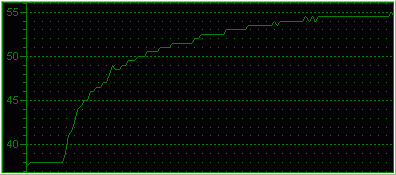
The idle temperature now starts from 38C and stabilizes at
55C which is only a little higher than the stock cooler temperatures, but
now the processor is running at 450MHz.
4. Conclusion
The Beetle is surely a performance cooler. Running at the
highest fan speed, the highest temperature from our CPU was barely 39.5°
celsius and in idle mode, just 31°C. If you don't care about the
extra noise
the Beetle produces while keeping the processor
cool, undoubtedly you'll love it.
The different pulsating colour leds, the UV sensitive material
it's made of and the manual fan control panels, are all part of its
feature set. However, the noise from the fan when running at full speed
is a major drawback and if you decide to keep it at the lowest speed, then
you lose all this great performance potential and the control panels become
unnecessary. In which case, all you get is a huge, fancy but quite
silent cooler, which
is still great compared to the stock AMD cooler.
Installing the Beetle is quite tricky. If you decide
to follow the steps presented in the leaflet included inside the package,
you'll catch yourself wondering "How did they do that?". It seems
the variety of motherboards on the market makes it too hard for a 4-in-1
solution to be installed as originally intended by TT, so you'll have to
improvise a bit to make it work with your computer.
The Beetle
costs around US$50. With the installation problems aside, the price is
satisfactory for the given features and performance.
Pros:
- Great heat reduction
- Front & Rear manual fan speed controls
Cons:
- Huge size
- Questionable universal CPU application
Performance: |
|
Features/Design: |
|
Installation: |
|
Value for money: |
|
