1. Introduction
Thermaltake Big Typhoon - 01 - Introduction
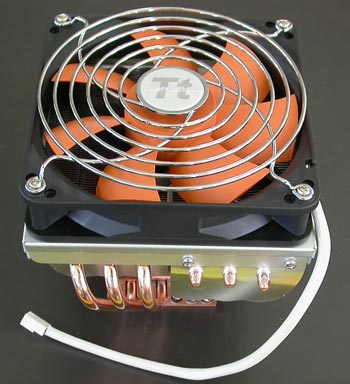
Thermaltake is one of the most recognizable brands when it comes to cases, cooling solutions and generally modding accessories. Their products feature great design, efficiency and innovation. Thermaltake has given us the chance to take a close look at its latest HSF (Heat Sink Fan) labeled Big Typhoon.
How it works :
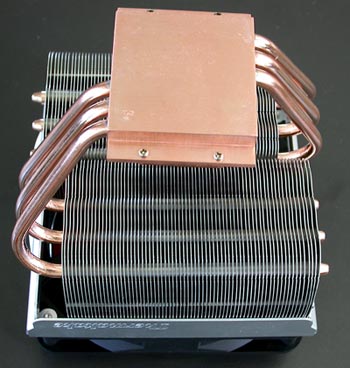
The copper base on the bottom of the cooler is placed on your CPU (we'll see how later on). As soon as the processor heats up, the heat is transferred to the base which in turn transfers the heat to a special liquid flowing inside the 6 copper heatpipes. This liquid flows through the heatpipes towards their colder ends which parcel out the heat across the 142 aluminium fins of the cooler. There, the 12cm fan takes over whose sole purpose is to cool these fins.
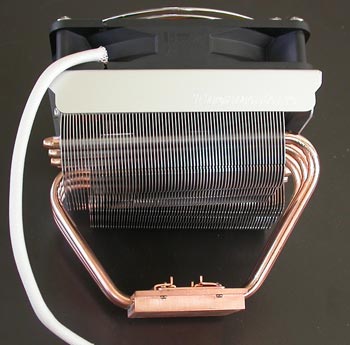
As you can see, the secret behind this design of the Big Typhoon is located in the heatpipes. The continuous flow of the hot liquid away from the base, towards the fan and inversely the colder liquid towards the copper base attached to the processor, is what keeps the temperature down.
Here are the detailed specifications as provided by ThermalTake:
| Product name |
Big Typhoon |
| Heatsink Dimension |
122 x 122 x 103 mm |
| Heatsink Material |
Copper Base & Aluminum Fin (142Fin) |
| Fan Dimension |
120 x 120 x 25 mm |
| Rated Voltage |
12V |
| Started Voltage |
7V |
| Power Input |
3.6W |
| Fan Speed |
1300 ±10% RPM |
| Compatibility |
Intel P4 LGA775
Intel P4 478 Prescott FMB1.5
AMD Athlon 64 / Athlon 64 FX
AMD Athlon XP up to 3400+
AMD Sempron up to 3400+ |
| Heatpipe |
Copper Tube ( 6 mm) x 6pcs |
| Max.Air Flow |
54.4 CFM |
| Max.Air Pressure |
1.87 mm H2O |
| Noise |
16dBA |
| Connector |
3 Pin |
| Weight |
813 g (28.70 oz) |
The Big Typhoon is a relatively silent cooler. It generates noise at a level of only 16dBA which will most probably make it indistingishable from the other fans in your computer. The 12cm fan spins at 1300rpm, a lot less than the majority of HSFs, something that contributes a good deal to the silent operation of the Big Typhoon.
Another great achievement of the Big Typhoon is its compatibility. You can install the cooler in all different kinds of sockets without any modification at all, just by choosing the right mounts on the H clips included with the product. More on that later.
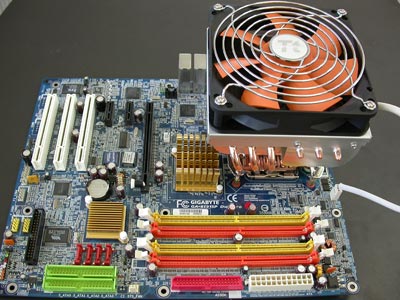
The Big Typhoon HSF as a whole, takes up space of 12cm x 12cm x 14cm and weighs 813 grams. That's almost a kilo which will be hanging off your motherboard. However, the copper heatpipes are strong enough so as not to bend and also most of the weight is centered on the base. So there's no need to worry that it will damage your motherboard or your processor. Let's see in detail, how to install the Big Typhoon on an LGA775 socket P4 processor.
2. Installation
Thermaltake Big Typhoon - 02 - Installation
Installation of the Big Typhoon was not so hard. It took much longer to disassemble the computer than to actually install the fansink on the motherboard, since you can't just plug it onto your motherboard socket.
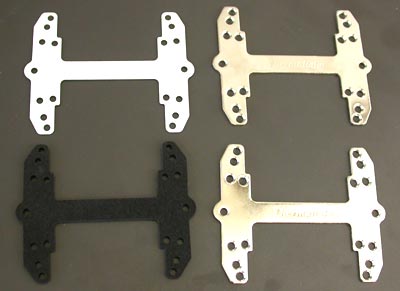
There are four H clips included with the Big Typhoon. Two metallic, one spongy and one mylar with adhesive tape attached.
To start off with, the first thing you have to do is to remove everything off your motherboard and take it out of the case so that you have clear access to your CPU (if you have trouble with that, consult your motherboard's manual). The reason for removing the motherboard entirely is that you will also need access to the rear of the motherboard.

Around the socket, you will find a set of screw mounts. Turn the motherboard over and place the sponge so that the mounts are aligned with the motherboard and everything sits symmetrically.

Next, peel the tape from the mylar H clip to reveal the gluey side and carefully attach it onto the sponge so that all mounts are now aligned.

After having done this, place one of the metallic clips on the pile of clips and secure its position by inserting the 4 larger screws included in the packaging.
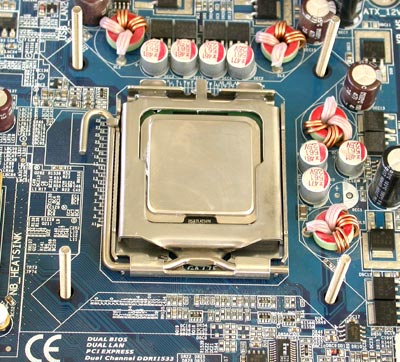
Now that the backbone of the HSF is properly set up, turn the motherboard right side up and slip on the 4 washers.
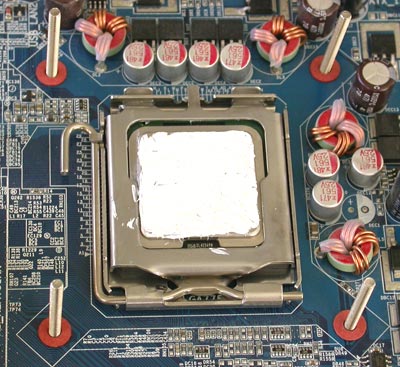
Uniformly cover the CPU with the High thermal conductivity compound included in the Big Typhoon package.

Next, secure the standoffs on each of the 4 screws.
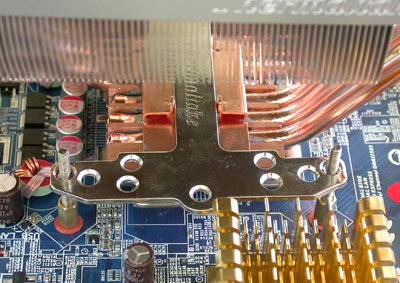
Place the heatsink on the processor and secure it with the last metallic H clip.

Now for the tricky part. You have to tighten 4 nuts over the 4 screws so that the heatsink is tightly attached on the processor.
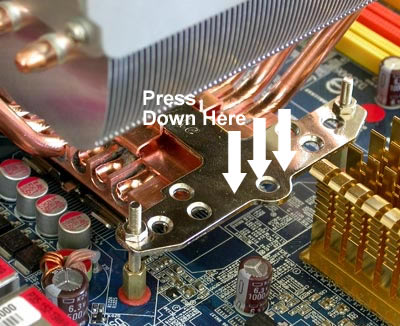
Using a wrench is hopeless and will take you hours of work. Instead, just press down the clip with one of your hands while tightening the nuts with the other.
After this step, the motherboard is ready to try.
3. Performance/Overclocking
Thermaltake Big Typhoon - 03 - Performance/Overclocking
To measure the CPU's temperature, we used SpeedFan v4.21 which provided us with real time monitoring and created a graph of the temperature over time. After letting the processor cool down in idle mode, we fired up Prime95 and ran the In-place large FFT test to heat it up to its maximum level. This is the graph of the temperature with the original Intel fansink:
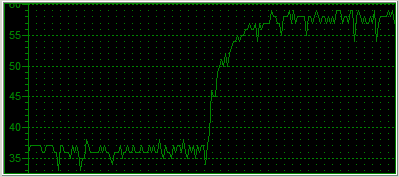
The temperature starts at 36C and reaches 58C when running the stress test.
After installing the Big Typhoon, we again ran SpeedFan and watched as it produced the graph again.
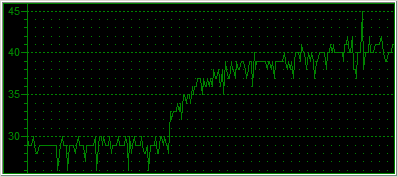
As you can see from the graph, the idle temperature is around 29 degrees Celsius. That's an amazing 7C drop for starters, and as the CPU started computing the Prime95 in-place FFT test, the temperature increased only up to 40 degrees, 18 degrees less than with the original Intel fansink.
Overclocking
The default settings for our Intel P4 LGA775 were 15 x 200MHz = 3.0GHz. In order to overclock our processor, we entered the BIOS and played around with the FSB clock and CPU Voltage settings. After some time experimenting with the FSB value, we concluded at setting the voltage to 1.6V and the FSB at 260MHz. This means the 3.0GHz P4 was now running at 15 x 260MHz = 3.9GHz.
At that speed, the system was able to boot and when running Prime95, which is very sensitive and hence ideal for identifying errors, reported all correct calculations. However, when trying to run 3D applications, the system would stall after a while and pop up an error message saying that the graphics card stopped responding.
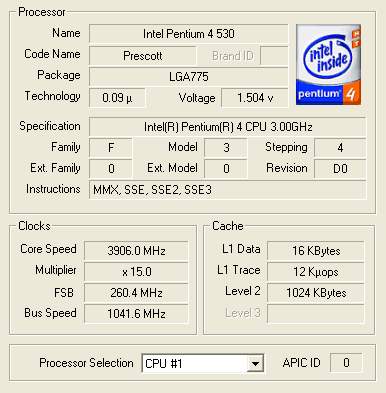
So, we rebooted into the BIOS once again and set the FSB a little lower to 255MHz. The processor was now running excellently at 3.825GHz and both computational and 3D applications ran troublefree. Let's see the graph showing the temperature of the CPU starting from idle up to the same Prime95 torture test.
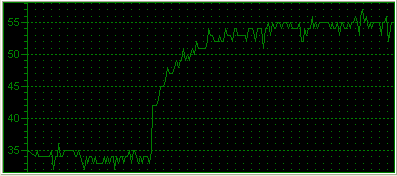
The idle temperature now starts from 35C due to the increased Voltage for the CPU. As we run the torture test, the line climbs up exponentially, stabilizing at around 55C.
With the installation of the Big Typhoon, we achieved a 825MHz increase in CPU clock while keeping the temperature at a lower level (2°C lower to be exact).
4. Conclusion
Thermaltake Big Typhoon - 04 - Conclusion
With the great cooling capabilities of the Big Typhoon, we got a temperature drop of 7 and 18 degrees under idle and 100% CPU load resptectively. This drop gave us the opportunity to increase the clock speed by 825MHz while keeping the temperature below what it was when using the original Intel cooler that came bundled with our proccessor.
The 16dBA noise eminating from the Big Typhoon make it an excellent air cooling solution. Although it's obviously not as silent as other no-fan solutions, its large 12cm fan with low revs contribute to its noise reduction. However, there are some minor problems with its design. The high density cooling fins can quickly gather a lot of dust quickly. This will decrease the heat transfer capabilities and as we noticed, increases the noise generated. So every once in a while, you have to clean it. Also, as you saw, the Big Typhoon is really, really big. It will take up most of any remaining space inside your case and could possibly interfere with any cables that were using that space, such as a front panel audio connector or an EZ plug cable (found on the latest Asus motherboards).

The installation has its own, pros and cons. It was really great to see universal coverage for 775, 478, 939 and Socket A type motherboards. On the other hand, to ensure the stability and compatibility of the Big Typhoon, ThermalTake had to put into play 3 H clips. This means, pluging in or removing the cooler, requires that you take the whole motherboard out of the case. However, this will hopefully need to be done only once as cleaning the fins does not require removing the whole backbone.
The Big Typhoon
costs around $50 USD. Although it's a relatively high price for an air cooler with no particular special features, the silence and/or overclocking it offers, more than make up for it.
Pros:
-Low Noise (16dBA)
-Very good thermal reduction
Cons:
-Huge size
-Fins gather dust easily
Performance: |
|
Features/Design: |
|
Installation: |
|
Value for money: |
|