1. Introduction
01 - Introduction
 With
the introduction of DDR2 memory for the Pentium 4 socket 775 motherboard this
year, surely some of you had second thoughts about upgrading your systems due
the cost of DDR2 memory. Here comes MSI with the solution: the MSI 915G Combo.
With
the introduction of DDR2 memory for the Pentium 4 socket 775 motherboard this
year, surely some of you had second thoughts about upgrading your systems due
the cost of DDR2 memory. Here comes MSI with the solution: the MSI 915G Combo.
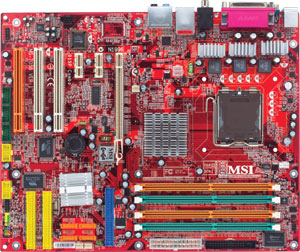
The main feature of the MSI 915G Combo is that you can plug in both DDR and DDR2 memory. This way, you won't have to spend any money on a brand new set of memory modules and/or have to throw away your old DDR modules. Later on, when DDR becomes obsolete and the price of DDR2 drops, you can switch the memory modules without having to change motherboard again.
As its name clearly states, MSI 915G Combo is powered by the Intel 915G chipset.(The
G in 915G betrays the integrated Graphics card processor).
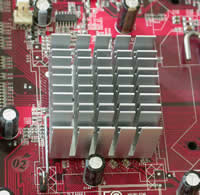 |
| The chipset is located below a silverplated fanless heatsink, that makes it ideal for those who are looking for a noiseless motherboard. |
Inside the card's packaging, you'll find the following accessories:


Here's a sum-up of the card's features:
Model |
915G |
SIZE WDH(mm) |
ATX 30.5cm(L) x 24.4cm(W)
|
CHIP |
|
|
|
2xDDR or 2xDDR2(DUAL CH)(2GB max)
|
|
|
|
|
|
|
|
|
|
|
|
|
|
|
|
|
|
|
Intel ICH6R |
|
|
Realtek 8110S (10/100/1000Mbps)
|
|
|
|
|
|
|
|
|
2. CPU & Cooler
02 - Board Layout
CPU & Cooler
In the socket 775 architecture, the pins have moved from the processor on to the motherboard's socket. That way, breaking one of them no longer results in a destroyed processor but a destroyed motherboard which could be replaced using the RMA service (depending on the manufacturer).
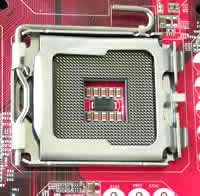
Inside the 915G Combo package, you will find a plastic CPU clip for installing
the CPU without damaging the socket pins. You are supposed to clip it on the
CPU by pushing it on it and then unclip it by "pushing the CPU down hard" just
as MSI suggests in the accompanying install guide. We found it really inconvenient
to install the CPU that way, as we wasted about 3 minutes to get it right and
finally decided to place it on the socket by hand which is far easier and in
our opinion much safer (just make sure you ground yourself first to discharge
any static electricity).
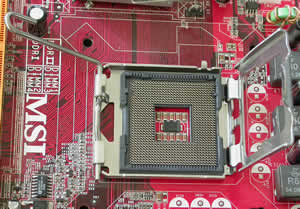
The rest of the operation was a breeze, as you just have to make sure the CPU is seated well into the socket, cover it with the metal plate and pull down the lock/release lever to secure the CPU.
Memory Modules
The memory banks are probably the most interesting part of the motherboard.
If you take a good look at the following picture, you'll notice apart from
the colors, that there are two different types of slots. The 2 orange slots
are for use with 240-pin DDR2 DIMM and the 2 light green ones for the 184-pin
DDR DIMM.
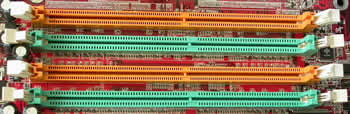
Since DDR2 is not backwards compatible you'll notice that the small notch in the center of each slot is slightly dislocated to prevent you from inserting the wrong kind of memory in the wrong kind of slot.
As you can see, the memory types alternate each other so that you can take advantage of the Dual Channel memory feature the chipset supports for increased memory performance.
Even though both types of slots are supported on the board, it should be noted that you can't use them simultaneously and the system might not be able to boot if you do so.
Power Supply
Another interesting fact concerning the motherboard is the new ATX1 power connector. In contrast to the standard 20-pin power supply, the 915G supports the 24-pin but with backward compatibility in mind so you won't have to add a new power supply to your new computer purchase bill.
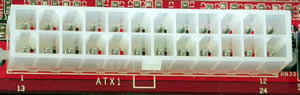
The four extra pins are:
Pin |
Signal |
11 |
+12V |
12 |
NC |
23 |
+5V |
24 |
GND |
Back Panel
The back panel provides the following connectors:

From left to right and top to bottom we have the mouse and keyboard PS/2 female connectors, the Serial and Parallel Port and the VGA connector for the on-board GPU. Then there's the S/PDIF Out-Coaxial for audio output to your speakers, two USB 2.0 ports, the LAN RJ-45 Jack and another set of USB ports. The remaining jacks concern Realtek's onboard soundcard. The first three audio jacks are for 2-channel mode for stereo output and the right two for 7.1 channel audio operation. Last but not least the S/PDIF Out Optical connector for digital sound output.
 |
| The realtek chip responsible for the board's Gigabit LAN interface.. |
Connectors
Below you can see the hard drive connectors. 3 IDE channels and 4 SATA connectors gives you the ability to install up to 10 drives on this motherboard!
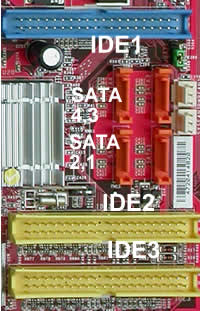
The first primary drive should always be connected to the blue
connector: IDE1. The IDE controller behind the blue connector is located on
the ICH6R chipset whereas the yellow ones are supported by VIA's 6410 IDE Raid
Controller which can connect up to four Ultra ATA 133 drives and also provides
RAID 0 & RAID 1 support.
Slots
The 915G Combo mainboard provides one PCI Express 16x slot, two PCI Express 1x slots and three 32-bit PCI bus slots as shown below.
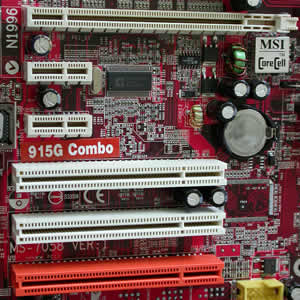
The only 16x PCI-E slot (not to be confused with PCI-X) is only made for graphics card expansion supporting a transfer rate of 2.5GB/s. The PCI Express 1x slots are for next generation peripherals (such as modems, TV tuners etc.) and support maximum transfer rate of 250MB/s.
The three remaining slots might seem familiar as they are plain PCI.
However, the orange one stands out as it supports 2 masters. That means, if the card you install on it supports it (such as a Wireless LAN card), it can act as a communication slot.
3. Performance
03 - Performance
For testing this motherboard we used 3 benchmarks. One concerning
overall performance (PCMark04) and two for checking out the integrated graphics
processor (Aquamark03, 3DMark01). The later two are known for their dependence
on the CPU processor so there's no fear of us concentrating solely on the
GPU.
PCMark04
PCMark04 is an application-based benchmark and a premium tool for measuring overall PC performance. It uses portions of real applications instead of including very large applications or using specifically created code. This allows PCMark04 to be a smaller installation as well as to report very accurate results.
| |
Intel 915G |
PCMarks |
3949 |
File Compression |
4.1 MB/s |
File Encryption |
55.0 MB/s |
File Decompression |
35.9 MB/s |
Image Processing |
14.6 MPixels/s |
Virus Scanning |
2576.2 MB/s |
Grammar Check |
2.1 KB/s |
File Decryption |
85.7 MB/s |
Audio Conversion |
2340.6 KB/s |
Web Page Rendering |
5.3 Pages/s |
WMV Video Compression |
51.3 FPS |
DivX Video Compression |
65.6 FPS |
Physics Calculation and 3D |
80.6 FPS |
Graphics Memory - 64 lines |
680.5 FPS |
3DMark01
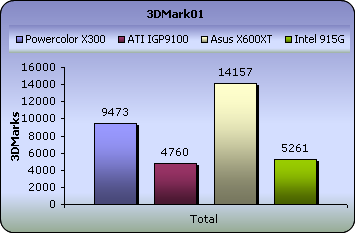
The 915G's performance was a little better that the performance we got from the ATI IGP9100 and not so far away from the X300 which is quite interesting.
Aquamark03
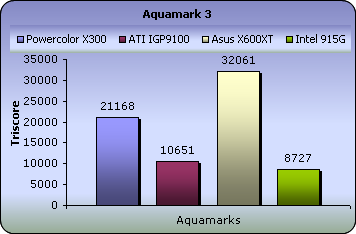
Aquamark03 is a much more serious benchmark than Futuremark's outdated 3DMark01. That's why the difference between the Intel 915G and a "real" VGA card is more obvious. In addition to that, Intel's chipset couldn't keep up with the IGP9100 and yielded the very low score of 8727.
4. Bios & Overclocking
04 - Bios & Overclocking
With the originally equipped BIOS on the mainboard, we were unable to boot with an Asus AX600XT installed. We installed a Powercolor X300 in order to boot to windows and then flashed the BIOS to its latest version (1.40). Flashing was a piece of cake, as the only thing we had to do is install and run MSI's Live Monitor utility which took care of everything through an easy update wizard.
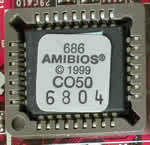 |
| 915G's BIOS is made by American Megatrends Inc. (AMI) and stored inside this chipset |
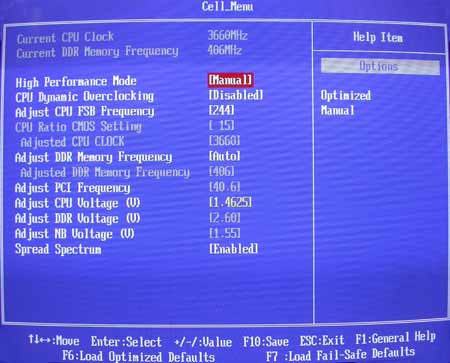
In order to overclock our P4 3.0GHz, we had to change the FSB and CPU voltage as the Multiplier in the P4 processors is locked by default. To achieve this, we entered the Cell Menu that is available through the main BIOS menu. The original values for our CPU were x15 for the multiplier, 200 for the FSB (15x200=3000MHz) and CPU voltage 1.3875.
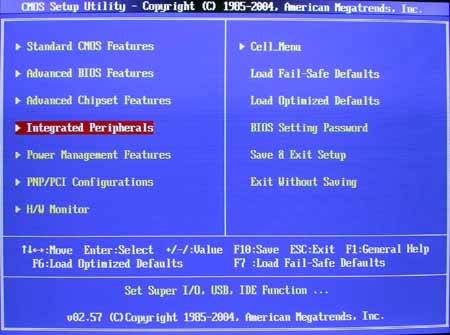
After an hour of playing with the settings, we managed to overclock the processor to 15x244=3660MHz. The CPU voltage wasn't enough to support that speed so we increased it from 1.3875 to 1.4625.
That's more than a 20% percent increase in the clock speed. Not bad considering the fact that we used our processor's stock standard cooling solution.
5. Conclusion
05 - Conclusion
Regarding MSI's 915G Combo features, the only disadvantage is the lack of firewire slots. Everything else a modern computer user might need is already provided on the motherboard. Gigabit LAN, soundcard, 6 USB slots and the integrated graphics card, all add up to this board's completeness.
Overclocking with the 915G Combo was quite satisfactory. We successfully set the processor at a 20% higher clock speed without loss in stability. Further increase was also possible but the stock fan on our CPU prevented us from getting a stable boot to windows as the processor overheated easily.
The MSI 915G Combo costs around $130, which might seem a lot, but on the other hand, MSI's 915P version costs approximately $120. $10 for the extra integrated graphics processor, the 915G, is an excellent price as the cheaper PCI-express graphics card you can get will cost you about $100. However, what you pay is what you get and the on-chip GPU is absolutely awful in 3D games and applications.
Pros:
-DDR and DDR2 support
-Silent operation
-Connectivity support for up to 10 drives.
Cons:
-Lousy 3D performance
-Lack of firewire slot
| Features |
|
| Performance |
 |
| BIOS/Overclocking |
|
Value for money |
|