1. The Software
ONES - Simple AudioCD guide -
Page 1
The Software
 TX
- ThinkXtra is a group of independent Companies with a large product
line focusing on storage. They have CDRW and DVD writer
solutions,
CD and DVD storage discs, MP3 and DVD Video drive
solutions, accessories for CD and DVD and software
for CD and DVD.
TX
- ThinkXtra is a group of independent Companies with a large product
line focusing on storage. They have CDRW and DVD writer
solutions,
CD and DVD storage discs, MP3 and DVD Video drive
solutions, accessories for CD and DVD and software
for CD and DVD.
As we mentioned above, the group also has recording software named
ONES. ONES is becoming quite popular these days. More and more users
have decided
to opt for this software instead of other, better known but more expensive
solutions. In the following pages we try to describe, with simple steps, how
to use this software
to burn an AudioCD. While there are many ways to accomplish this task,
we present the simplest method.

System Requirements
ONES has the following minimum requirements:
Operating System - Microsoft Windows 98SE,
Windows ME, Windows 2000 or Windows XP. ONES will launch, but then immediately
and gracefully terminate after an appropriate message, if started under an
older version of Microsoft Windows.
Processor - A Pentium II (or equivalent) CPU, running at 266MHz or faster. For CD recording faster than 8x, or for DVD recording, a 1GHz CPU is suggested.
System Memory - 128MB of system memory. More memory is suggested for intensive recording operation, like running operations on many drives simultaneously (multiple drive copy or recording) or running several operations concurrently on different drives. Also, up to 512MB of memory could be necessary when pre-mastering UDF discs with more than 100,000, up to 1 million files or folders.
Hard Drive Space - 4MB (yes only 4MB) of free space on the system hard drive. In case you want to copy a full disc via single drive, temporary space is needed for the full disc dimension. That could be up to about 800MB for CD or about 4.3GB for DVD.
Video - High Color (16 bit) video is recommended. ONES will work without problem also with only 256 or 16 video colors, but in that case a lower resolution set of icons and bitmaps would be used. ONES is not video intensive; therefore, the actual speed of the graphic sub-system is not an issue.
Pointing Device - Even though it is virtually possible to use ONES with a keyboard alone, it is strongly suggested the use of a mouse or other pointing device.
CD and DVD Recorder - A CD or DVD recorder of any brand, attached via ATAPI, any type of SCSI, USB 1.x or USB 2.0, or Firewire 1394 buses. ONES also supports, beside the CD-R and CD-RW technology, newer DVD-R, DVD-RW, DVD+R, DVD+RW and DVD-RAM recorders. Because of a new Fuzzy Logic recording engine developed by Prassi Technology, virtually any brand and any type of CD or DVD recorder produced after the year 2000 are supported. Few exceptions could still happen, in case of drives with an implementation of the recording command set that is too distant from the international MMC specifications.
Buy this software for €19.90 from here.
We won't scrutinise the software in this review
since there is already an article on this from our team available here. Instead,
as we have said, this will be a simple guide regarding
AudioCD's...
2. Recording Using the Wizard
ONES_AudioCD - Simple AudioCD guide - Page 2
Recording Using the Wizard
This method is recommended for the first time or novice user.

The screenshot above is what you'll see when you initially run the software.
 The
simplest way to record a disc is through the use of the software wizard. From
the main menu bar, choose the Action option, (the first option from the left),
and select the Wizard icon from the drop down menu.
The
simplest way to record a disc is through the use of the software wizard. From
the main menu bar, choose the Action option, (the first option from the left),
and select the Wizard icon from the drop down menu.
Alternatively, select the icon located exactly below the the Action menu
option, or press the keyboard shortcut Ctrl+W.
After selecting the wizard, the following screen appears:
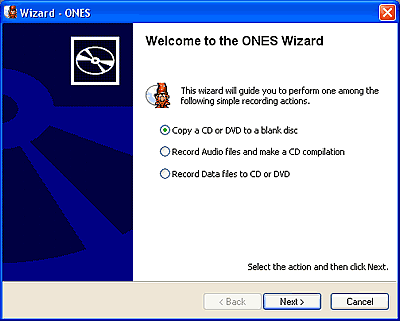
Here, you have to define exactly what you would like to burn. In our example,
we selected the second option to create an AudioCD compilation. We then
pressed the Next button which brings up the next screen, shown
below:
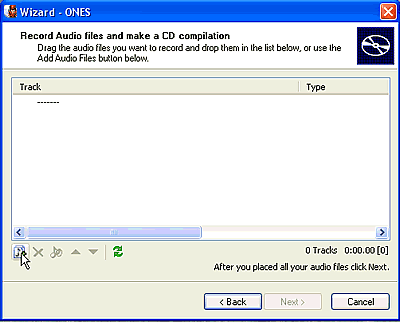
Select the the add audio icon located on the bottom left, (see mouse pointer
above), to add the music files you want to burn. Selecting the icon brings
up the following
screen in which you have to locate your files.

As soon as you locate the appropriate folder that contains your music
files, you'll have to choose which files you want to burn. After completing
this task, press on the Add button.


Your music complilation is now ready. Notice that all of your tracks will
be converted to .wav files. If you wanted to burn a media with only compressed
audio files
such as MP3, then you should burn the MP3 files as data.
Now simply press the Next button.

If you haven't already inserted a disc in the drive, you'll see the above
"Not Ready" message (in red), located just under the target drive's name. Once
a disc is inserted, you should see
something like the following.
If
the indication message changes, as below, but is still red, then your disc
is full.

If for any reason you would like to change the drive you are about to use,
then open the "target drive" drop down selection and choose the correct drive.

Before pressing the Next button, you can also choose whether to
overburn your CD or not, knowing of course that your burner is capable of
such an action.
Otherwise ignore this and use the default setting ( No).

Make sure that you have configured all the appropriate settings,
since after pressing the Next button and once the writing process
begins, there's
no way
to go back...


3. Audio Compilation
ONES_AudioCD - Simple AudioCD guide - Page 3
Audio Compilation
Instead of using the wizard, you can always perform the same task manually,
a process that is not overly difficult.
With this method, you'll also have
the
oppurtunity to adjust some extra settings.
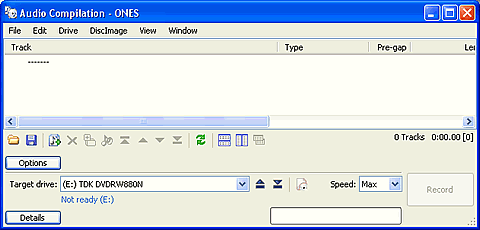
 Choose
this following icon from the and the applications opening screen (shown above),
after which the screen shown below will be appear:
Choose
this following icon from the and the applications opening screen (shown above),
after which the screen shown below will be appear:
As you can see in the screenshot below, there are some extra
options:
If you had previously saved a project, you can
now load it. Of course, you can always save the procedure that you
are currently creating and load it later.
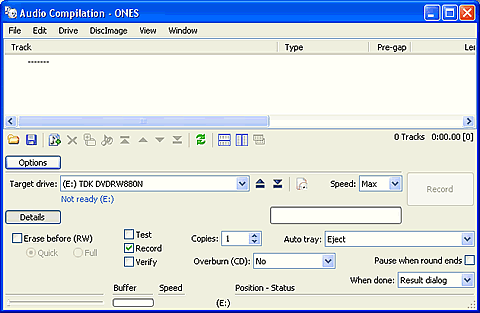
You can choose to make a simulation before burning ( Test), Burn the CD and
Verify the written data. If you select them all, the burn button label
will mention all of them. Also, if the inserted disc is an RW media, you can
also erase it from here.
There's also an option to set the Album's title or the Artist's name.
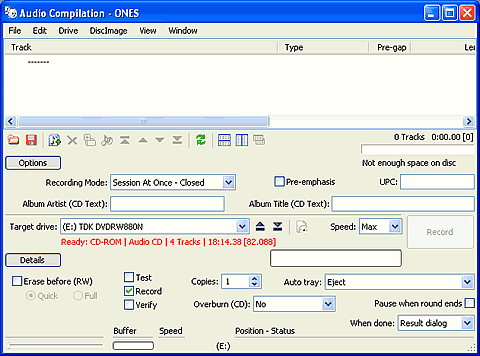
The text message color located under the target drive's
name, will be red if the media is full, otherwise blue.
 The
"Recording Mode" drop down list lets you select the writing method you want
and whether it will be a multisession disc or not.
The
"Recording Mode" drop down list lets you select the writing method you want
and whether it will be a multisession disc or not.
 You
can also set what the software will do after the writing process
finishes.
You
can also set what the software will do after the writing process
finishes.
The files selection procedure is similar to that described in the
previous page.
4. Erase RW Disc
ONES_AudioCD - Simple AudioCD guide - Page 4
Erase RW Disc
There is also an option available to erase RW media, seperately from any other
action.

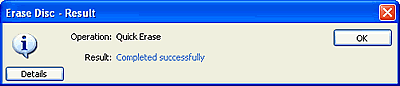
As soon you select the Erase Disc icon, the following screen will pop
up.

There are options for both Quick and Full Erase, located in the upper part
of the screen.

After pressing the Erase button (with either Quick or Full erase), the
process begins.

The time required depends on your selection.
5. Comments
ONES_AudioCD - Simple AudioCD guide - Page 5
Comments
We hope that you have found this simple guide helpful.
There aren't too many things to discuss regarding the pros and cons. Generally,
the software is
very
simple and easy to use and you don't have to have any previous experience with
recording to be able to use it. There is a more detailed review
of the software here, where advantages
and disadvantages are summarised.